Browsing Tag

Tips

Create

Easy Summer Project: DIY Doormats!

I’m the kind of person that thinks in seasons. On Pinterest I literally have my food boards split into seasons (summer food, fall food, etc). Eating a watermelon basil salad in November just feels wrong, almost as weird as eating cozy chicken pot pie in May. Am I right?? This seasonal framework carries over into my decor, especially on my porch! You guys know what I mean…you have the winter wreath, the spring wreath, the summer wreath,etc. Now I’m kind of obsessed with having seasonal doormats as well. I’m in the process of helping my mom do a “porch makeover” (stay tuned for the big reveal next week) and we needed some fun, summery doormats! My fellow blogger and Target partner-in-crime, Ashley, found some good options, but my parent’s house is tricky and it has three front doors (yeah, three?!?) and we couldn’t find three of the same mat! But sitting next to the picked-over piles of cute mats, was a pile of plain, natural doormats and that’s when the idea struck! Let’s just paint our own! So we did some googling and figured out what we needed, thought about some designs, and went at it. We decided to do a fun watermelon theme on one set and a patriotic theme on the other set (perfect for the upcoming 4th of July holiday).

Some projects we get ourselves into seem super easy, but end up being more complicated and time consuming than we ever thought possible. This project was the opposite! It was super simple and worked out just as easy as had hoped it would. It would even be a fun project to do with kids. It also makes a great gift idea for a new home-owner or anyone that appreciates a little pizazz on their porch! Check out all the details below.

Image-1 (1)

Supplies:

  • Plain, natural doormat (you can buy them for $10 at Target, Home Depot, or Ikea)
  • Large all purpose sponge (with curved edge)
  • Painter’s tape (you know, the green or blue stuff)
  • Outdoor acrylic craft paint (2 oz bottle of each color)
  • Waterproof clearcoat/sealer (for extra protection)
  • Large all-purpose scissors (for cutting sponge)
  • Small sponge paint brush (for touch ups)
  • Fine bristle paint brush (for accents/details)
  • Paper plate (for paint)
  • Sharpie marker (to make sponge stencil)
  • Tarp or sheet (to protect floor from paint)


Directions for Watermelon Doormat:

  1. Lay down the tarp to cover your floor.
  2. Shake or wipe off doormat with a towel to get any dirt or dust off.
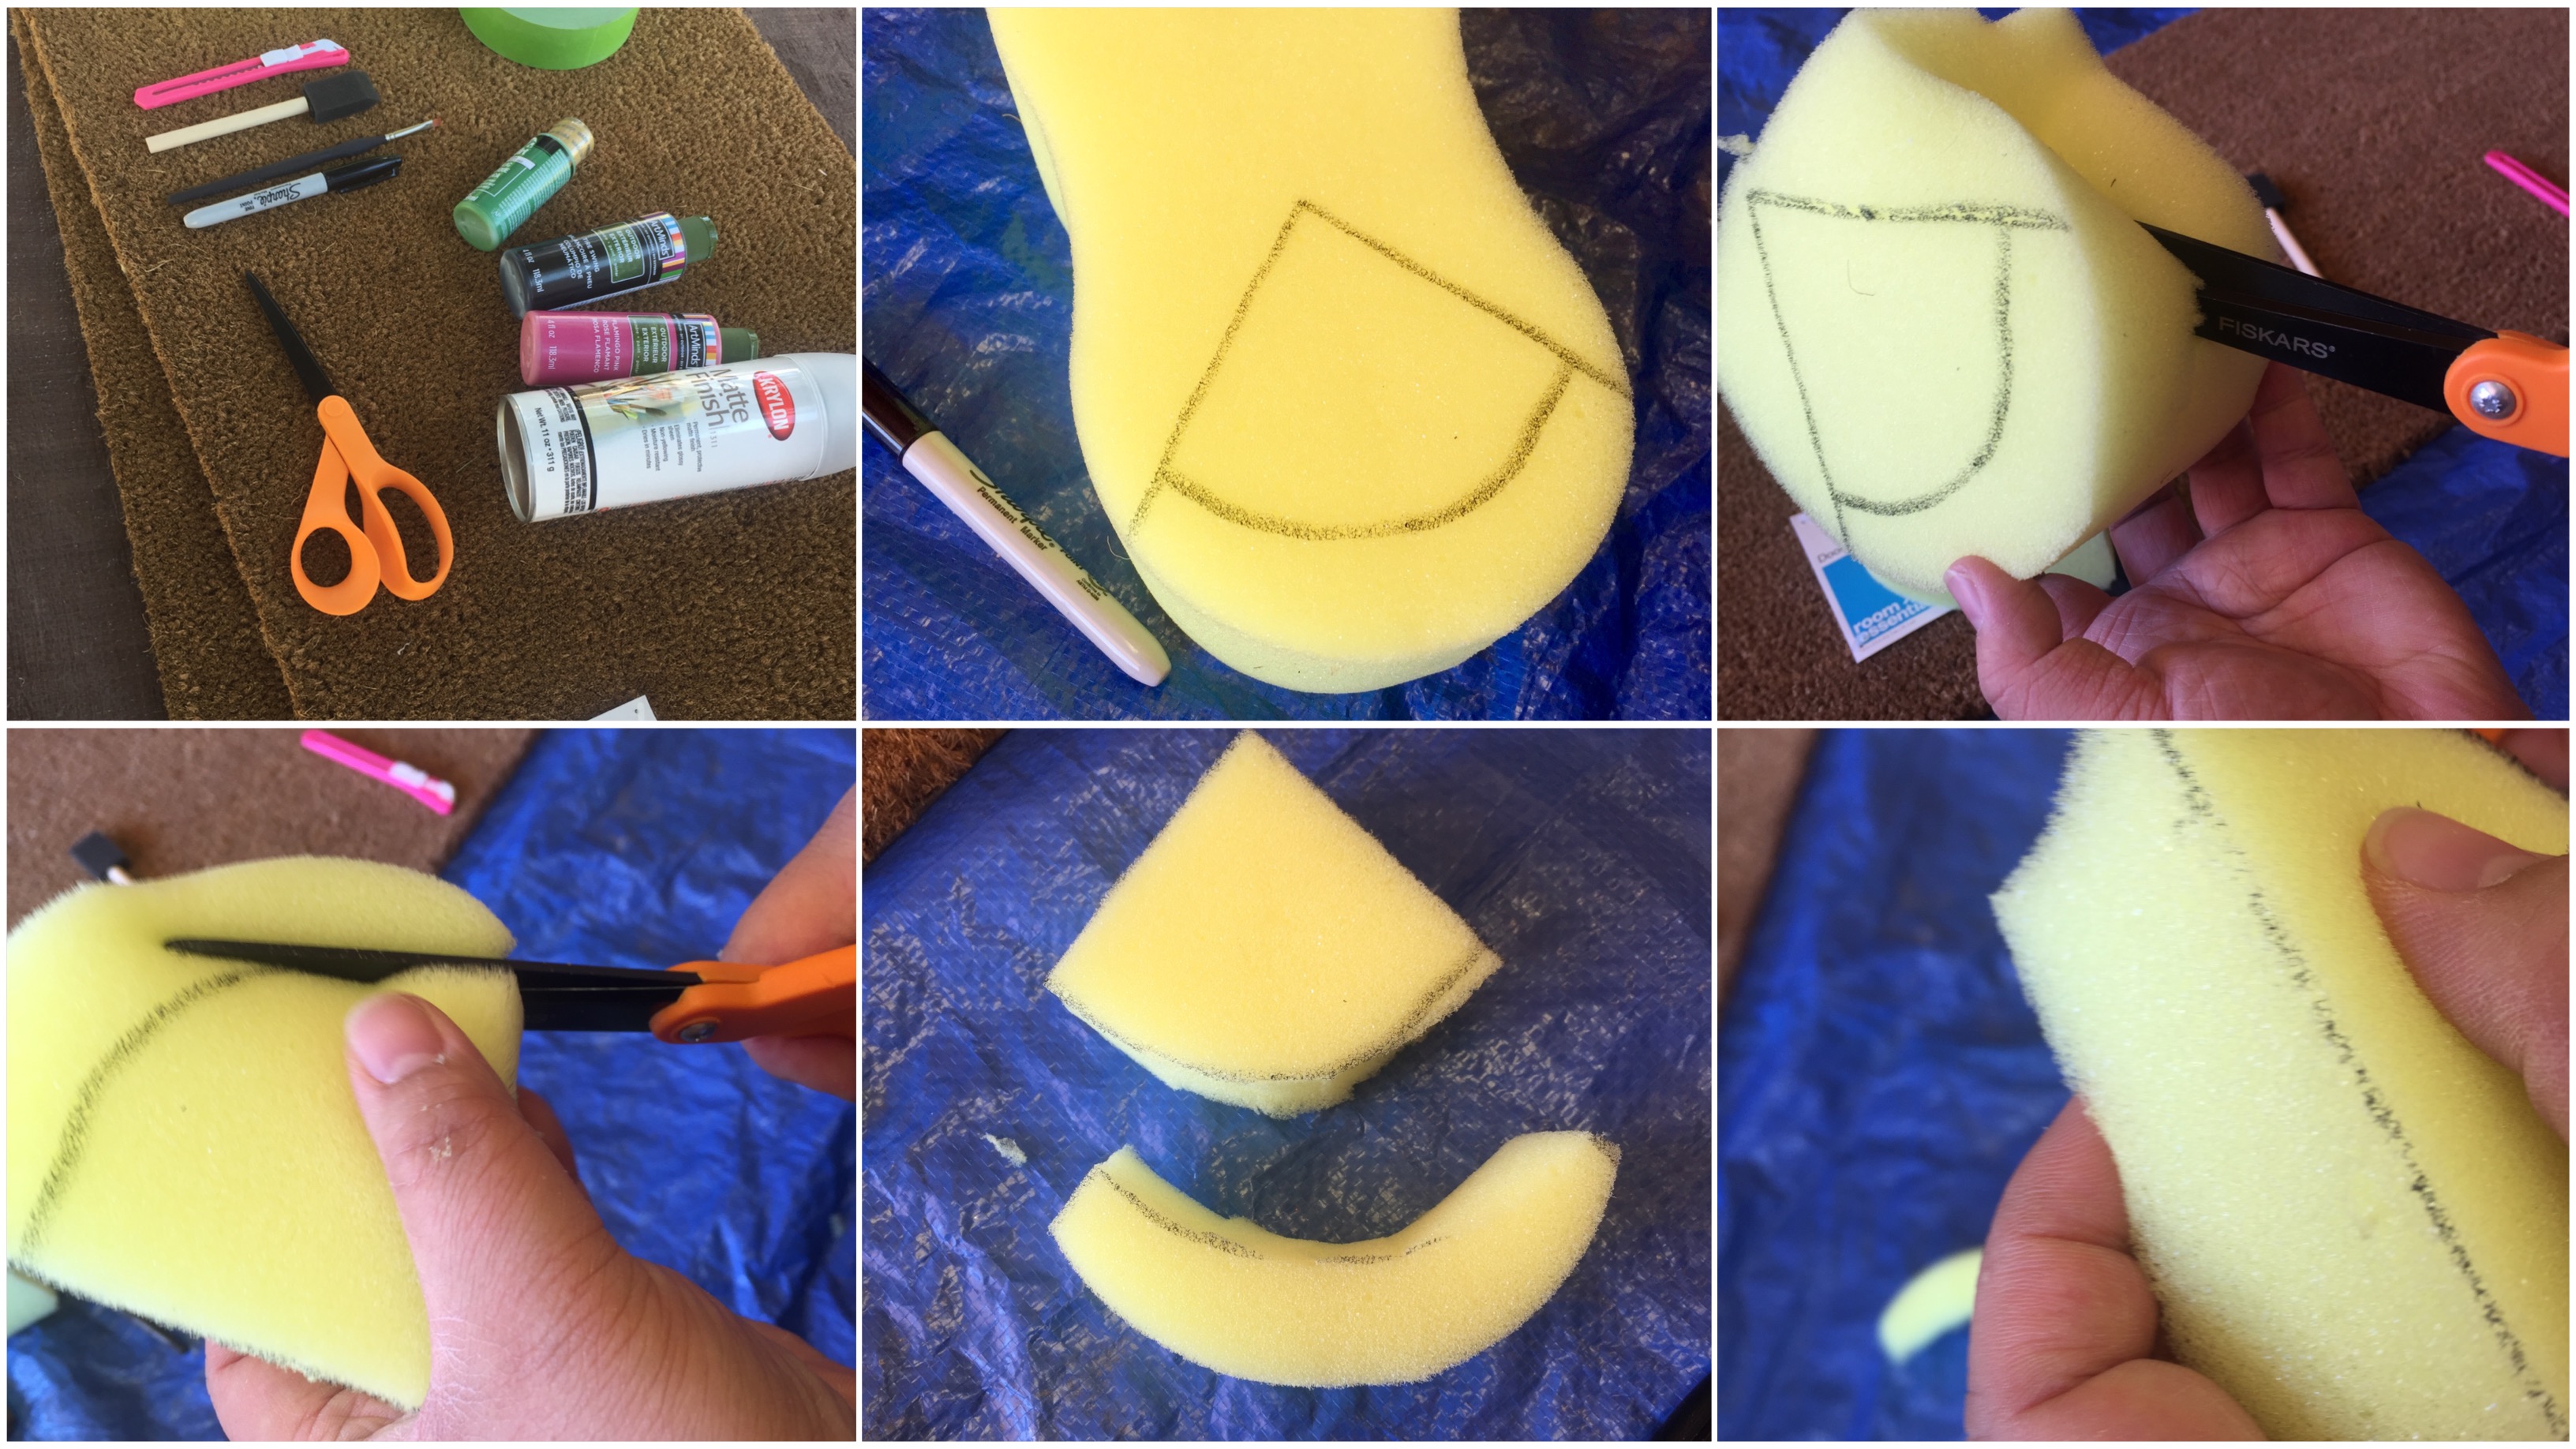
  3. Using a stencil or freehand, take the curved end of the sponge and draw a triangle coming to a point in the middle of the sponge, making the shape of a watermelon slice. Then draw the curved line about ½ inch to ¾ inch from the curved edge to make the watermelon rind.
  4. Cut out the watermelon shape using scissors. Our sponge was really thick, so we also cut the shape in half so it was easier to work with. You should have one piece cut for the watermelon slice and one piece for the rind.
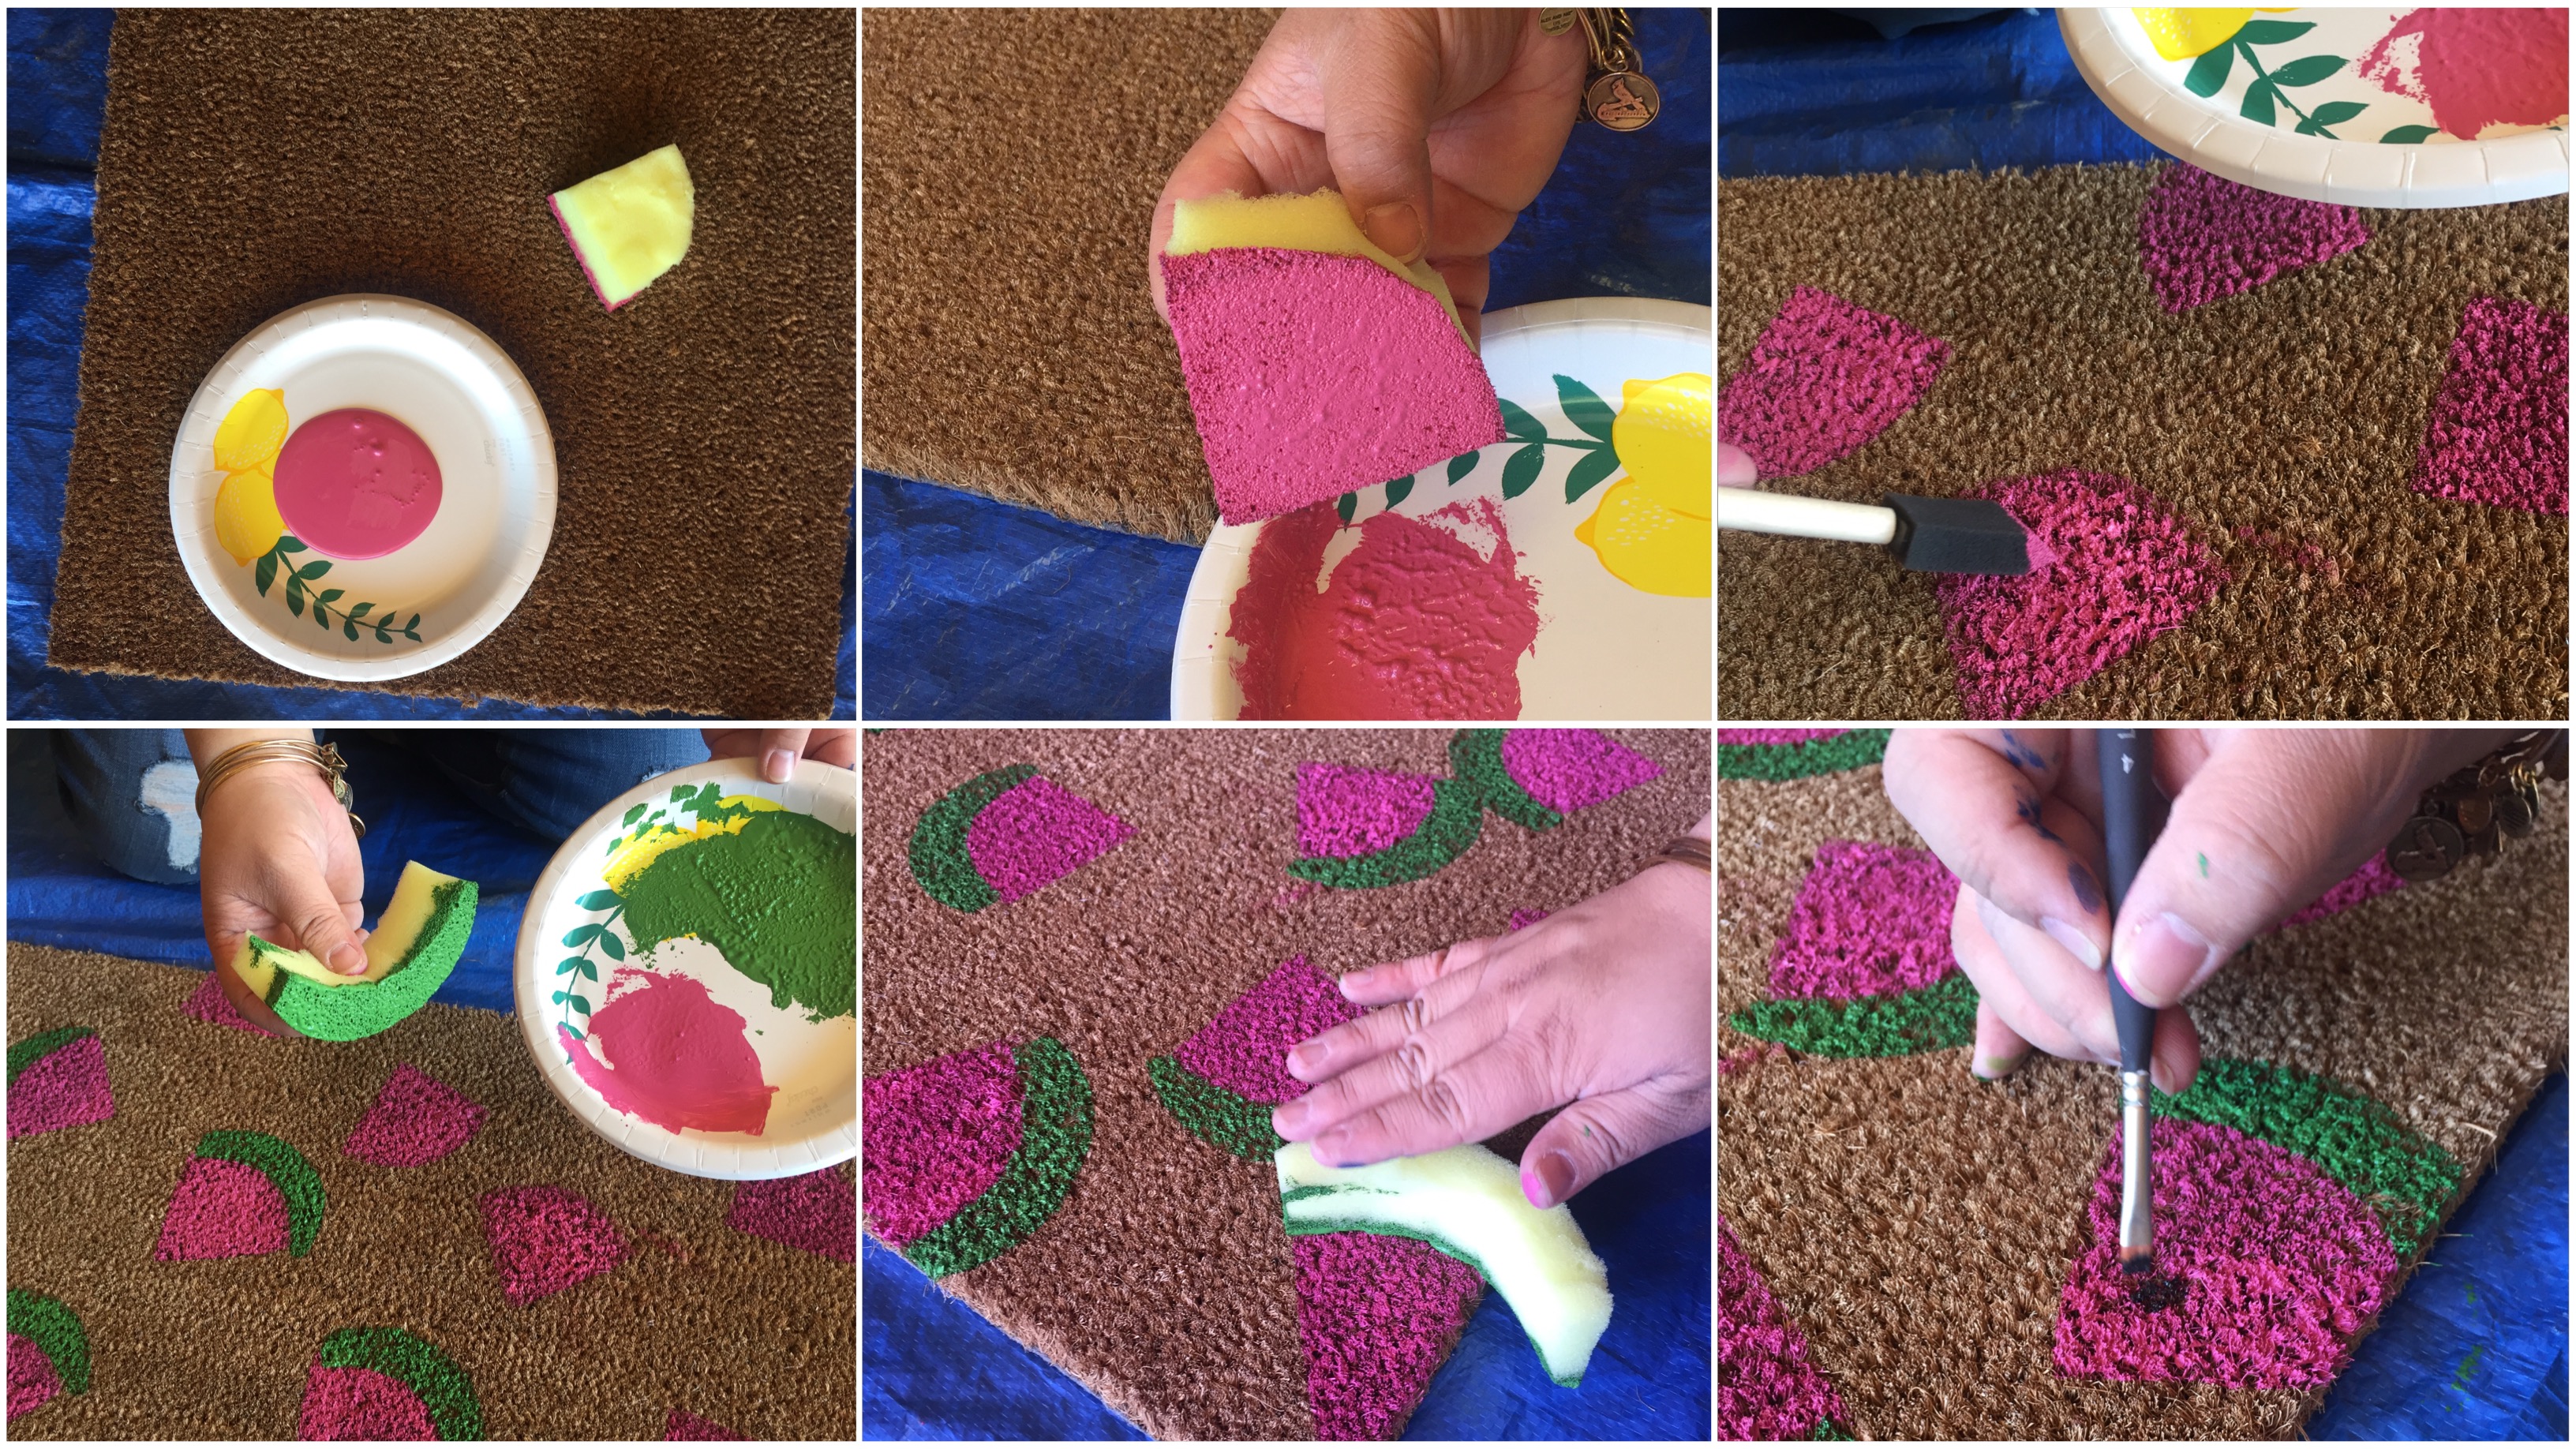
  5. Pour entire 2 oz bottle of pink paint onto paper plate (don’t pour the green paint yet–it will dry out) and dip watermelon slice into the paint. Make sure there is a thick coating of paint on the sponge.
  6. Stamp the watermelon slice onto the mat and press firmly around the entire shape to ensure the paint transfers from the sponge to the mat. Repeat this process until the mat is covered with a random pattern of watermelon slices.
  7. Allow pink slices to dry about 15 to 20 minutes before stamping the green rind.
  8. Once the slices are dry, pour green paint onto a new paper plate and begin stamping the rinds on each watermelon slice. Allow to dry.
  9. Next, taking the fine bristle paintbrush and black paint, begin painting small oval-shaped seeds on each slice of watermelon. Allow to dry.
  10. Finally, spray the mat with two coats of craft clear coat/sealer (waiting 15 minutes between coats). If you use outdoor paint this isn’t necessary, but will help protect the mat even more. 

IMG_8286
IMG_8287


Directions for Patriotic Design:

  1. Shake or wipe off doormat with a towel to get any dirt or dust off.
  2. Find center of the doormat by folding in half and marking subtly with Sharpie.
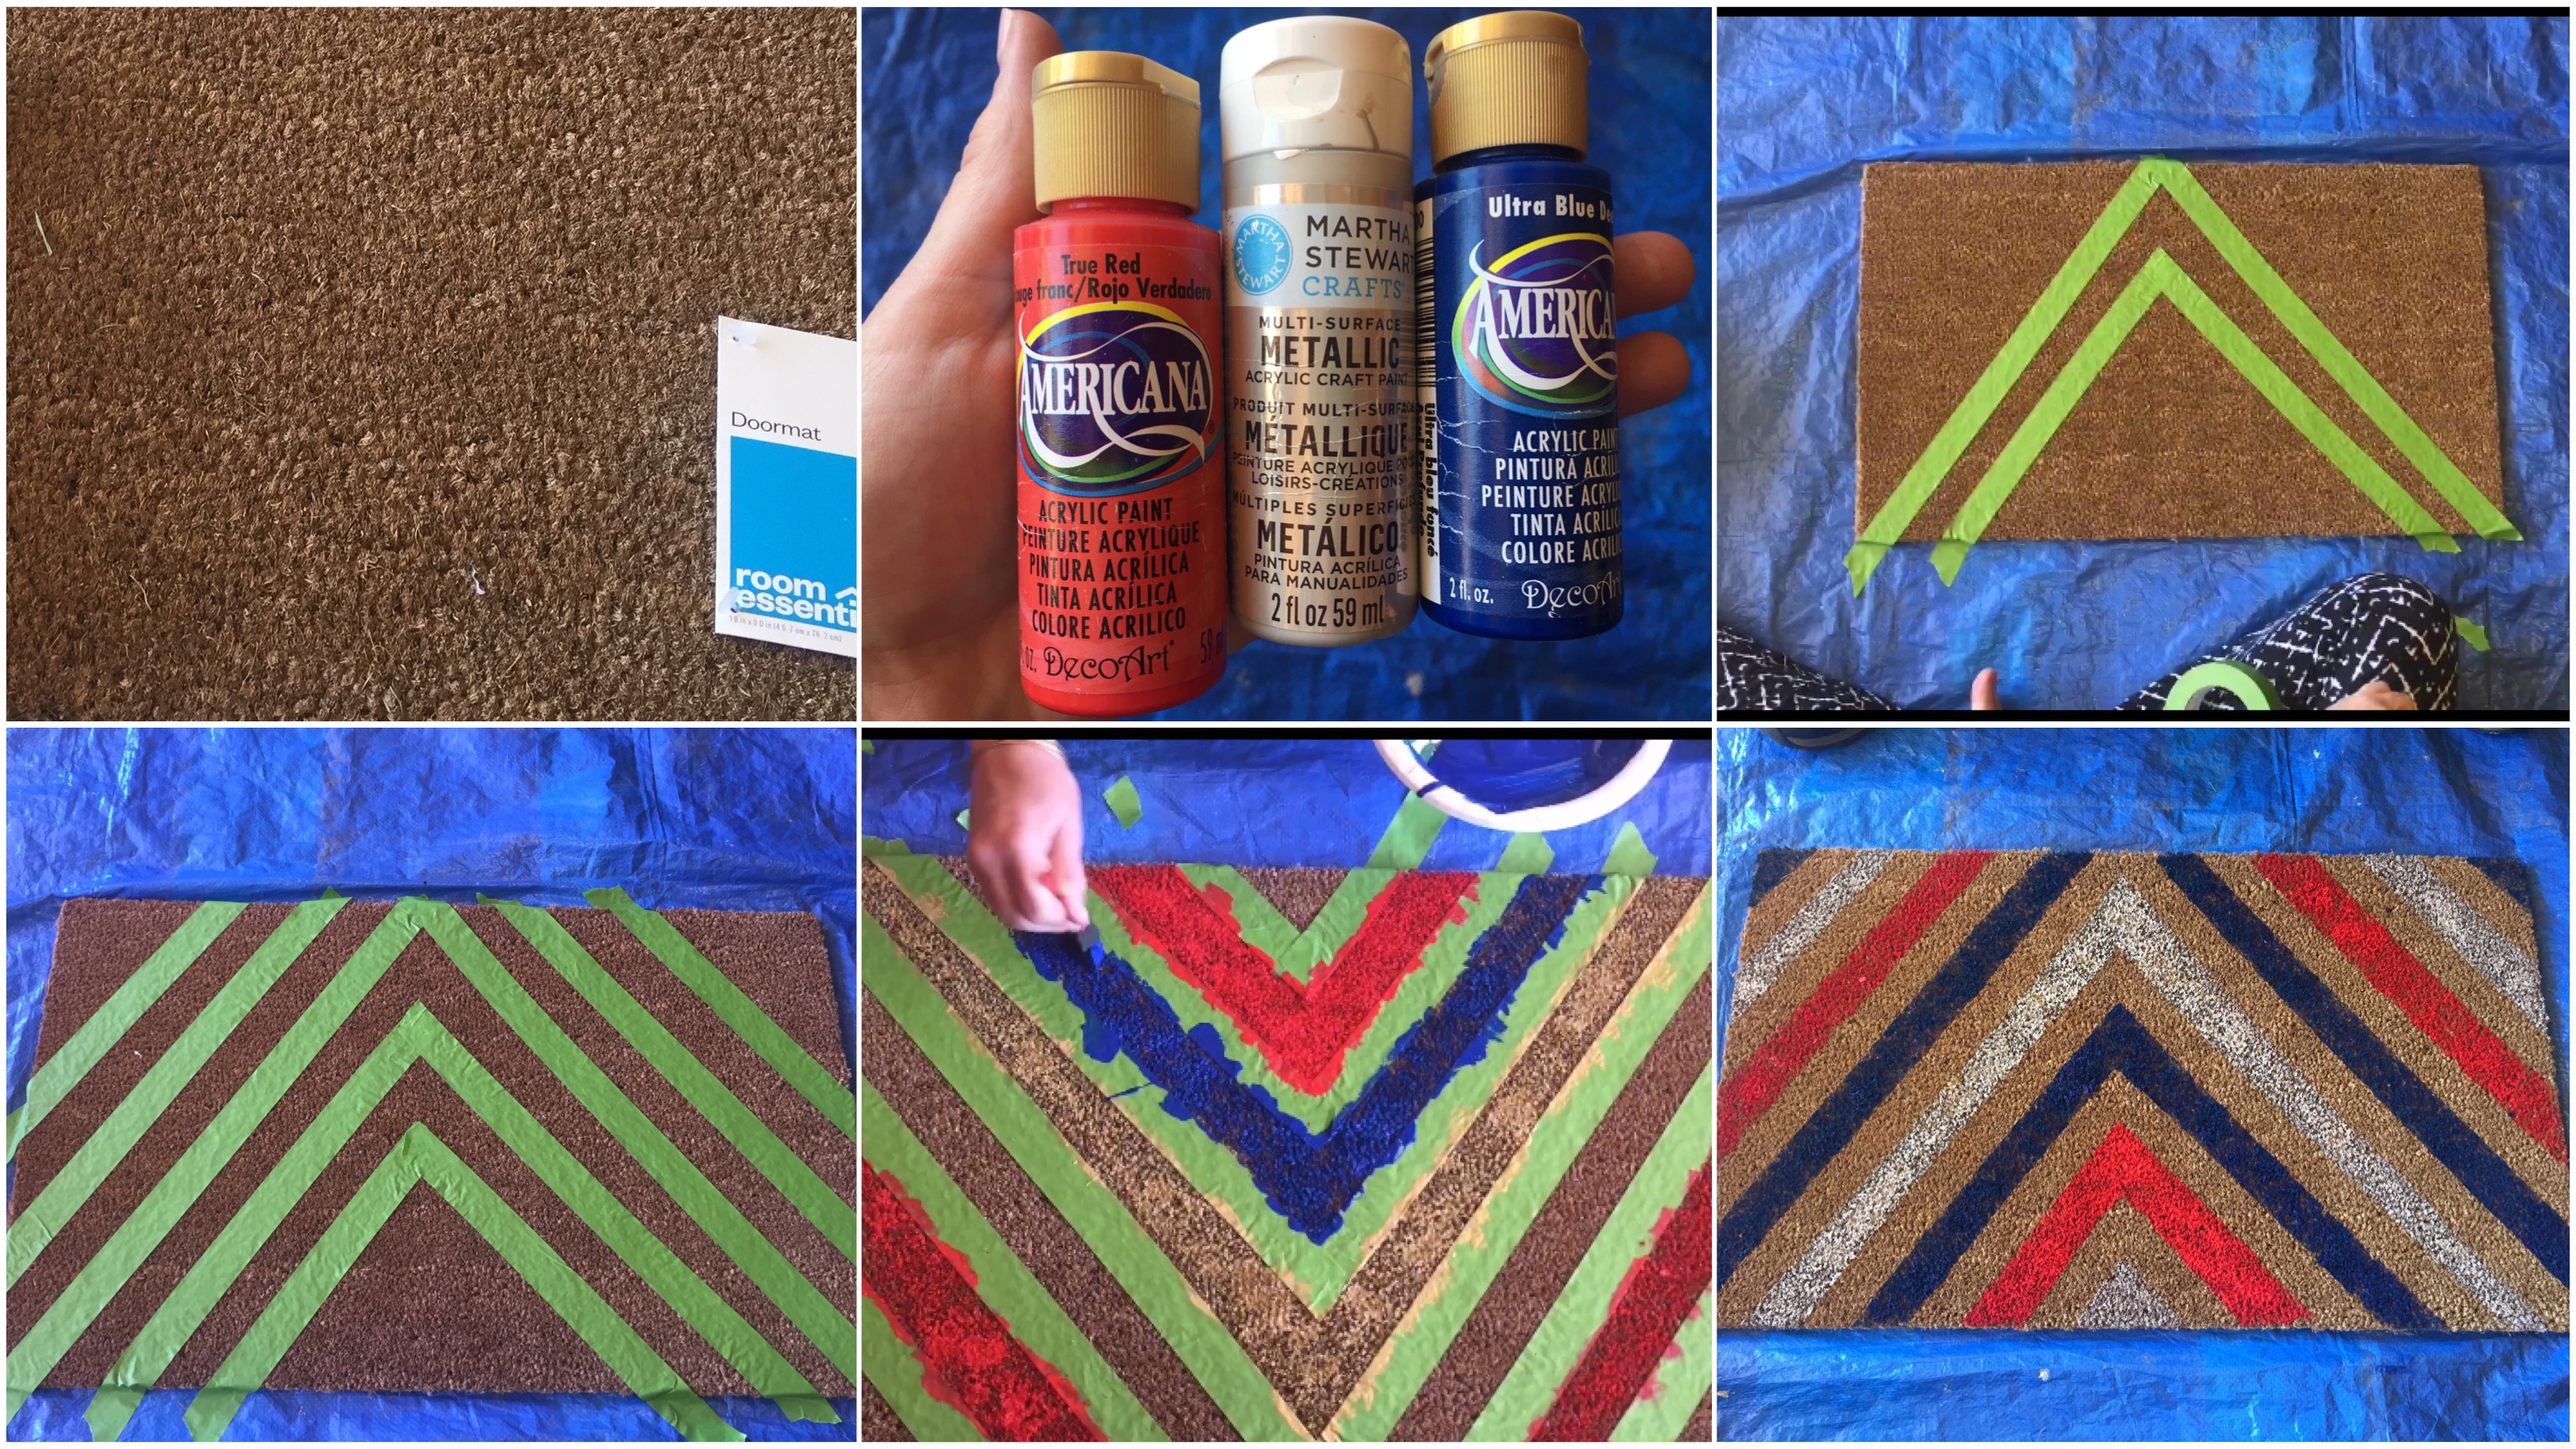
  3. Starting in the center, take the painter’s tape and make a line from the center of the mat to the bottom left-hand corner. Repeat and make a similar line from the center to the right-hand corner.
  4. Press the tape firmly into the mat (I rubbed the closed paint bottle over and over the tape until it was fully adhered). This is key to ensure that you have crisp lines and your paint won’t bleed through!
  5. Continue applying the tape in the same fashion to complete the pattern shown.
  6. Gather the paint, you will need a full 2 ounce bottle for each of the three colors, red, blue, silver.
  7. Determine which sections will be which color, I did an alternating pattern of red, blue, silver, blue, red, silver.
  8. Starting with the red, pour paint onto paper plate and paint ALL the red sections. Next, pour the blue paint onto a new paper plate and paint ALL the blue sections. Lastly, pour the silver paint onto a new paper plate and paint ALL the silver sections.
  9. Allow the paint to dry for 15 to 20 min (faster if you put it in the sun) before removing the tape! It’s worth the wait…you’ll mess up your crisp lines if you don’t wait.
  10. Finally, spray the mat with two coats of craft clear coat/sealer (waiting 15 minutes between coats). If you use outdoor paint this isn’t necessary, but will help protect the mat even more.


IMG_8292

Tip: we tried it using both the sponge paint brush and a cut square of the large sponge used for the watermelon and FYI the piece of the big sponge worked way better and had better pain coverage than the sponge paintbrush.

Image-1 (10)

IMG_1036

Sweet Tips

5 Tips for Riding the North Pole Express

North Pole Express Tips sweetlemonmade.com

This year I had the chance to take my three-year-old daughter Olivia on the North Pole Express. I have heard a lot of great things about this magical experience aboard the Heber Creeper on the Heber Valley Railroad, and was excited to finally check it out for myself. Since it was our first time, I wasn’t quite sure what to expect. Thanks to some tips from our family and friends, we were able to be prepared for the adventure.

North Pole Express Train sweetlemonmade.com

North Pole Ticket sweetlemonmade.com

The North Pole Express is a 90 minute train ride to the North Pole aboard the Heber Creeper. This adventure mimics the classic tail of the Polar Express. Some kids dress even dress in their Christmas pajamas. Along the journey you can expect to meet Mrs. Clause, eat chocolate chip cookies and sing Christmas carols. Once you reach the Noth Pole, Santa Clause boards the train and meets with every little boy and girl. Olivia had so much fun meeting Santa Clause and singing along with everyone on the train. 

North Pole Train Entrance sweetlemonmade.com
img_2783
We want you to have the same great experience, so below are 5 tips to keep in mind when riding the North Pole Express.

  1. Buy Tickets Early: As you might already know, tickets go fast and the North Pole Express will sale out. Tickets go on sale in the early fall, so make note on your calendar to check the website in October for the best dates and times for your family.
  2. Dress Warm: We were worried there wouldn’t be heat on the train, but it was pretty warm. You will however want to bundle up because you will be spending some time outside before and after the train ride. It’s pretty chilly up in Heber in the winter!
  3. Arrive Early: Our train was scheduled for 5:00 but we decided to get there 30 minutes early. This allowed us to check out the gift shop and get situated. We waited in line outside for about 15 minutes and were able to be one of the first ones on the train.
  4. Get the Best Seat: Make sure to sit on the right side of the train. This is the best spot because you will get to see the North Pole and Santa right out your window. If you are on the left side, you can still see, you just have to stand up and move over to the window.
  5. Bring Snacks: The train ride is 90 minutes, which can be a tad long for some kids. It’s hard to get my three-year-old to sit still for 5 minutes, so I brought lots of snacks to keep her occupied. The elf’s bring around cookies and hot chocolate, so you’ll have an added snack for the ride.

Overall we had a great experience on the North Pole Express and will make this a new Christmas tradition. We can’t wait to go again next year and make this a family tradition.

Sweet Tips

Best App for Black Friday Shopping

The biggest shopping day of the year is almost here…Black Friday! This year, I’m throwing out the printed ads and I’m preparing by having everything readily available on my phone. Who’s with me?

There are a variety of shopping apps but I’ve recently found one I love called Flipp.  Take a look at the details below and check it out for yourself. You have a few days left to download the app and give it a trial run before your big shopping mission!


Flipp 

Flipp App Logo sweetlemonmade.com

Flipp is an app that helps make weekly shopping simple. It removes the clutter of traditional ads and coupons and replaces them with digital versions from retailers. The best part is you can also add loyalty cards to match local deals with coupons. There are more than 800 stores on Flipp, including Target, Walgreens, Smiths and more. 

Flipp App Screen Shot sweetlemonmade.com

Top App Features:

  • Browse your favorite local weekly ads from over 800 retailers
  • Match coupons with weekly ads for additional savings
  • Plan ahead and discover deals for each item in your shopping list
  • Clip items to organize your list to make your shopping trip easy.
  • Receive reminders about expiring deals, new offers and updates from your favorite and nearby retailers 

Download from iTunes or Google Play

Available on iOS and Android

Create

Pumpkin Carving Made Easy!

Raise your hand if you love Halloween and all it’s pumpkin-y fanfare…. Yes, me too. I love decorating and carving pumpkins, but pumpkin guts make me want to barf. Seriously, even the thought of scooping that stringy stuff makes me queasy. I don’t know why, but I hate it. So when my friend showed me this magic tool that cleans out those slimy pumpkin innards in a matter of seconds, I was amazed. Even if you don’t have a hard-core aversion to inner pumpkin mush, you’ll still love this. This little tool attaches to any drill (yeah, like the one your husband has in the garage) and guts the entire pumpkin in a matter of seconds. Score!! Watch the YouTube video below to see this baby in action and click here to buy this little piece of genius right now on Amazon.

image-1-2

Sweet Picks

April Sweet Picks

April Sweet Picks sweetlemonmade.com

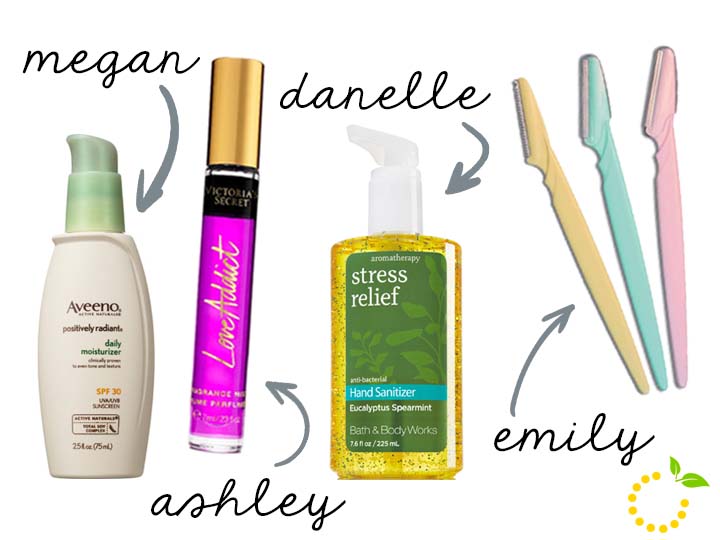
Bath and Body Works Eucalyptus Spearmint Hand Sanitizer: Who hates germs and stress? *all the hands* Yeah, duh, me too. I work in the hospital as a nurse practitioner so obviously I’m anti-germ and usually a little stressed (ok or a lot stressed) and this hand sanitizer is a little piece of heaven. You can ask anyone I work with. I have a large dispenser of this spearmint and eucalyptus potion on my desk and when emotions or tensions are running  high, I give everyone a squirt. If someone comes into our office afterward they always comment on the relaxing smell. It seems crazy, but using this flavor of hand sanitizer and taking a few deep breaths of the scent is really relaxing! Grab the travel size and sneak a few zen moments/sniffs when and wherever you need—right before a big meeting or waiting in line at the Chick-fil-A drive-thru with a van full of noisy kids. Trust me, the stress relief promises with this product are no lie. Try it!
Image Source: Bath and Body Works

Aveeno Positively Radiant Daily Moisturizer: A couple years ago I noticed my makeup was patchy on my skin and not applying very smoothly. Little did I know, the main culprit was my lack of facial moisturizer. I had never used a facial moisturizer before so I was pretty clueless to all of my options. In my mind, I would just pull out the cherry almond scented Jergens Lotion that’s been sitting in my closet for the past decade. I decided to go to Ulta and ask someone for some better advice. My skin can be very sensitive to products so I was hesitant to try something new. She suggested Aveeno and I haven’t used anything else since. 

Aveeno Positively Radiant Daily Moisturizer is oil free and hypoallergenic, which is perfect for my sensitive skin. I’ve noticed that it has evened my skin tone and has eliminated my patchy makeup problem for good. This moisturizer goes on smoothly and is really light weight. My favorite thing is it also has SPF 30 so I know I’m always protected without putting on extra sunscreen. 
Image Source: Aveeno

Love Addict Mini Fragrance Mist from Victoria Secret: When it comes to fragrance mists and body sprays, I’m all about the fruity and sweet scents! So when I discovered the Love Addict fragrance mist one day during one of my frequent visits to Victoria’s Secret (which is every few weeks when I redeem my FREE panty coupons I receive in the mail–because who would turn down a freebie with no strings attached! Not this girl!).  I sprayed the tester on my wrist and loved it immediately. I kept catching myself smelling my wrist as I walked around the store! I knew I wasn’t leaving without it and lucky for me the mini fragrances were BOGO (buy 1, get 1 FREE) that day! They have this deal quite often!

I am horrible at describing scents so it’s a good thing the description tells me that Love Addict has notes of wild orchid and blood orange. Also, I love the convenient size, as I can easily throw it into my purse or makeup bag. (7 ml/.23 fl oz.) FYI–the mini fragrance in Love Addict is hard to find and not sold online, so search your local VS store and get your hands on one of these!
Image Source: Victoria’s Secret

Tinkle Razor: The worst name, but the best product. These little guys are so handy. You can use them for shaping your brows, unibrow defense, to take care of those sneaky dark hairs that appear on your upper lip giving the illusion of a mustache (ugh, I feel you) or you can go wild and use it to get rid of all your face hair. “Shave your face? What?” Yes, it’s a thing. That’s what I do. It’s awesome. My skin feels smoother. My makeup goes on perfectly. It’s great. No foam or water necessary, just you, your face and a tinkle (I know, it makes me snicker to say tinkle out loud too).

These little guys come in a pack of 3 for about $5 and of course you can buy them on Amazon. There are other brands and razors out there like this, but I splurge the $5 and buy the real deal, Tinkle razors. Some things are worth going name brand for, this is one of them. If you’re a visual person like I am and want to see these Tinkles in action, check out this “How-To” video.  
Image Source: Beauty Plus Salon