Create

April Fool’s Spaghetti and Meatball Cupcakes

April Fool's Spaghetti and Meatball Cupcakes sweetlemonmade.com

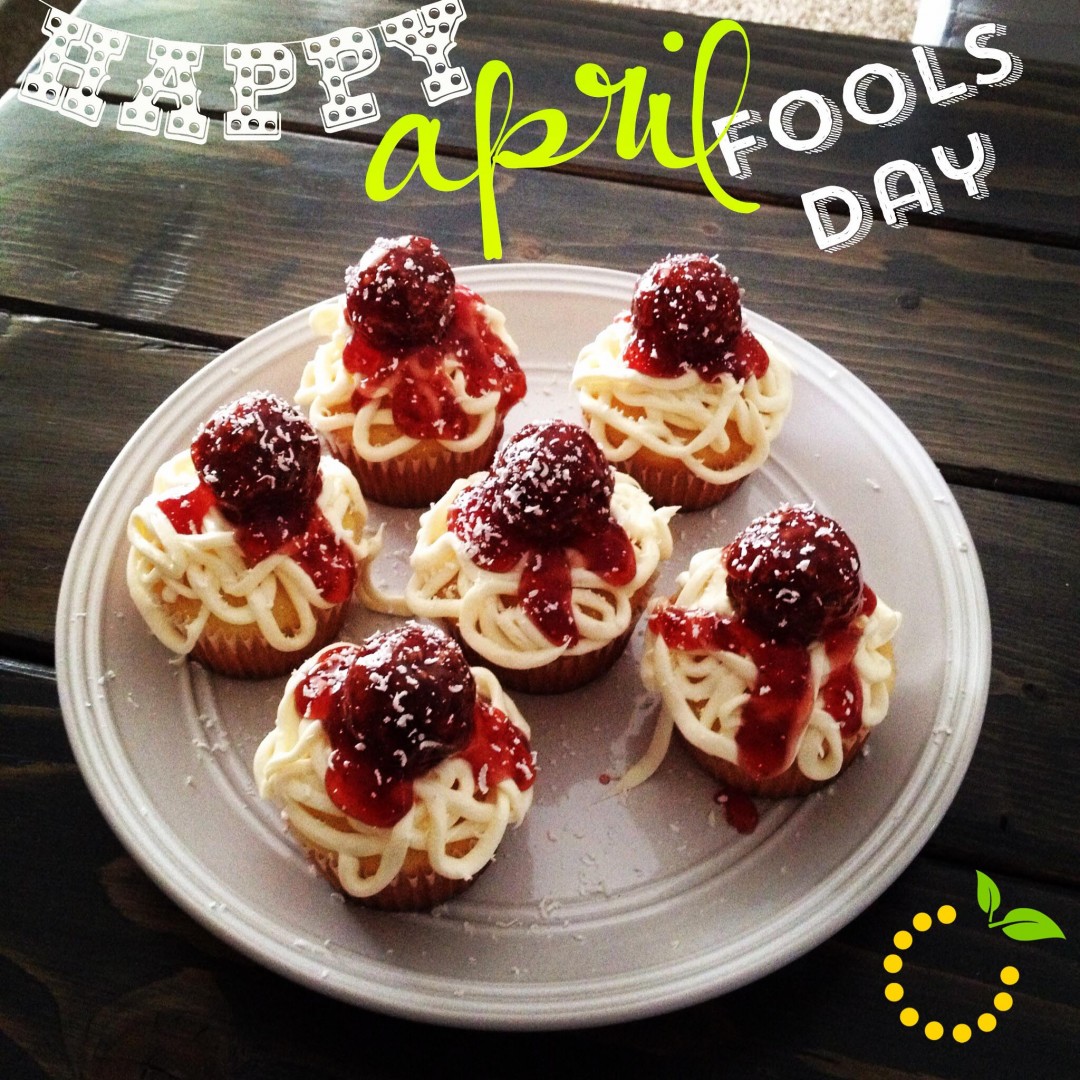
I’ve got an unconventional cupcake flavor I whipped together that I think you should try out–spaghetti and meatball. You’re probably thinking that I’ve gone insane but, trust me it tastes really good!

Just kidding!! APRIL FOOL’S! Gotcha ya!

I have a love/hate relationship with April Fool’s Day because I love to play tricks on people but, I hate getting tricks played on me! So for me, I bake treats that look like food to trick my family, friends, and coworkers but, lucky for them they never taste awful!

Spaghetti and Meatball Cupcakes sweetlemonmade.com

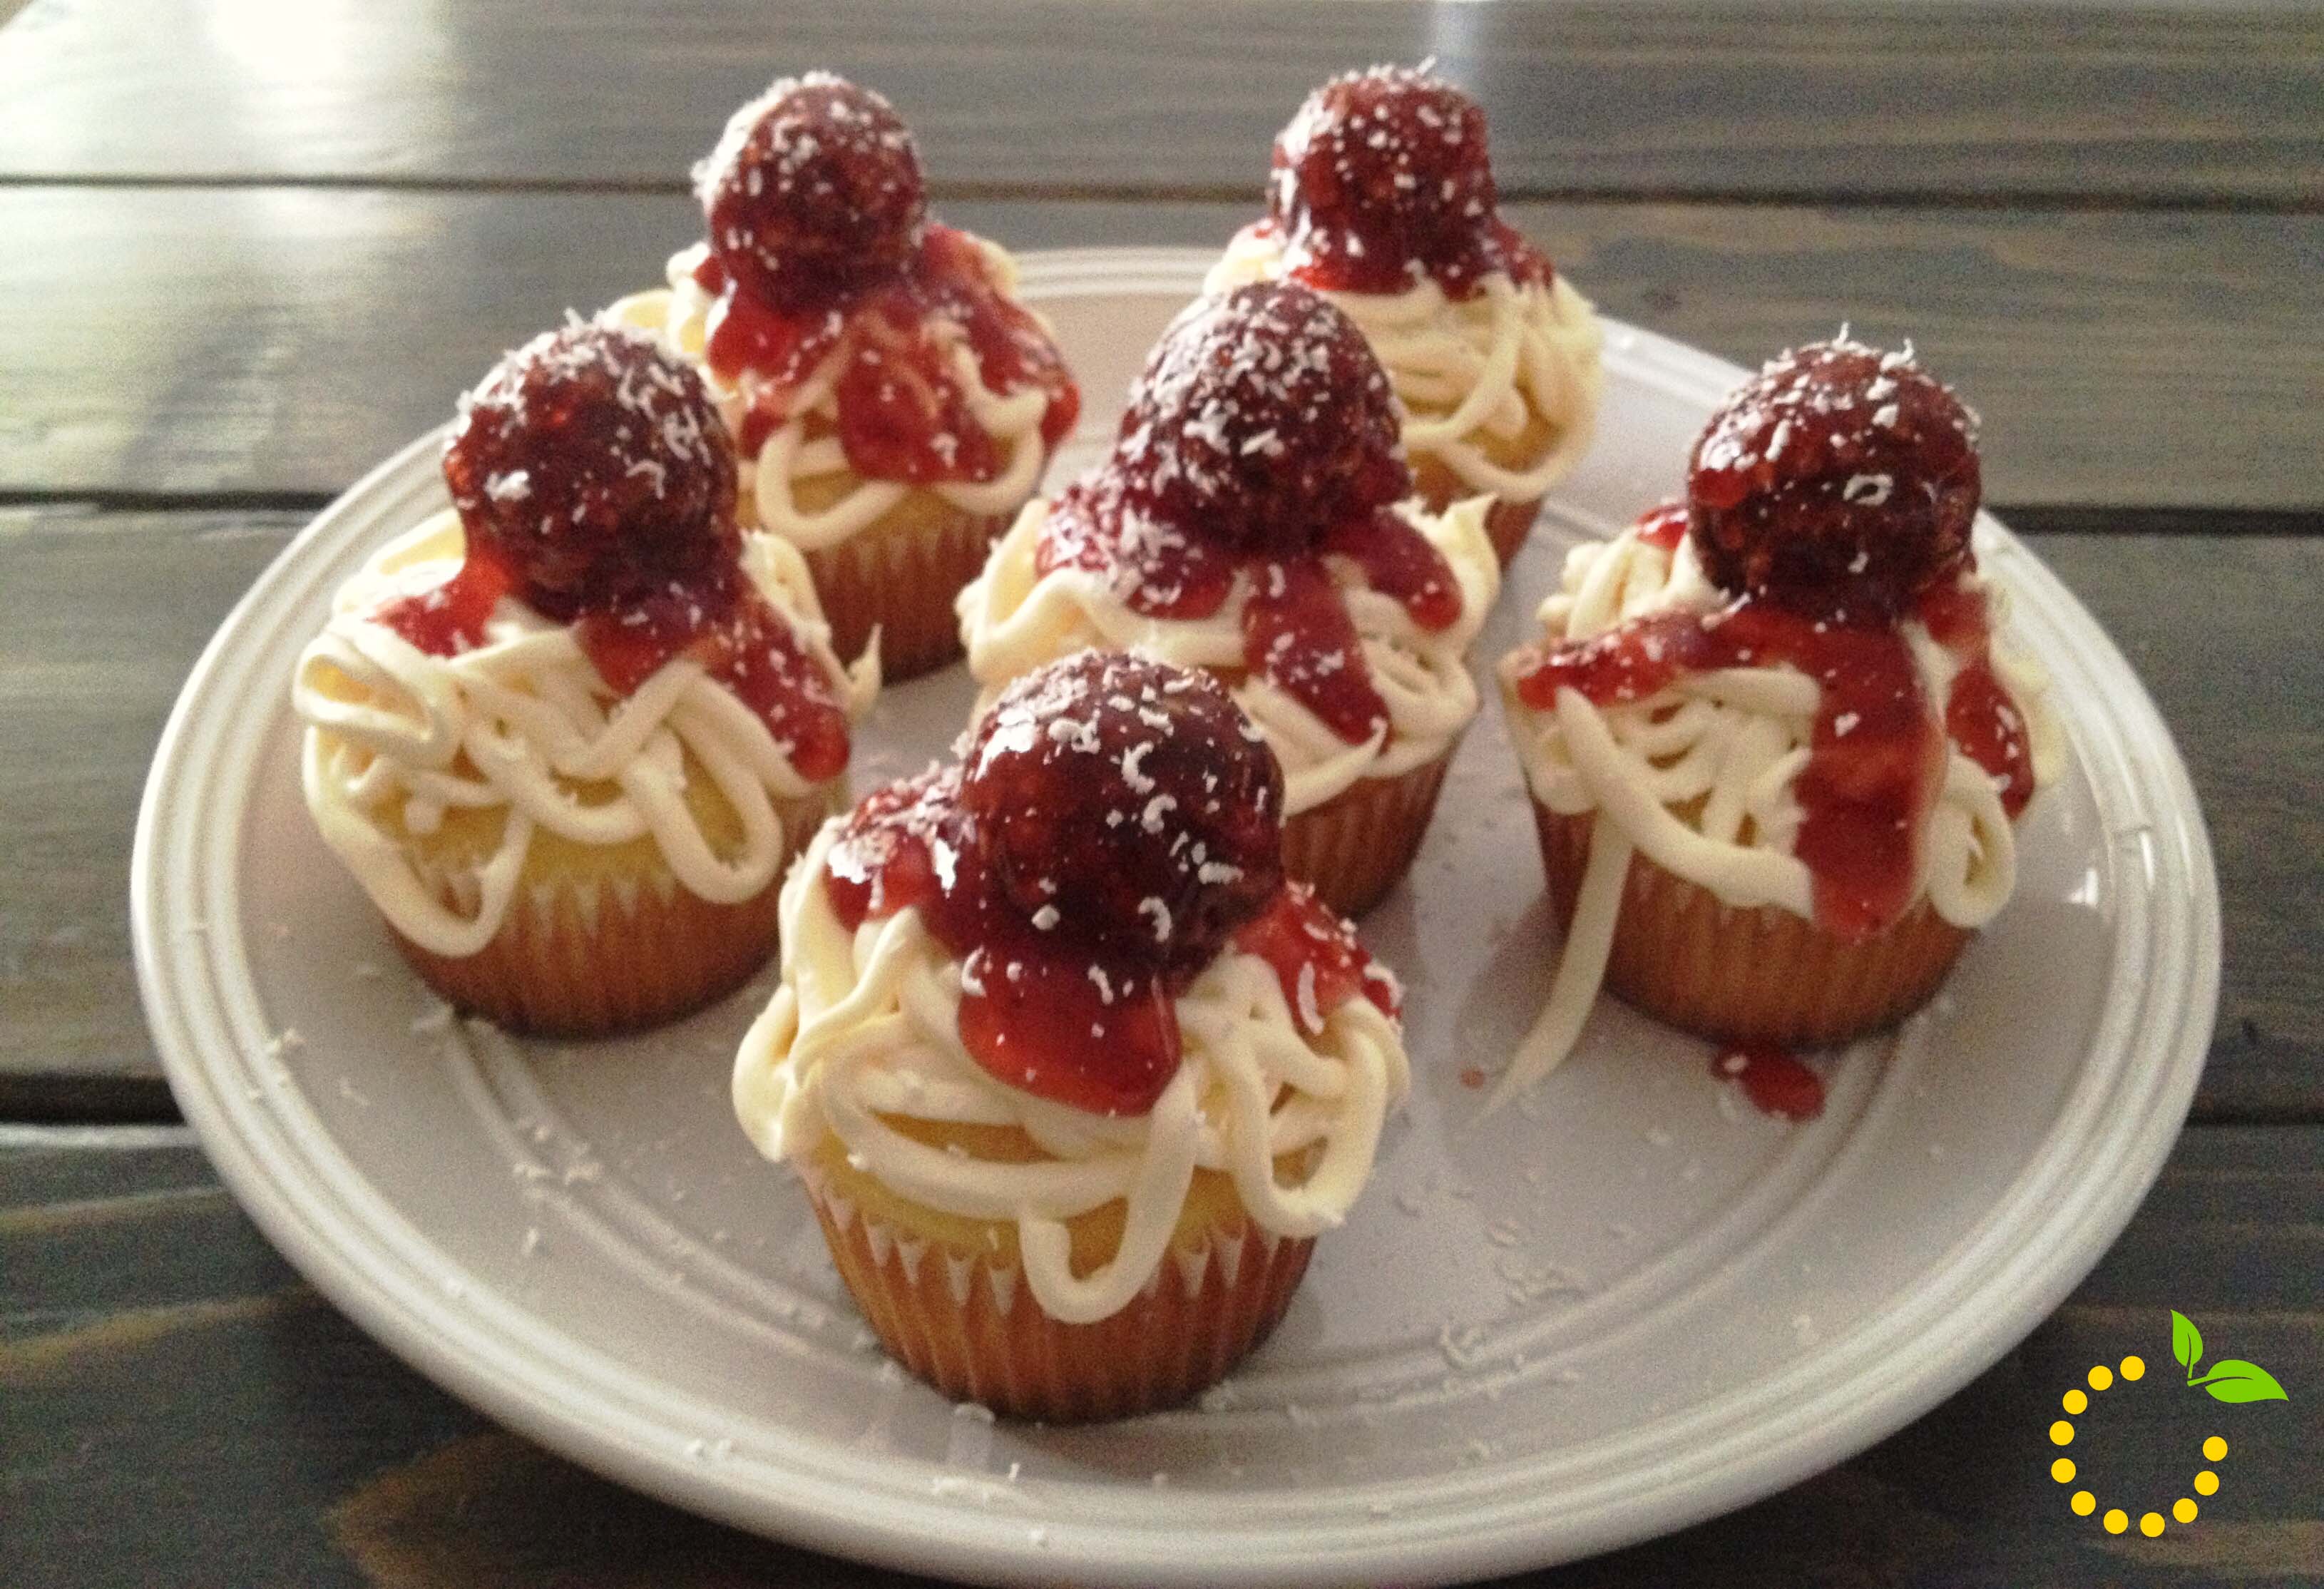
So, if you want to play an April Fool’s Day joke on your family, friends, or coworkers without being mean spirited these spaghetti meatball cupcakes will fool them but won’t make them want to gag! Some of them will think you are crazy for wanting them to try a spaghetti and meatball cupcake but, little do they know it actually tastes pretty good! The chocolate cupcake with “cream cheese frosting” spaghetti noodles, a “Ferrero Rocher” meatball, “strawberry jelly” marinara sauce, and “grated white chocolate” Parmesan cheese doesn’t taste all that bad! And I’m not just saying that to get you to eat it and for me to say “April Fool’s”! Or am I? I’m just messing with you, they taste good! 🙂

Spaghetti and Meatball Cupcakes
A delicious vanilla cupcake with cream cheese filling.
Write a review
Print
Ingredients
  1. VANILLA CUPCAKES
  2. 1 1/2 cups cake flour
  3. 1 1/4 cups all-purpose flour
  4. 2 1/2 tsp baking powder
  5. 1/4 tsp salt
  6. 1 cup unsalted butter, softened
  7. 2 cups granulated sugar
  8. 4 eggs, room temp
  9. 4 tsp vanilla extract
  10. 1 cup undiluted evaporated milk
  11. CREAM CHEESE FILLING
  12. 8 ounces cream cheese, room temp
  13. 5 tbsp. unsalted butter
  14. 2 1/2 cups powdered sugar
  15. 2 tsp. vanilla
  16. ADDITIONAL CUPCAKE INGREDIENTS
  17. Strawberry jelly
  18. Dozen Ferrero Rocher
  19. Almond bark
Instructions
  1. Preheat oven to 325 degrees.
  2. Sift together the flours, baking powder, and salt and set aside.
  3. Cream together butter and sugar in a mixer until light and fluffy.
  4. Add eggs, one at a time, beating well after each addition.
  5. Beat in vanilla extract.
  6. Gently fold in the dry ingredients in three equal portions, alternating with the milk (start with dry ingredients and end with dry ingredients).
  7. Pour batter evenly into paper lined muffin pan.
  8. Bake for 12-16 minutes or until a toothpick inserted into the center comes out clean. Watch cupcakes carefully, making sure to not over bake. As soon as the toothpick comes out clean, remove the cupcakes from the oven. Let cool for 2 minutes and remove from pan and let them cool completely on a cooling rack.
  9. Next up is the cream cheese filling. In a bowl of a stand mixer fitted with the paddle attachment beat the cream cheese and butter on medium speed until well combined and smooth, about 2-3 minutes.
  10. Mix in the vanilla extract.
  11. Gradually add in the powdered sugar until desired consistency is reached and smooth--should be thick but, not too thick.
  12. Transfer the cream cheese filing to a pastry bag fitted with a small round tip.
Notes
  1. Cupcake Assembly
  2. 1. Pipe cream cheese frosting onto the cupcakes in a figure-eight motion to make it look like spaghetti.
  3. 2. Unwrap a Ferrero Rocher and roll it in the jelly to coat it. Place in the middle of the cupcake and drizzle a little extra "sauce" jelly on top.
  4. 3. Grate almond bark on top to make it look like Parmesan cheese.
Sweet Lemon Made https://sweetlemonmade.com/

Create

DIY Disneyland T-Shirts

Disneyland T-Shirts sweetlemonmade.com

My daughter recently turned two and to celebrate we planned a family trip to the Happiest Place on Earth…Disneyland! It had been 10 years since my last visit (way too long) and would be Olivia’s first time, so I wanted to make it as fun and magical as possible.

The first thing that popped into my head was to make our own t-shirts to wear on the trip. Sure, I could easily go to the store and find something cute, but there was something special about making my own. I wasn’t sure where to start since it was my first time making anything with vinyl, so I called up my crafty sidekick Ashley for some help! I was surprised with how fast and easy it was to make the shirts, so I will definitely be making more in the future.

STEP 1.
Visit a local craft shop and retail store to pick up your supplies. My shopping list included: 

  • Adult Plain White T-Shirt: $5 each at H&M.
  • Child Plain White T-Shirt: $1.50 each at Old Navy (Yay for clearance deals).
  • Iron-On Heat Transfer Vinyl: $12 for one roll of black and $16 for one roll of red glitter. The vinyl is the most expensive part of the project, but the red glitter was totally worth the price.

Disneyland DIY T-Shirt Supplies sweetlemonmade.com

STEP 2.
Grab a vinyl cutter and prepare the images you want to use on your shirt. Ashley owns a Silhouette Cameo, which was super easy to use, but because my designs weren’t on a template, we had to look online and upload them to the Cameo. Every system is different, but here is a Silhouette tutorial by Sew Dang Cute Crafts for reference. Just remember, make sure your designs are printed backwards since you are ironing onto a shirt! (That might have slipped our minds…a couple of times)

STEP 3.
Drape your shirt over an ironing board and get your vinyl in place. Grab a towel to cover your shirt and start ironing. Run the iron back and forth multiple times. Lift the towel slowly to see if the vinyl is sticking or if it needs more heat. Once it sticks, you’re done! 

DIY Disneyland T-Shirts sweetlemonmade.com


Celebrate

Last Minute Easter Basket Ideas

Easter Basket sweetlemonmade.com

I know what you’re thinking, “Easter is on Sunday. Why are you just now showing me these cute ideas?” I hear you. But let’s be honest, if we would have posted this on Monday you probably still wouldn’t have had time to go to the store and put these together. But maybe you’re the type of person that is super planned and you absolutely needed this post two weeks ago, to you and all the other prepped people, we solute you. We want to be you. You can stop reading now or save this post for next year. To the rest of you who are knee deep in work stuff, kid stuff, house stuff, and trying to work out and eat healthy stuff, read on. We’ve got some fun ideas for an Easter basket that you can pull off in a Saturday so rest assured. The one thing I do regret in posting this tonight in an attempt to connect with my midnight-oil-burning friends, is that I didn’t give you enough time for 2-day shipping on Amazon Prime. Next time, I’ll remember the shipping window, promise.

Okay, now on to the stuff! This was definitely a creative sweet lemonMADE collaboration as we wandered the aisles of Target (no, we are not sponsored by them, but we should be! #dreams). Wait, you mean, you don’t wander the aisles of Target at 10 o’clock at night on a Tuesday? Oh, you do, oh, okay. Phew.

For the kiddos…

Girl Easter Basket sweetlemonmade.com

First of all, that dress! Talk about flower power, we all gushed over it. It has the perfect amount of whimsy and fun with all those bright colors and that retro, floral pattern. We may have checked the entire store to find that pattern in anything else (really, ANYTHING), but if you want this happy print you’ve gotta buy this dress. We paired it with some sweet shades (also Target), one of those darling, BabyLit books (Barnes and Noble), naturally we chose “The Secret Garden” (wait, are we supposed to use quotes or underline book titles…um, does it change if it is APA format vs MLA format?  Is there a blog format?? Um, I think you can do either way, right? Mrs. Dursteler? Are you reading this? You knew what I meant). And if you wanna splurge a little (read: a lot) you can snag some of these great Freshly Picked Mocs, the ones pictured here are “petite cashmere.”

Boy Easter Basket sweetlemonmade.com

You will be the coolest mom, aunt, grandma, sister around if you get the dudes in your life one of these “Bunch-O-Balloons” water balloon fillers. Talk about ultimate life hack, you can fill 100 water balloons in 1 minute! Oh, and did we mention that it is self-tying? Yes, amazing (find it at Target, Walmart, or Amazon). Throw in a fun spring shirt, and one of those great BabyLit books and you’re set.

For the awesome ladies in your life…sisters, friends, coworkers

Friend Easter Basket sweetlemonmade.com

Okay, did you guys read that flavor? Pearberry!! Talk about throwback! When I saw this at Bath and Body Works I knew I had to buy it for my fellow sweet lemonMADE ladies. This was the scent of our awkward tween years. It’s weird, just putting it on transports me back to junior high with my braces and Doc Martens. I threw in a fun new flavor of Trident Layers gum (watermelon/tropical fruit) and a new stick of everyone’s favorite, Baby Lips by Maybelline.

Coke Easter Basket sweetlemonmade.com

I don’t know about you, but Diet Coke is a religion around here, and there’s nothing most women love more (maybe their husbands and kids, maybe). Diet Coke goes great with anything, but especially these Cape Cod chips (YUM!) on a blanket in the park. Yeah, that’s the stuff dreams are made of.

Easter Candy sweetlemonmade.com

And if all else fails and you run out of ideas and time just buy the people you love some Easter chocolate. They won’t be mad you did.

Eats

Birds Nest Cupcakes

Easter is just right around the corner! If you are in charge of making a dessert, these cupcakes are cute and delicious. Cadbury Mini Eggs are one of my favorite Easter candies so, when I saw these cupcakes on my Pinterest feed, I knew I had to make them because I couldn’t pass up the chance to add Cadbury Mini Eggs to a cupcake! I just can’t get over how cute these little chicks are! These fluffy vanilla cupcakes, with chocolate buttercream frosting, shredded coconut, and the cutest Cadbury Mini Egg chicks are the perfect addition to any Easter celebration. Warning: you may need to buy an extra bag of Cadbury Mini Eggs, you won’t be able to resist snacking on them while you make these delicious cupcakes! 🙂

Birds Nest Cupcakes
Fluffy vanilla cupcakes with chocolate buttercream frosting.
Write a review
Print
Ingredients
  1. VANILLA CUPCAKES
  2. 1 1/2 cups cake flour
  3. 1 1/4 cups all-purpose flour
  4. 2 1/2 tsp baking powder
  5. 1/4 tsp salt
  6. 1 cup unsalted butter, softened
  7. 2 cups granulated sugar
  8. 4 eggs, room temp
  9. 4 tsp vanilla extract
  10. 1 cup undiluted evaporated milk
  11. CHOCOLATE BUTTERCREAM FROSTING
  12. 2 cups powdered sugar
  13. 1/3 cup salted butter, softened
  14. 2 Tbsp heavy cream
  15. 1/2 tsp vanilla extract
  16. 1 Tbsp cocoa powder
  17. Yellow and red food coloring gel
  18. ADDITIONAL INGREDIENTS
  19. 1 cup sweetened coconut flakes
  20. Cadbury Mini Eggs
  21. 1 Tbsp semi-sweet chocolate chips
  22. Cupcake liners
Instructions
  1. To make the vanilla cupcakes, preheat oven to 325 degrees.
  2. Sift together the flours, baking powder, and salt and set aside.
  3. Cream together butter and sugar in a mixer until light and fluffy.
  4. Add eggs, one at a time, beating well after each addition.
  5. Beat in vanilla extract.
  6. Gently fold in the dry ingredients in three equal portions, alternating with the milk (start with dry ingredients and end with dry ingredients).
  7. Pour batter evenly into paper lined muffin pan.
  8. Bake for 12-16 minutes or until a toothpick inserted into the center comes out clean. Watch cupcakes carefully, making sure to not over bake. As soon as the toothpick comes out clean, remove the cupcakes from the oven. Let cool for 2 minutes and remove from pan and let them cool completely on a cooling rack.
  9. Next up is the chocolate buttercream frosting. In a large mixing bowl, using an electric mixer whip together powdered sugar, butter, heavy cream, and vanilla extract for 1 minute until smooth and fluffy.
  10. Scoop out 2 and 1/2 tablespoons of the frosting into a small bowl and tint it with yellow and red gel food coloring (you will only need a tiny bit) until you get the desired orangish-yellow color to your liking for the beaks.
  11. Add cocoa powder to the remaining frosting mixture and whip together with electric mixer until well combined.
Notes
  1. ASSEMBLING THE CUPCAKES
  2. 1. Toast coconut flakes by preheating oven to 350 degrees. Spread coconut onto a cookie sheet and bake for 8-9 minutes or until golden brown, rotating pan halfway through baking. Watch closely to prevent over toasting. Allow to cool.
  3. 2. Frost cooled cupcakes with chocolate buttercream frosting.
  4. 3. Gently press 3 Cadbury Mini Eggs into the center of each cupcake with the pointed end facing down into the frosting and the large rounded end facing up.
  5. 4. Sprinkle toasted coconut around the Cadbury Mini Eggs (work quickly before the frosting sets so the coconut sticks better).
  6. 5. Fill a ziploc bag with orange tinted frosting. Using scissors cut a very small tip off of the corner of the bag and pipe beaks onto the Cadbury Mini Eggs.
  7. 6. Melt chocolate chips in a microwave safe bowl in the microwave in 20 second intervals, stirring between each interval until melted and smooth. Using a toothpick, dip the end of the toothpick into the chocolate and dab the eyes onto the chicks.
  8. Chocolate butter cream frosting recipe adapted from cookingclassy.com
Sweet Lemon Made https://sweetlemonmade.com/
Birds Nest Cupcakes sweetlemonmade.com

Sweet Picks

March Sweet Picks

Hey friends, so in case you haven’t noticed we’re doing something here and it’s called “Sweet Picks.” Every month we will each share something awesome that we love (like a beauty product, book, gadget, etc., you know, our “must haves”) and then we will give one away to YOU. Think Oprah’s Favorite Things, but cheaper (no cars here). So stay tuned each month for your chance to win!

Retro Hair Dry Clean Dry Shampoo: Alarm goes off…BEEP.BEEP.BEEP.  Snooze. Blissful 9 minutes. BEEP. BEEP. BEEP. “9 minutes gone already?” I ask myself in a sleepy stupor. Enter negotiation mode. “I don’t really need to eat breakfast.” Snooze. And 9 more minutes of happiness. BEEP. BEEP. BEEP. “I’ll do my makeup in the car. There are always lots of red lights.” SNOOZE. Nine more minutes of sleepy, dreamland. BEEP. BEEP. BEEP. “Forget washing my hair. I’ll wear a ponytail.” SNOOZE.

If you know these irrational sleep negotiations like I do, you need some dry shampoo in your life. It will soak up that bedhead and give those roots some spring in their step—all without washing your hair, saving you precious time in the morning. And you know, experts  say you shouldn’t wash your hair everyday anyway (every beauty blog and even WebMD). So obviously this is a win-win. I know what some of you are thinking though, “Yeah, but I NEED to wash my hair everyday.” No, you don’t. You really don’t. I promise. Here’s how. 

Enter Retro Hair: Dry Clean, dry shampoo. Grab the can (kiss it first because you’re about to fall in love). Then tip your head upside down and spray your roots, making sure to get those greasy bedhead cowlicks extra well. The spray will hit you with a cold burst of air and leave your hair with a damp, powdery feel (however, it will NOT leave a white, powdery residue behind like some other dry shampoos. This is key if you have darker hair). Next, key tip here (learned from one of my favorite bachelor alums via snapchat—don’t judge), with head still upside down take blow dryer and meet those cold roots with a blast of hot air for just a minute—moving blow dryer around entire head. Flip your head up, give your roots a little lift and poof with your hands and blow dry again if needed. Then brush out that wild mess the blow dryer left behind and style. Entire process takes 3 minutes and you didn’t even have to get it wet. I get more compliments on my hair on a dry shampoo day than any other day. Like cheese and fine wine, I feel like my hair gets better with time. Yours will too.
Image Source: Amazon

Glam Glow Mud Mask: I was introduced to this little gem on a summer getaway with my best gal-pals. We rented a lake house in Cape Cod and spent the days lounging in swimsuits and yoga pants and ate M&Ms and kettle chips all day. It was a glorious time.  One of my favorite parts of that trip though, was our “favorite things” exchange. We each brought everyone a product that we love (cue sweet lemonMADE sweet picks) and exchanged them. This is where GlamGlow mud masks came into my life. My NYC BFF, a compulsive beauty junkie (that’s a compliment), was the one to introduce us to them. She always knows the best beauty products and isn’t afraid to try them all—and I think the fact that she lives in NYC gives her extra street cred. But just incase you aren’t ready to trust my reviews you can rest assured that Sephora reviewers (all 1,684 of them) loved this stuff. 

So what’s so magical, you ask? I think the magic is in the tingle, or maybe it is the volcanic pumice rock or the French sea clay…whatever it is, it’s awesome. It is pretty simple to use, just cover your face with the concrete-colored mask (don’t be alarmed by the bits of green tea leaves mixed in), spare your eyes, and wait for it to dry. As the mask is drying your face will start tingling and your skin will get tight (boom…take that wrinkles!). You’ll notice when the mask is dry because the color will change to a light seafoam color, but you can leave it on for 5 to 20 minutes. When you’re ready to be done just get warm water on your hands and start scrubbing (circular motion is what the beauty Nazis recommend) and rinse it all off. Then touch your face. It will feel like a baby’s bum. You’re welcome.

P.s. We are giving this away on Instagram, so go enter. I hope you win. You want this stuff.
Image Source: Sephora

Fujifilm Instax Share Printer: If you’re looking for a fun and easy way to instantly print photos from your smartphone or tablet, the Instax Printer is the way to go. The printer fits in the palm of your hand, so it’s easy to store and the only requirement (besides buying the Polaroid film) is to download an app to retrieve your pictures. You can even get creative by adding templates, fonts and other icons to your picture. This printer is so much fun, but it will cost you a pretty penny. Be prepared to spend $129 and an extra $20 for a pack of film. This “toy” doesn’t come cheap, but it’s the perfect way to get the vintage feel of a Polaroid while using modern technology.
Image Source: Amazon

Benefit Cosmetics Stay Don’t Stray Eyeshadow Primer: The Benefit Cosmetics Stay Don’t Stray Eyeshadow Primer is a life saver and one of my makeup go-to products that I can’t live without. If you are like me, and have a problem with oily eyelids this stuff is amazing! Before I started using this primer, my eyeshadow and eyeliner would just melt off an hour after I’ve applied my eye makeup and make my eyes burn. I like that the primer is tinted (to give your eyelids an even base color) and the doe foot applicator is nice to keep the product clean by not having to put your fingers in the product. Even though it is a bit pricey at $26.00 a bottle, it’s worth it and it lasts quite a while since you use a small amount each time.
Image Source: Benefits Cosmetics