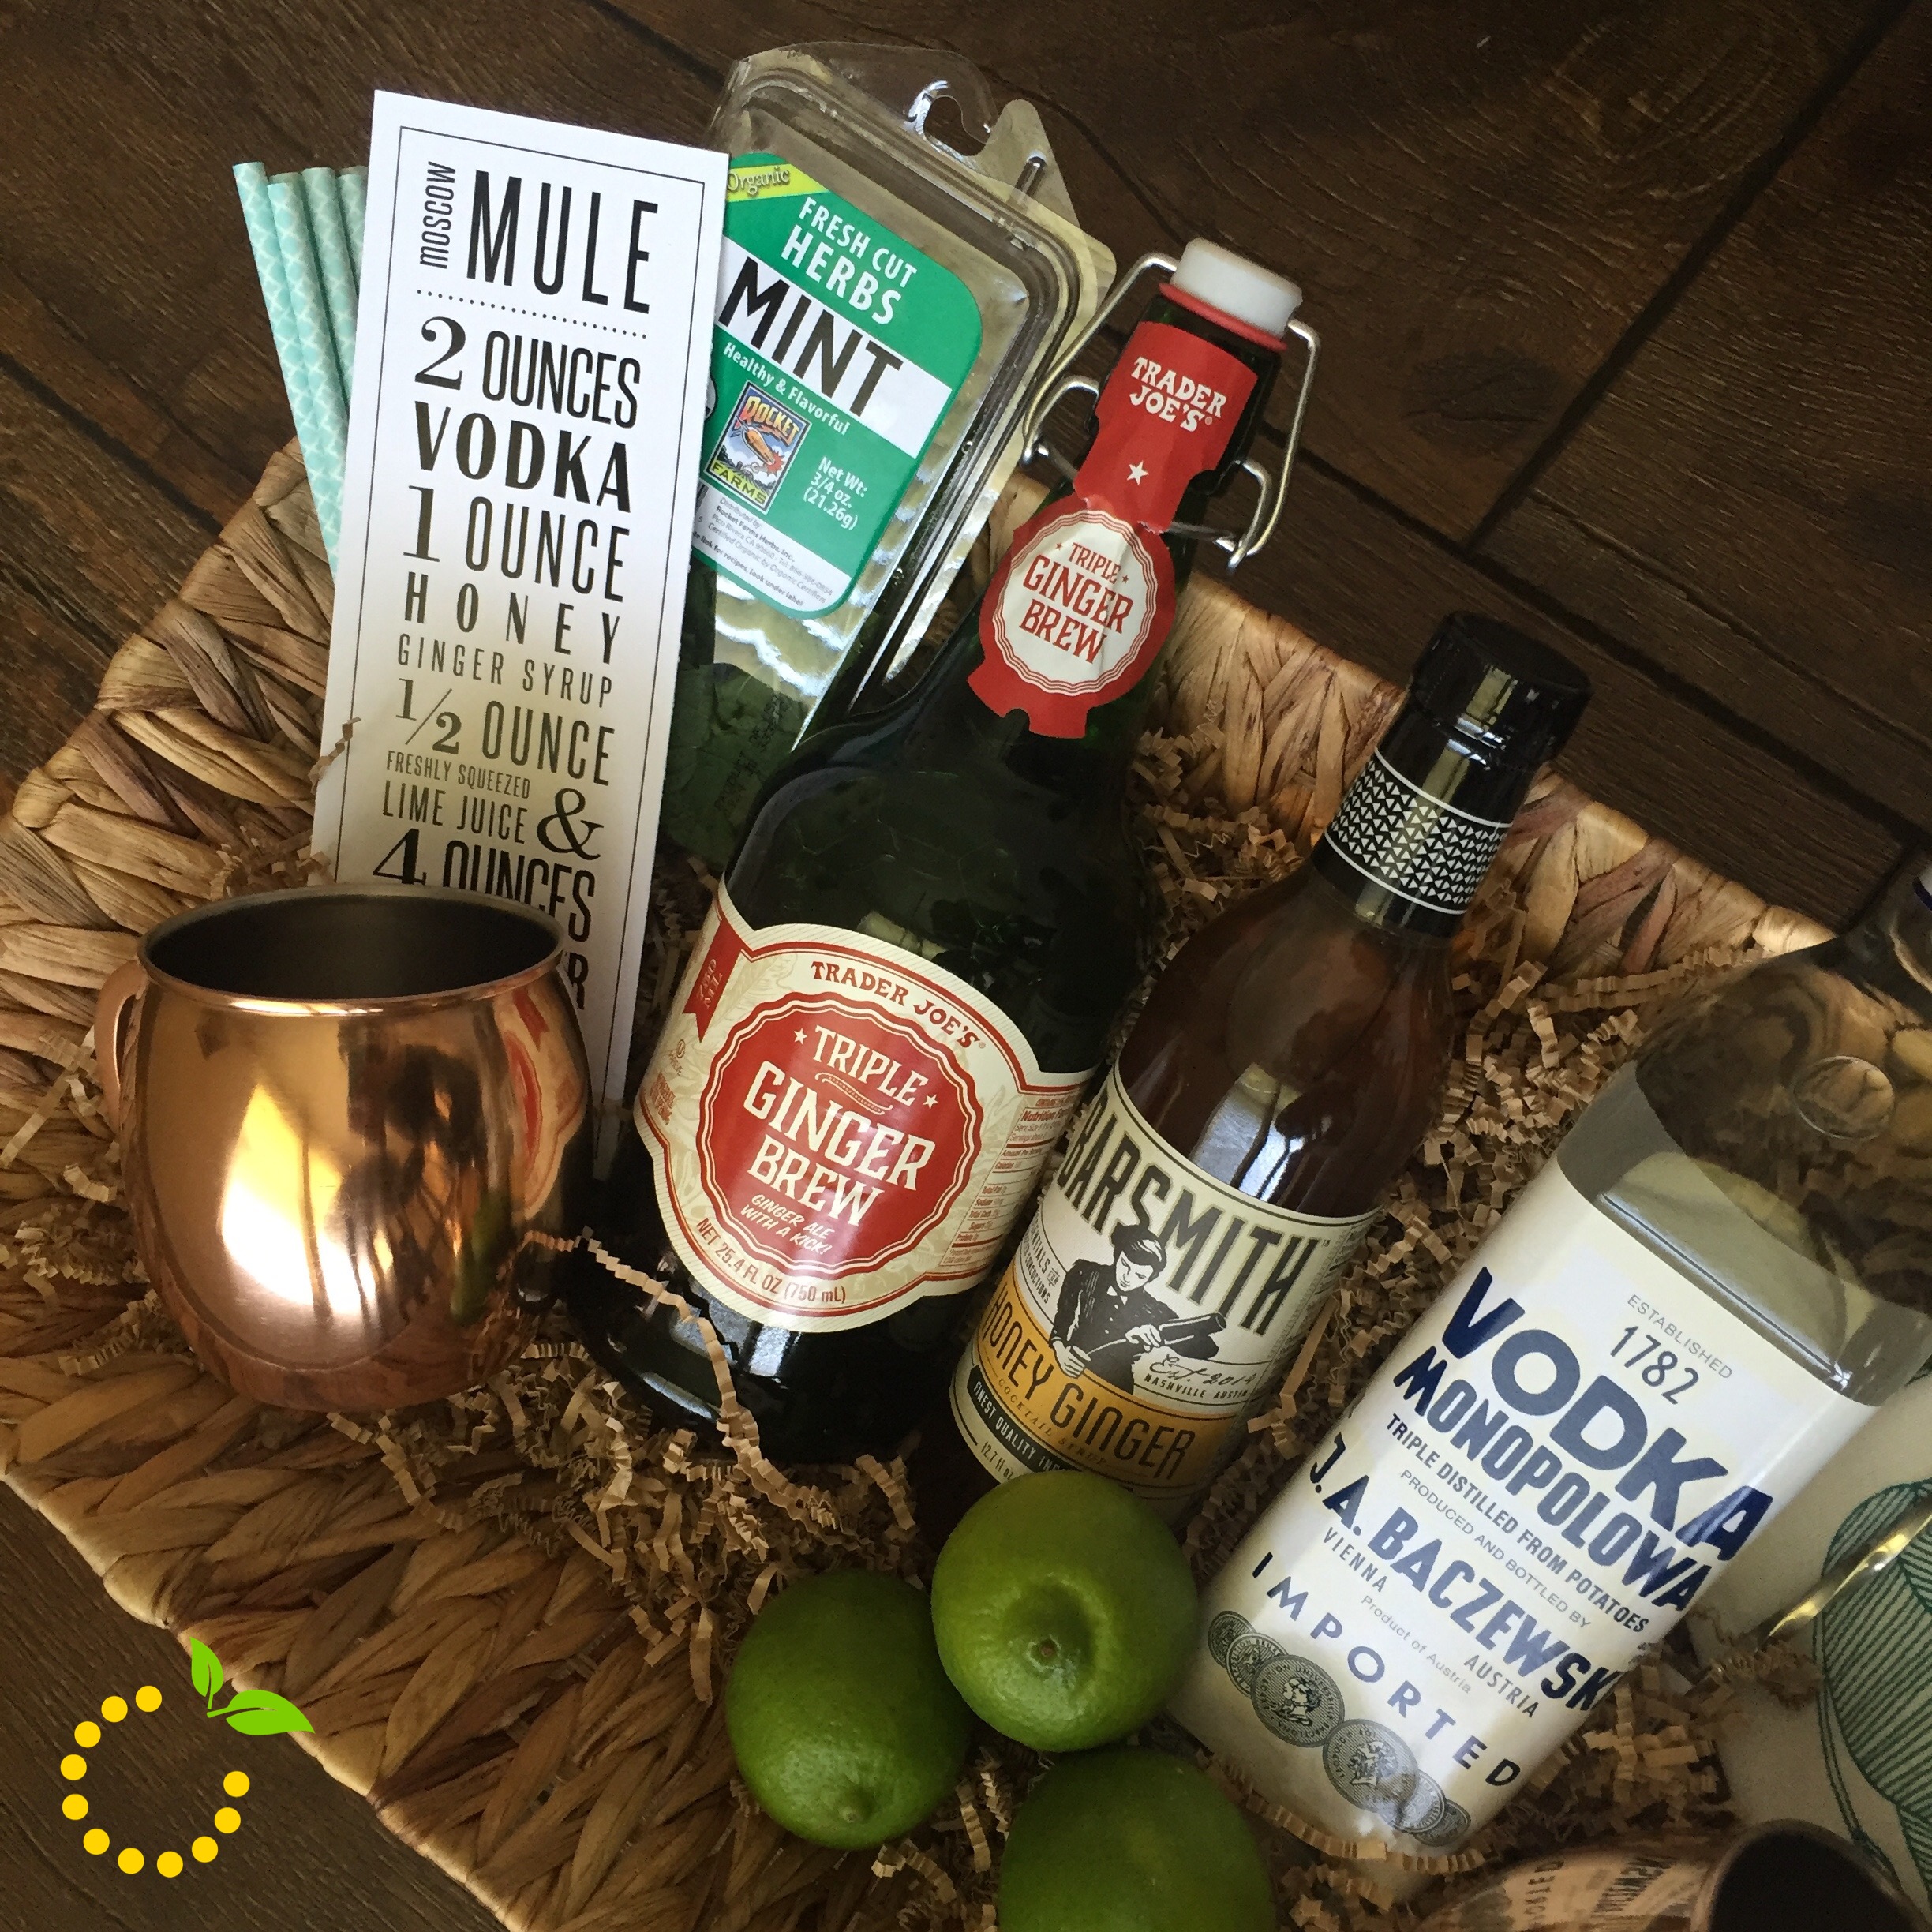
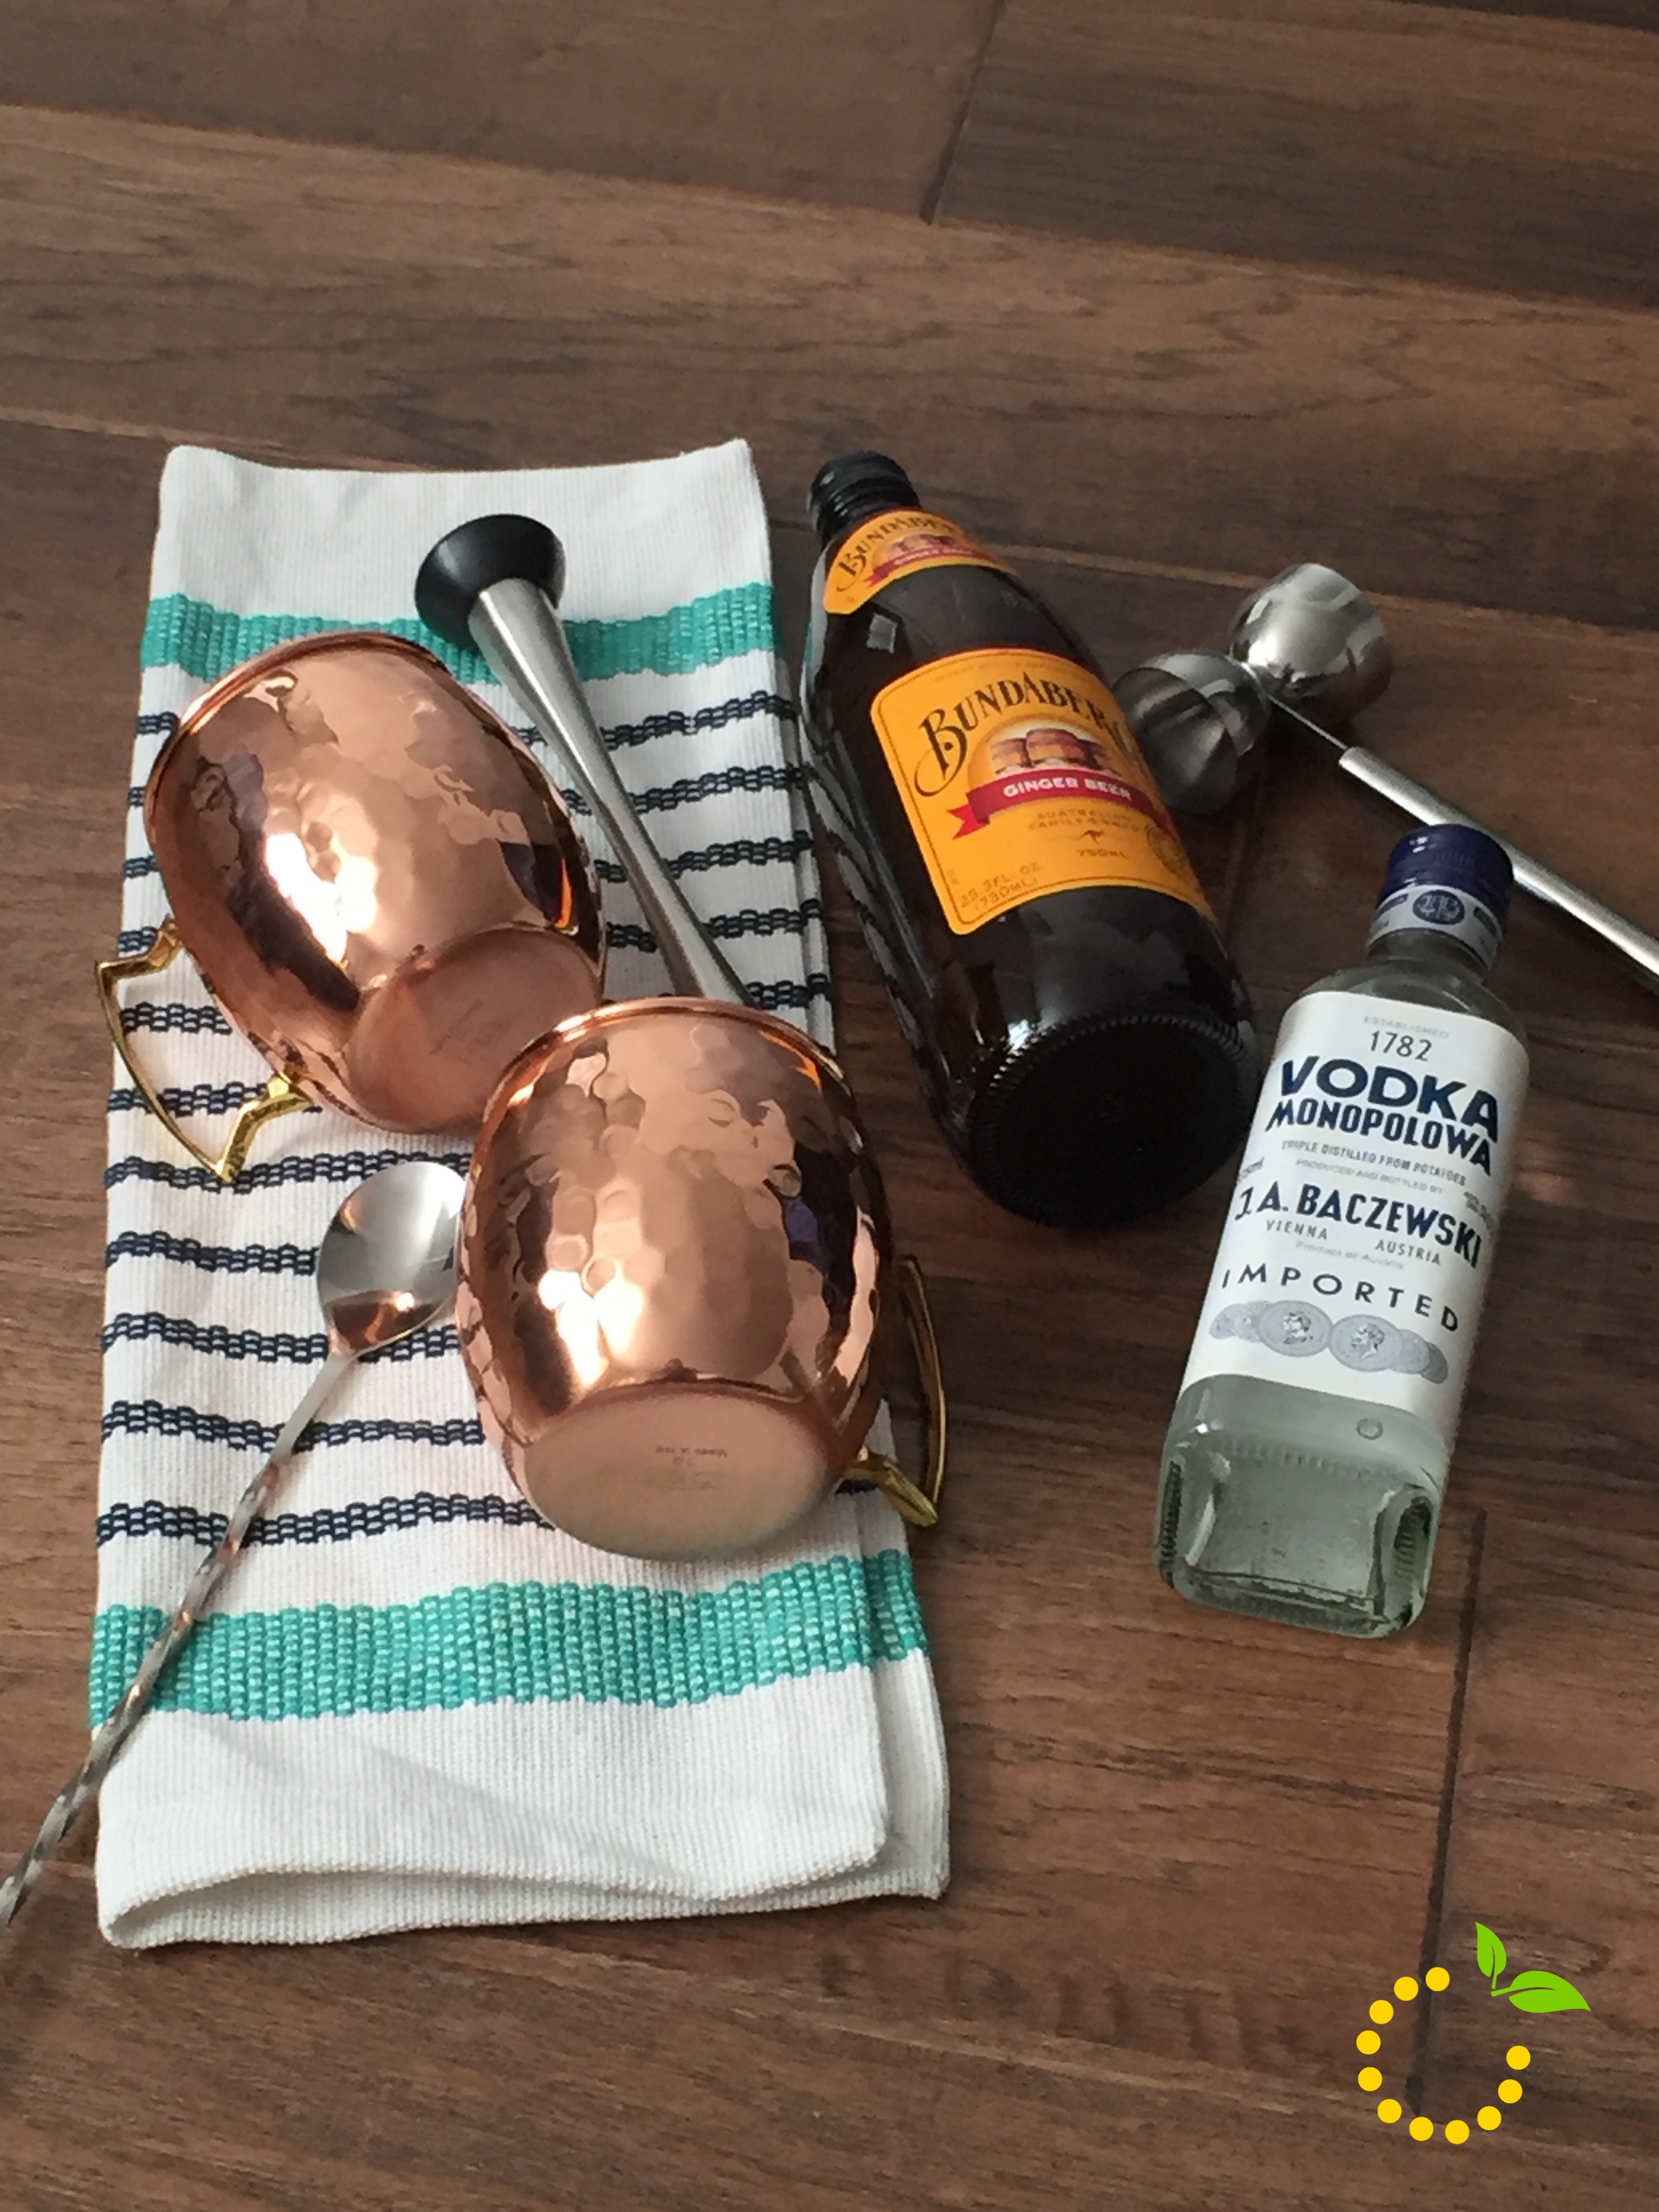
Moscow Mules have been a favorite cocktail of mine lately and a go to cocktail to mix up at our parties! If you’ve never had a Moscow Mule, you need to try one. The Moscow Mule is a very simple cocktail that consists of ginger beer, vodka, lime juice, honey ginger syrup (optional), and mint.
So when one of my friend’s birthdays was coming up who loves Moscow mules, I knew it would make the perfect gift basket and that they would love it! So, if you’ve got someone who loves Moscow Mules this makes the perfect gift and they will end up loving you! The copper mugs alone are so cool and you can’t have a Moscow Mule without the signature copper mug.
For those friends or family members that love cocktails, this is the perfect gift basket for them for practically any occasion like a birthday, bridal shower, wedding, Father’s Day, Mother’s Day, or Christmas! I’ve got a list of all the items below needed to make a Moscow Mule gift basket! We’ve also made a recipe card and a downloadable PDF file of the recipe to download and print to place in the basket!
Happy National Chocolate Chip Day!! If you were looking for an excuse to make some chocolate chip cookies today, today is the day to have that cheat day because c’mon it’s a national holiday! And any reason to make these soft cream cheese chocolate cookies is a good day in my book! These cream cheese chocolate chip cookies are so soft and moist with the addition of a little bit of cream cheese.
Would you believe me if I told you that the secret ingredients to these soft cookies is cream cheese and cornstarch?!? If you don’t believe me, give this recipe a try and tell us what you think. The other secret to thick soft cookies is to refrigerate the dough for up to 2 hours or overnight. I know some people hate recipes that require you to refrigerate your dough, but if your dough is warm your cookies will spread while baking and turn out thin.
I love how these cookies are thick without being cakey and the texture of these cookies are a bit chewy around the edges while the interior is soft, tender, and moist.
1/4 cup cream cheese, softened (don't use fat-free, light or whipped)
3/4 cup light brown sugar, packed
1/4 cup granulated sugar
1 large egg
2 teaspoons vanilla extract
2 1/4 cups all-purpose flour
2 teaspoons cornstarch
1 teaspoon baking soda
1/4 teaspoon salt
2 1/4 cups semi-sweet chocolate chips or chunks (I like to use 1 cup chips and 1 1/4 cups chunks)
Instructions
To the bowl of a stand mixer fitted with the paddle attachment, combine the butter, cream cheese (to get an accurate measurement, put it into a 1/4-cup measure cup rather than using the marks on the outside package), sugars, egg, vanilla, and beat on medium-high speed until well-creamed, light and fluffy, about 5 minutes.
Scrape down the sides of the bowl, and add the flour, cornstarch, baking soda, salt, and mix until just combined, about 1 minute.
Add chocolate chips and chunks, and beat for just a minute to incorporate, or fold in by hand.
Using a medium cookie scoop, form heaping mounds. Place on a large plate and flatten mounds slightly with your palm.
Cover with plasticwrap, and refrigerate for at least 2 hours, or up to 5 days, before baking. Baking with warm dough causes cookies to spread and bake thinner and flatter.
Preheat oven to 350F and line a baking sheet with parchment paper or a Silpat Non-Stick Baking Mat and place dough on baking sheet, spaced at least 2 inches apart. Bake for 8 to 9 minutes, or until edges have set and tops are just beginning to set. They will look slightly under cooked, pale and glossy in the center. Rotate pans after 4 minutes and do not bake longer than 10 minutes as cookies will firm up as they cool. (If dough is refrigerated overnight, allow dough to come to room temp for 15 minutes before baking).
Allow cookies to cool on the baking sheet for 5 minutes before removing and transferring to a rack to finish cooling.
Oh, if only we could all live in brand new, crisp white houses with perfect black shutters on all the windows, and inviting porch swings to sit in as we gaze across our perfectly manicured yards. But let’s be honest, most of us live in somewhat outdated, basic middle-class houses with far more weeds in the yard than we care to admit. We’re all secretly hoping that Chip and Jo show up to make our home reno dreams come true! But alas, all of our renovation dreams usually end up being just that–dreams. Haha.
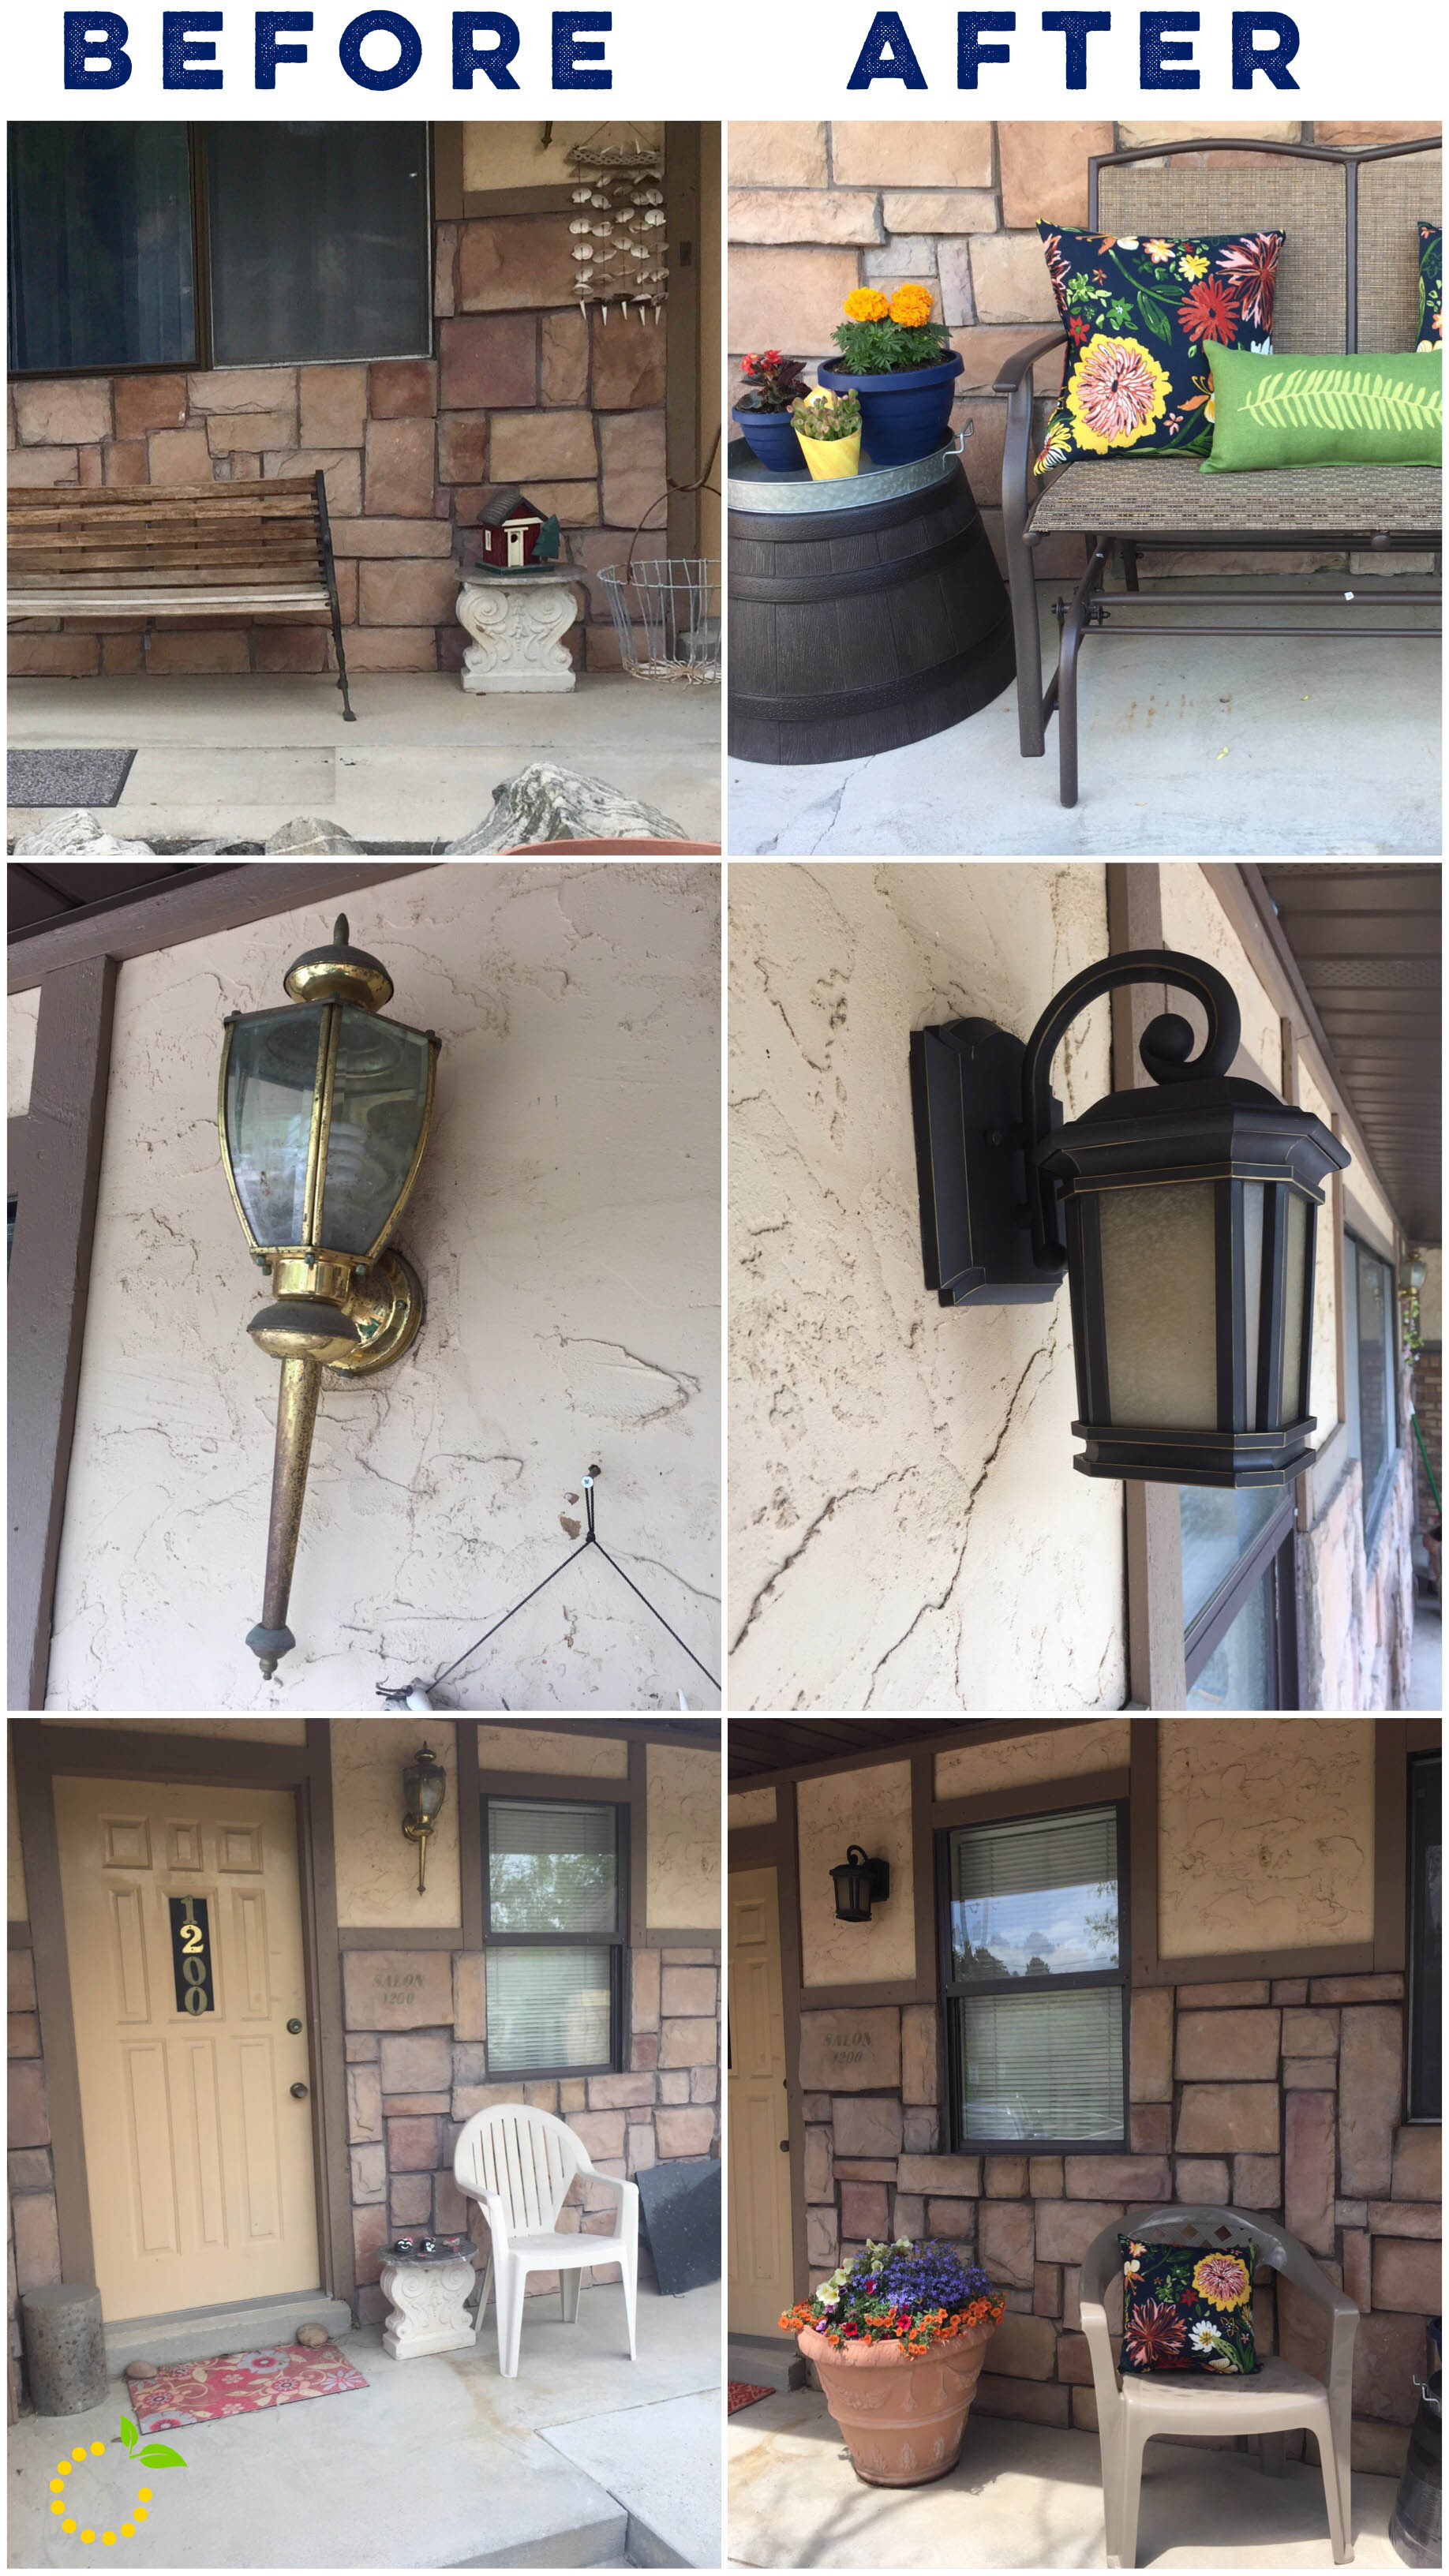
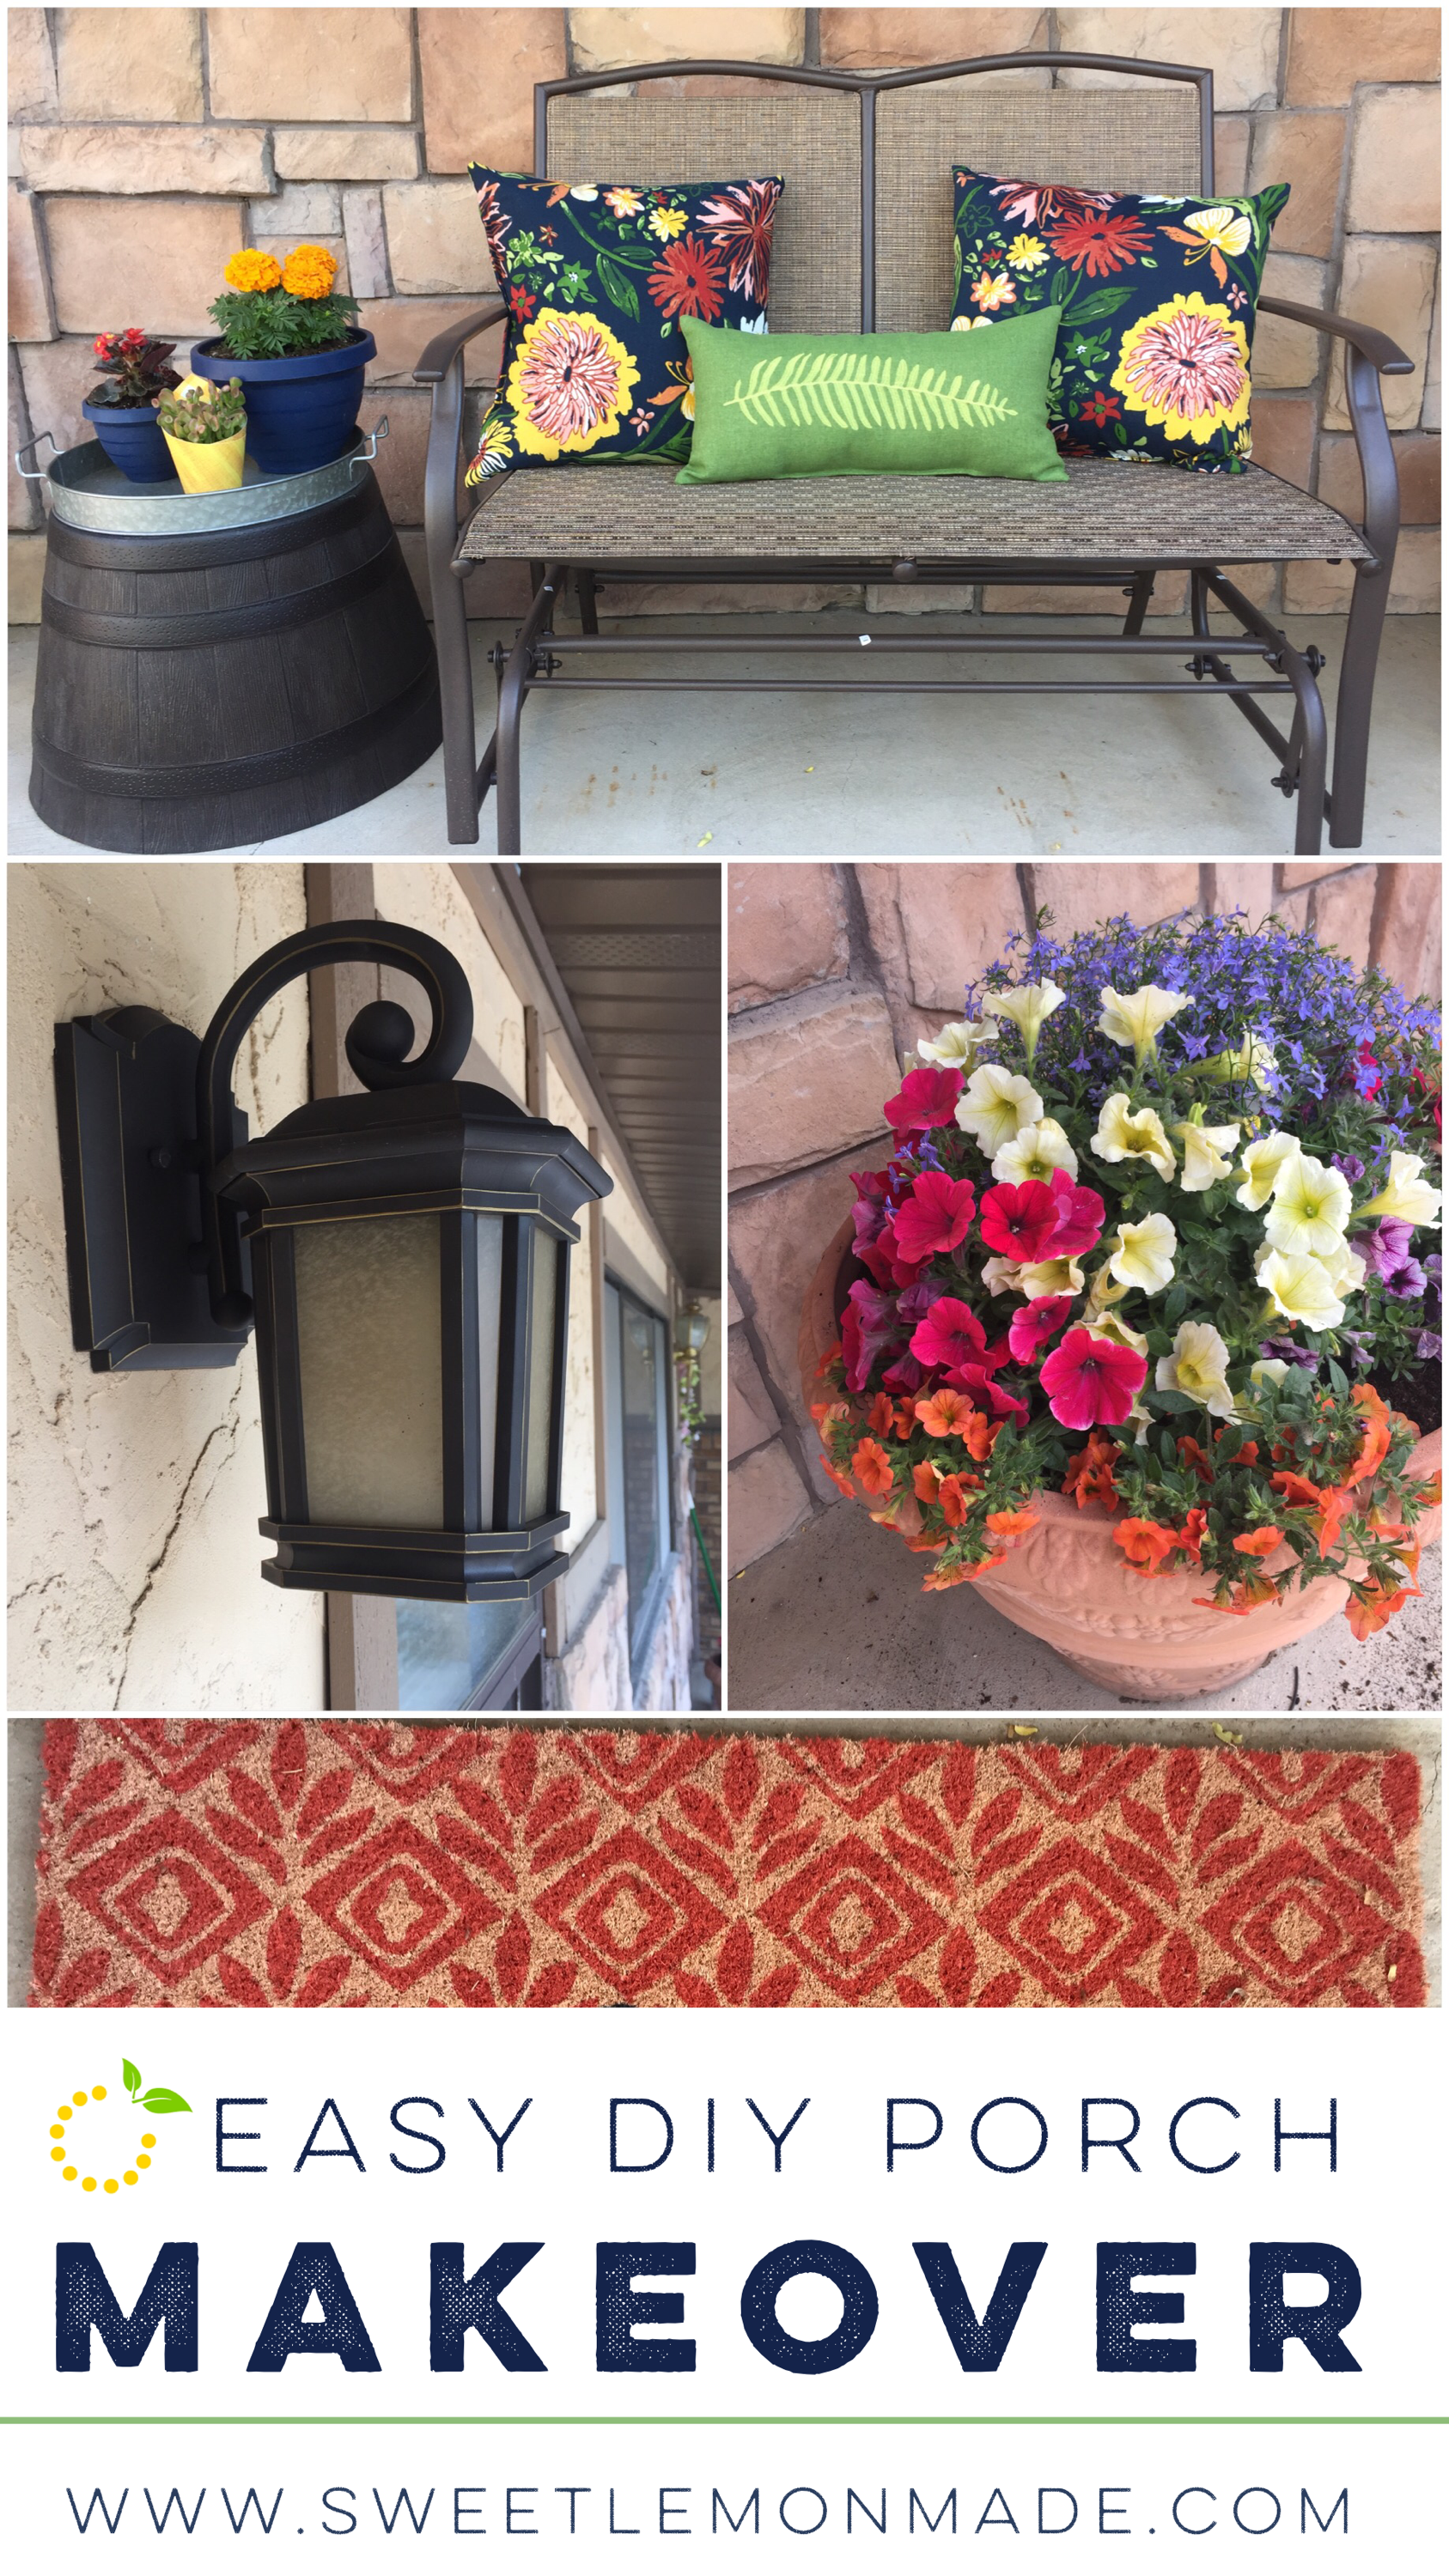
Well, this year my mom has been working hard to renovate our childhood home that was built in 1985 and it can definitely start to get overwhelming. It starts as a room or two and before you know it there’s a project for every room in the house! So to help encourage her along, I decided to surprise her with a little porch renovation. And for $270.88 I was able to really enhance the curb appeal on this 1980s rambler.
If you’re looking to amp up your curb appeal because you’re getting ready to sell your home or just want to smile a little bigger when you pull in the driveway, we’ve got some quick and easy ideas to help you spruce up any porch or patio.
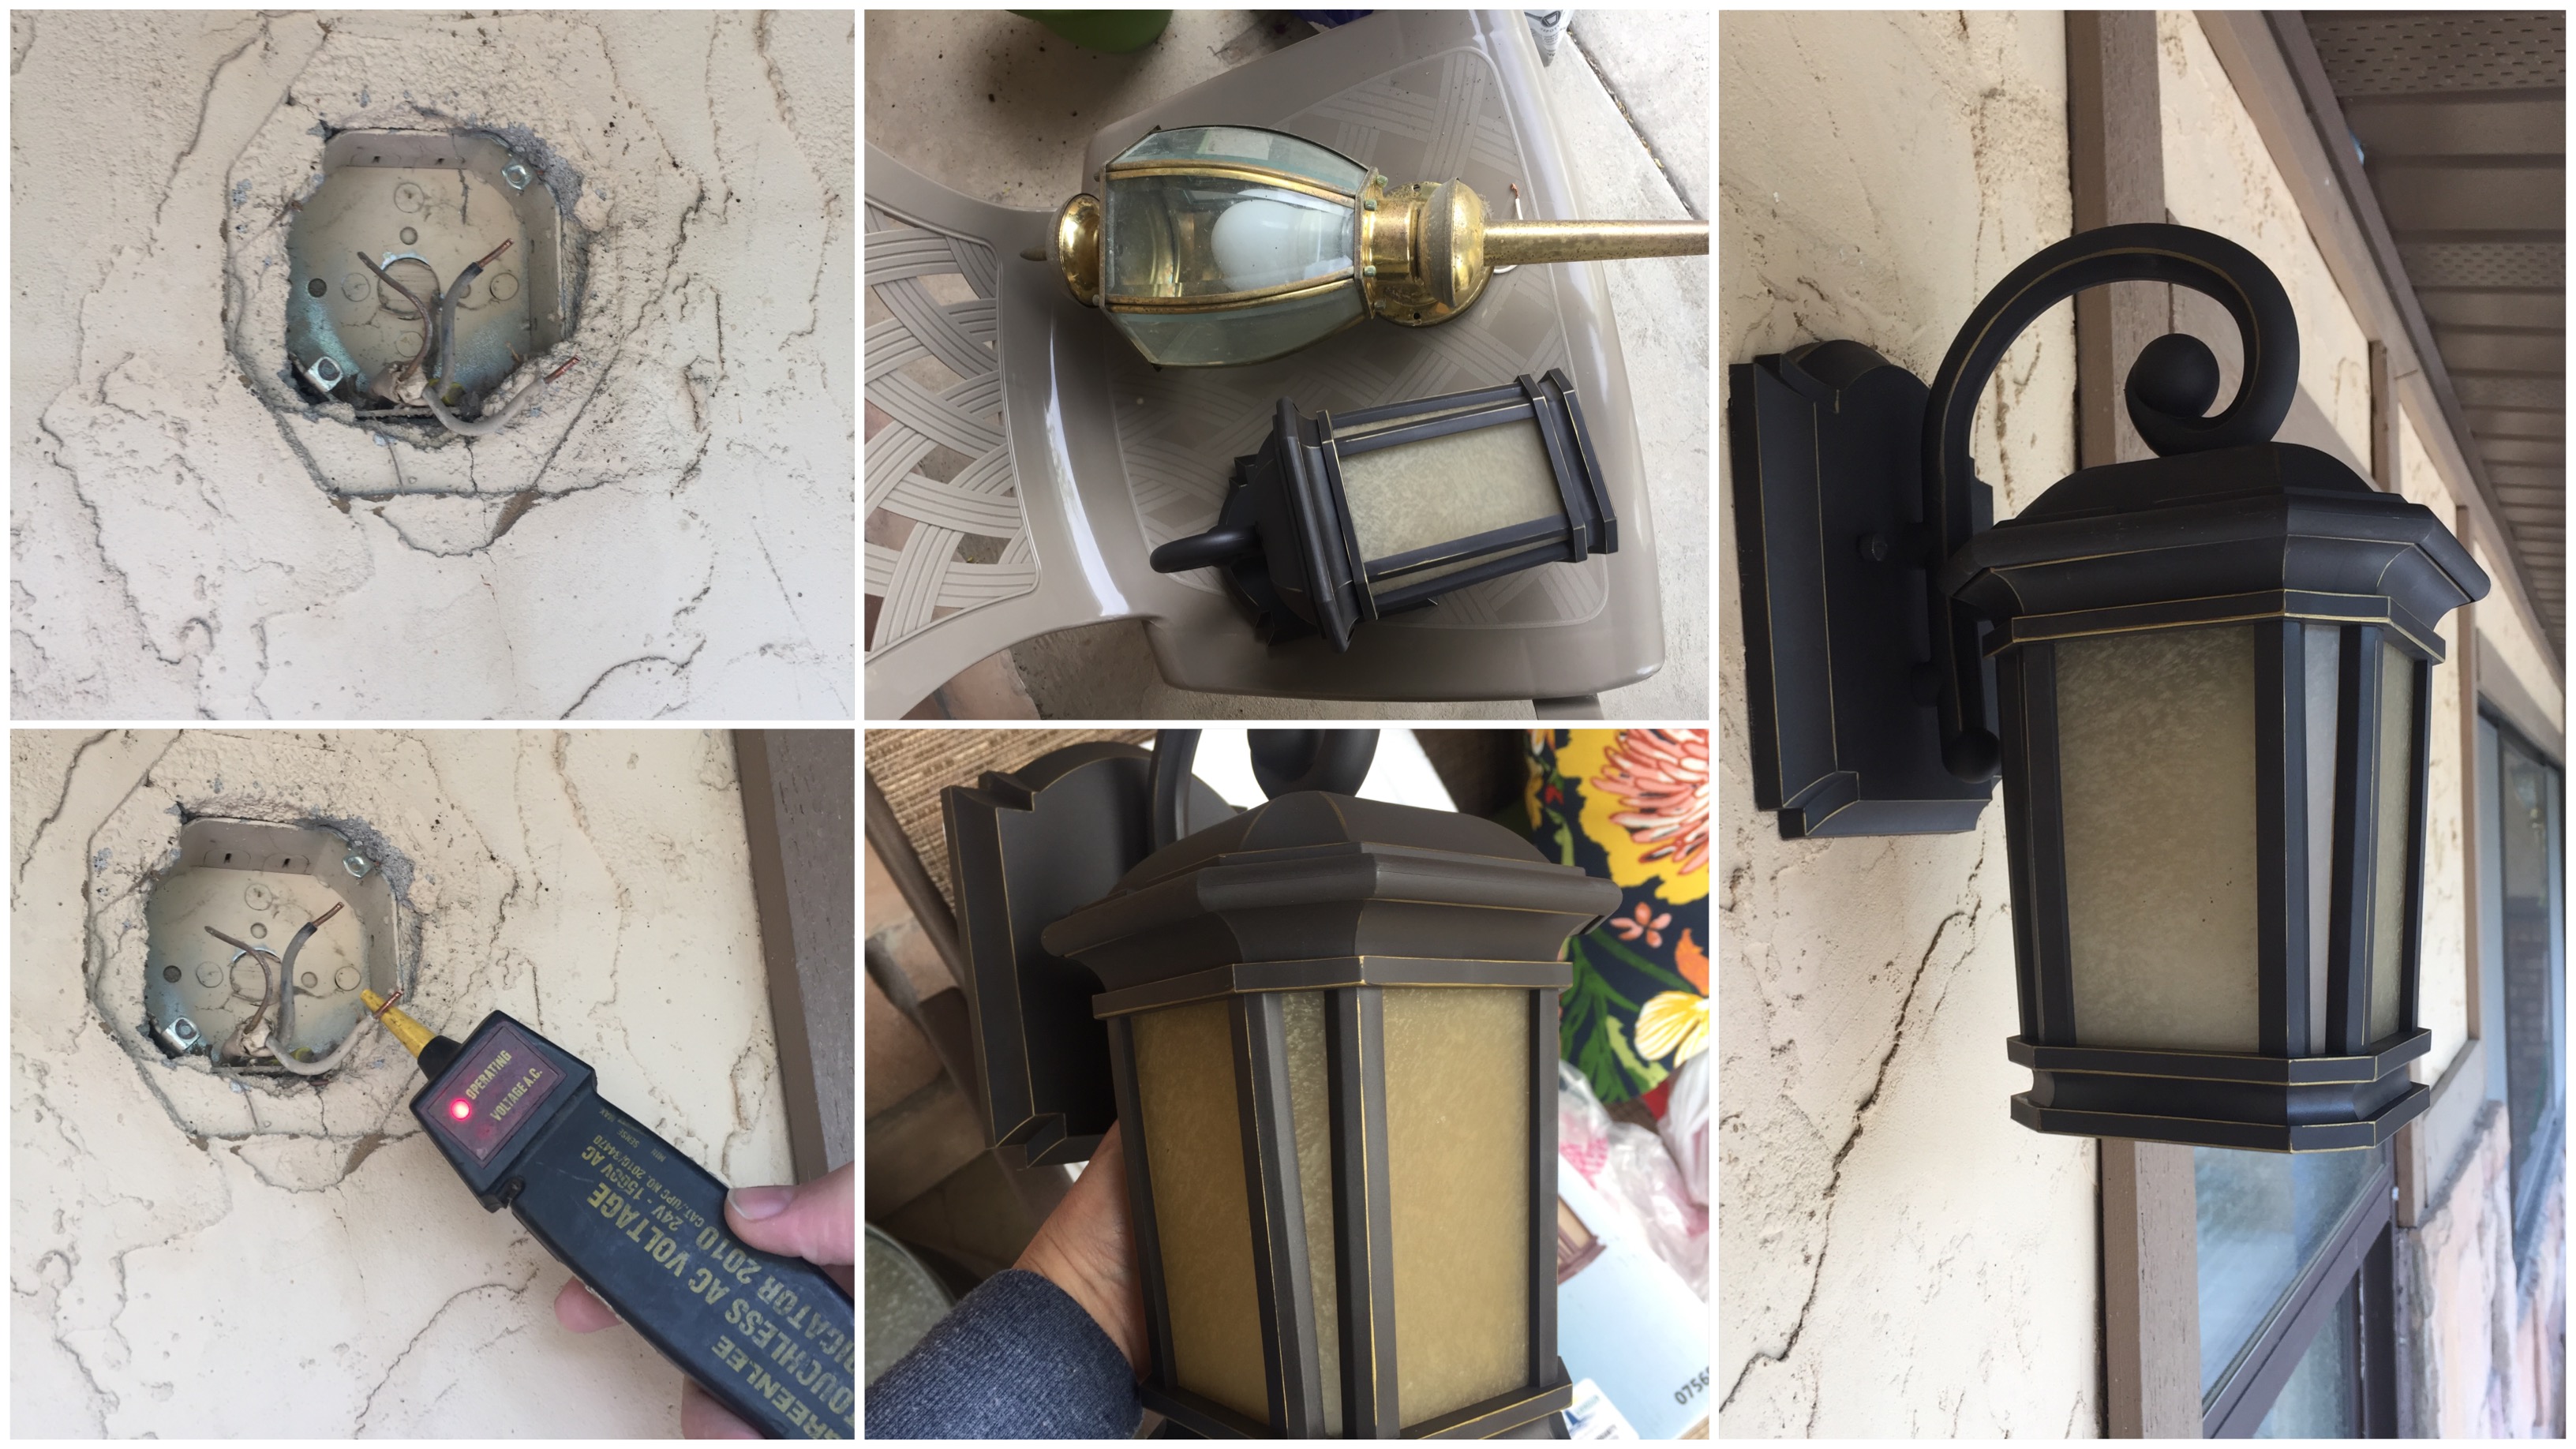
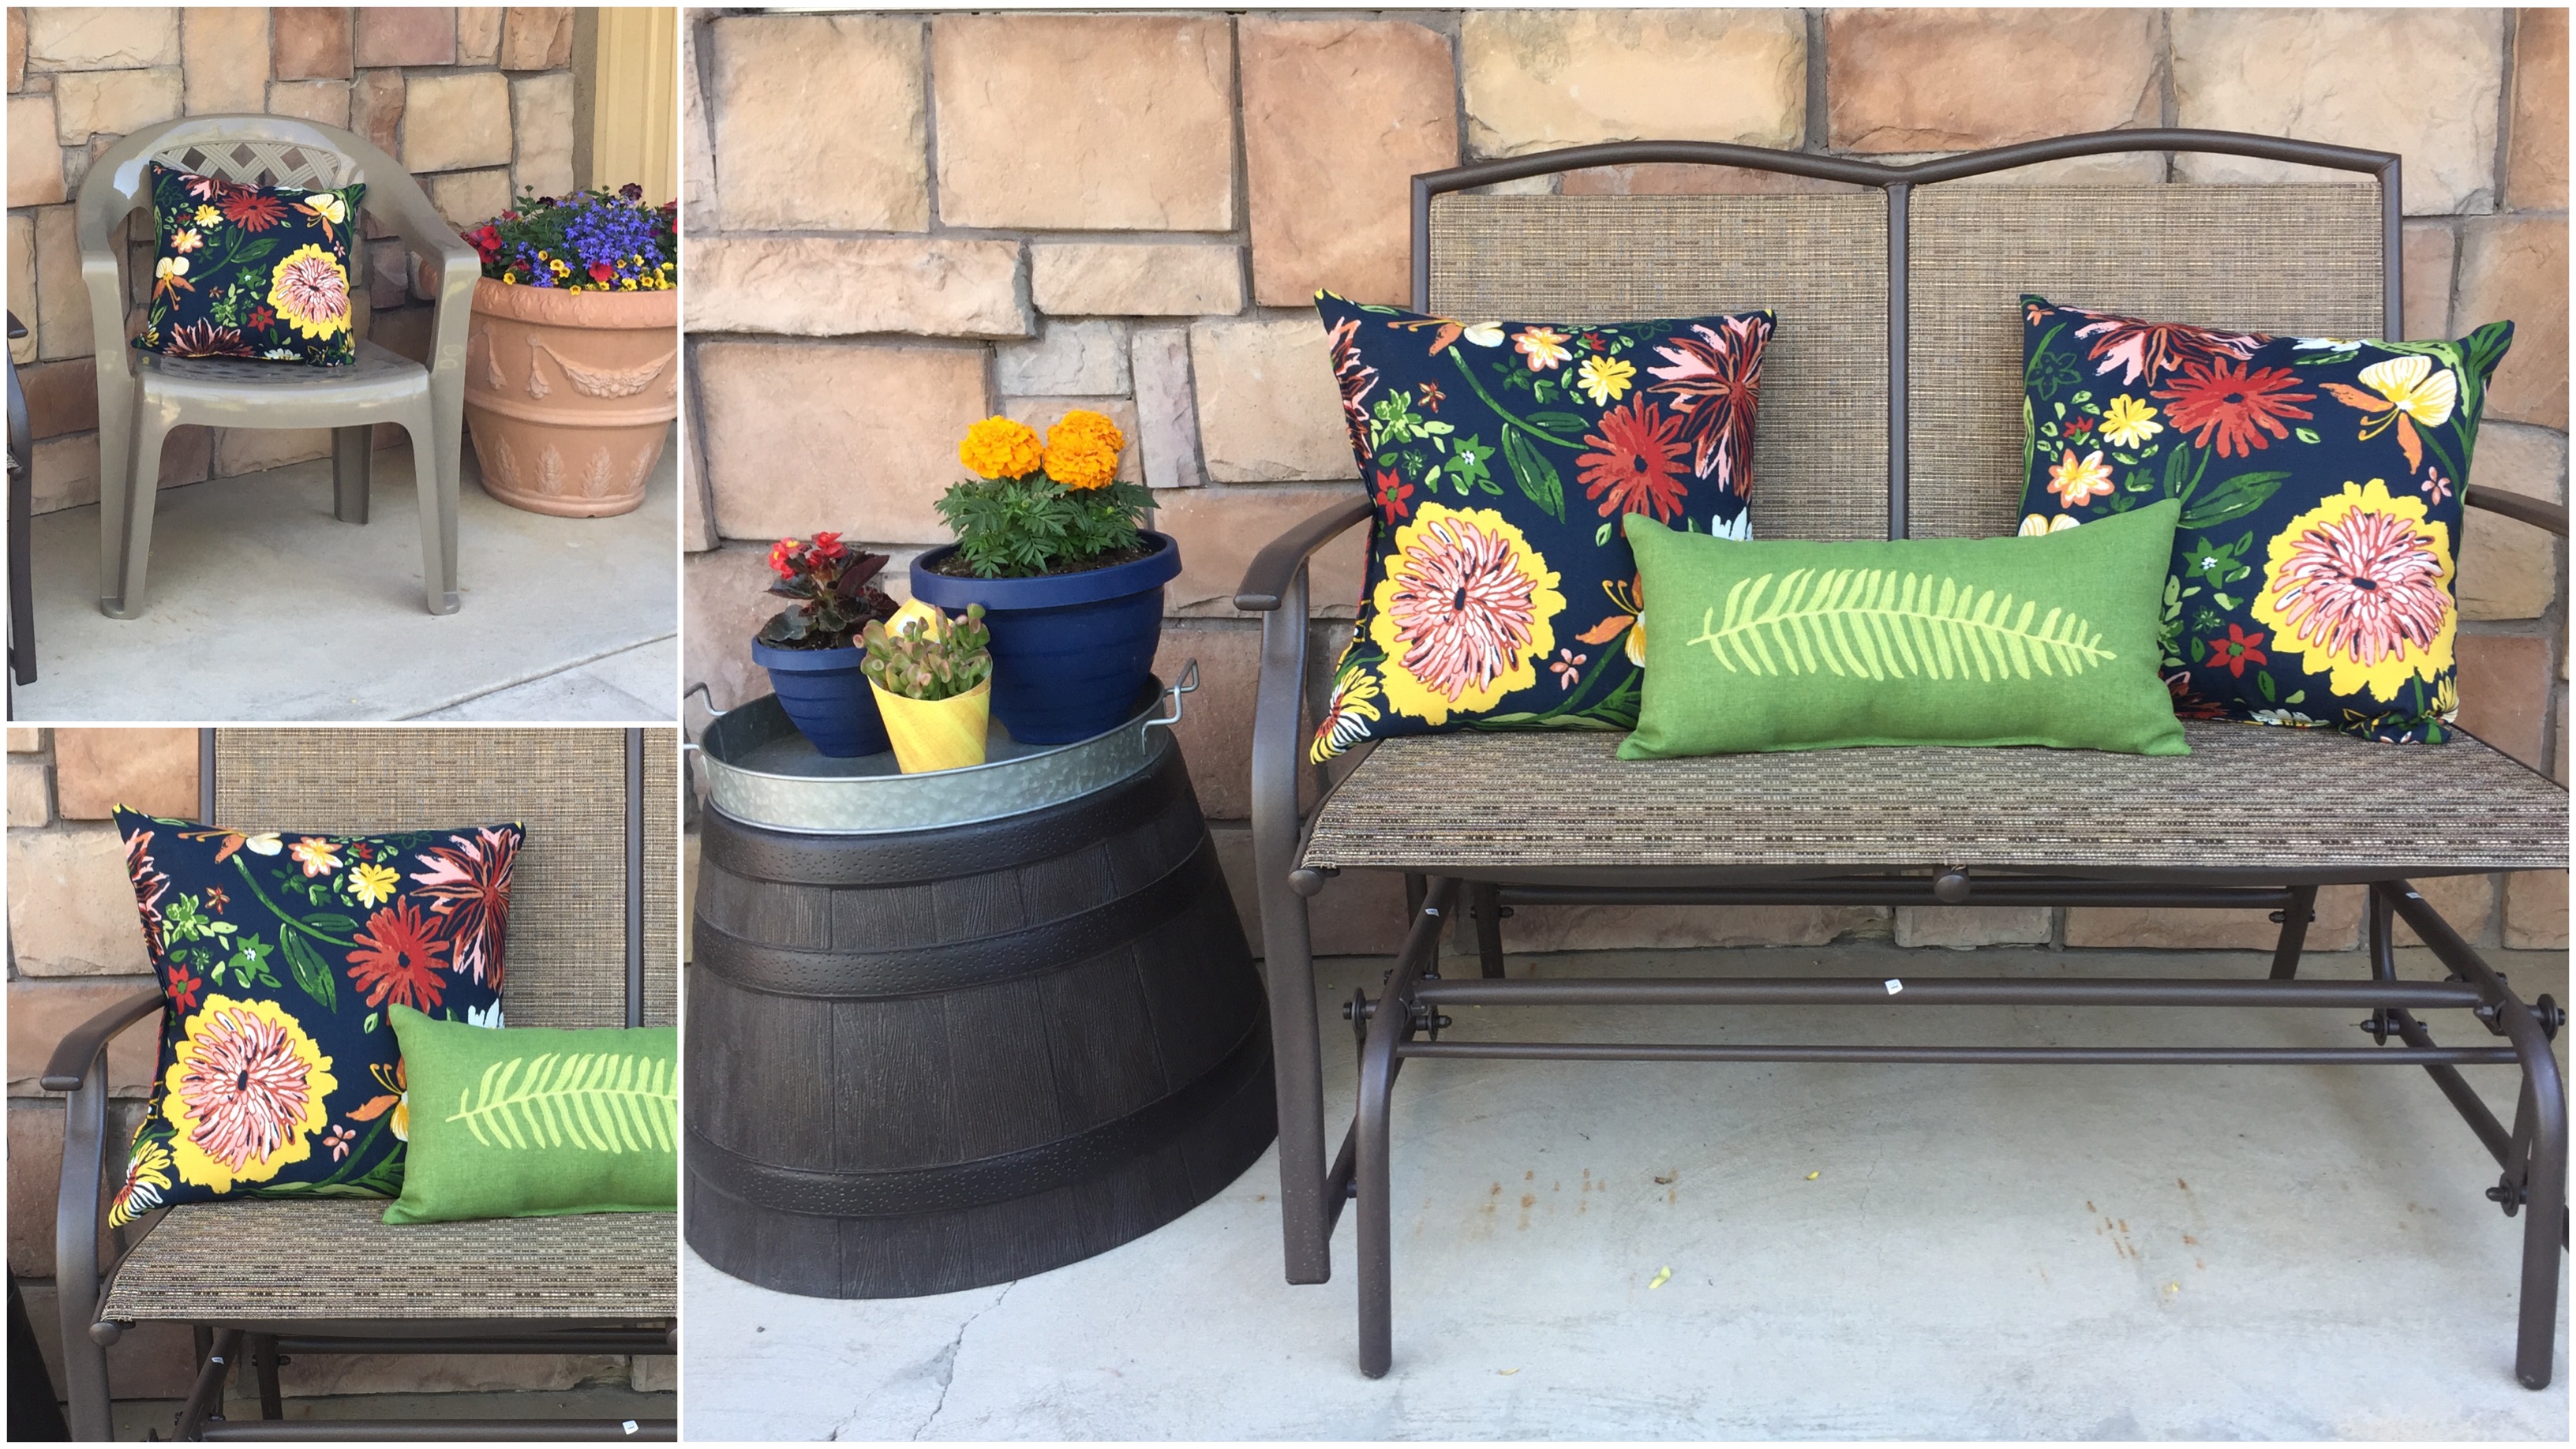
Light fixtures. This swapout definitely gave us some bang for our buck! As you can see these old brass fixtures have seen better days, and for $39 each we were able to switch them out for a much more modern fixture. I honestly never really noticed how bad those old light fixtures looked until we changed them. The new ones give such a polished. complete finish! These lights were surprisingly easy to switch out as well–no electrician required. Just make sure you go to your circuit breaker and turn OFF the power to the porch light before you replace it. THIS STEP IS KEY to avoid getting zapped!
Fun pillows. Adding pillows to the outdoor furniture really gave a great splash of color and made the porch a lot more inviting. The pillows also made our $14 plastic chairs from Home Depot look a lot classier! These pillows are made with outdoor fabric so they can withstand some of the elements without wearing down or molding. The great part is that you can switch the pillows out quite easily and change the whole look of the porch for different seasons.
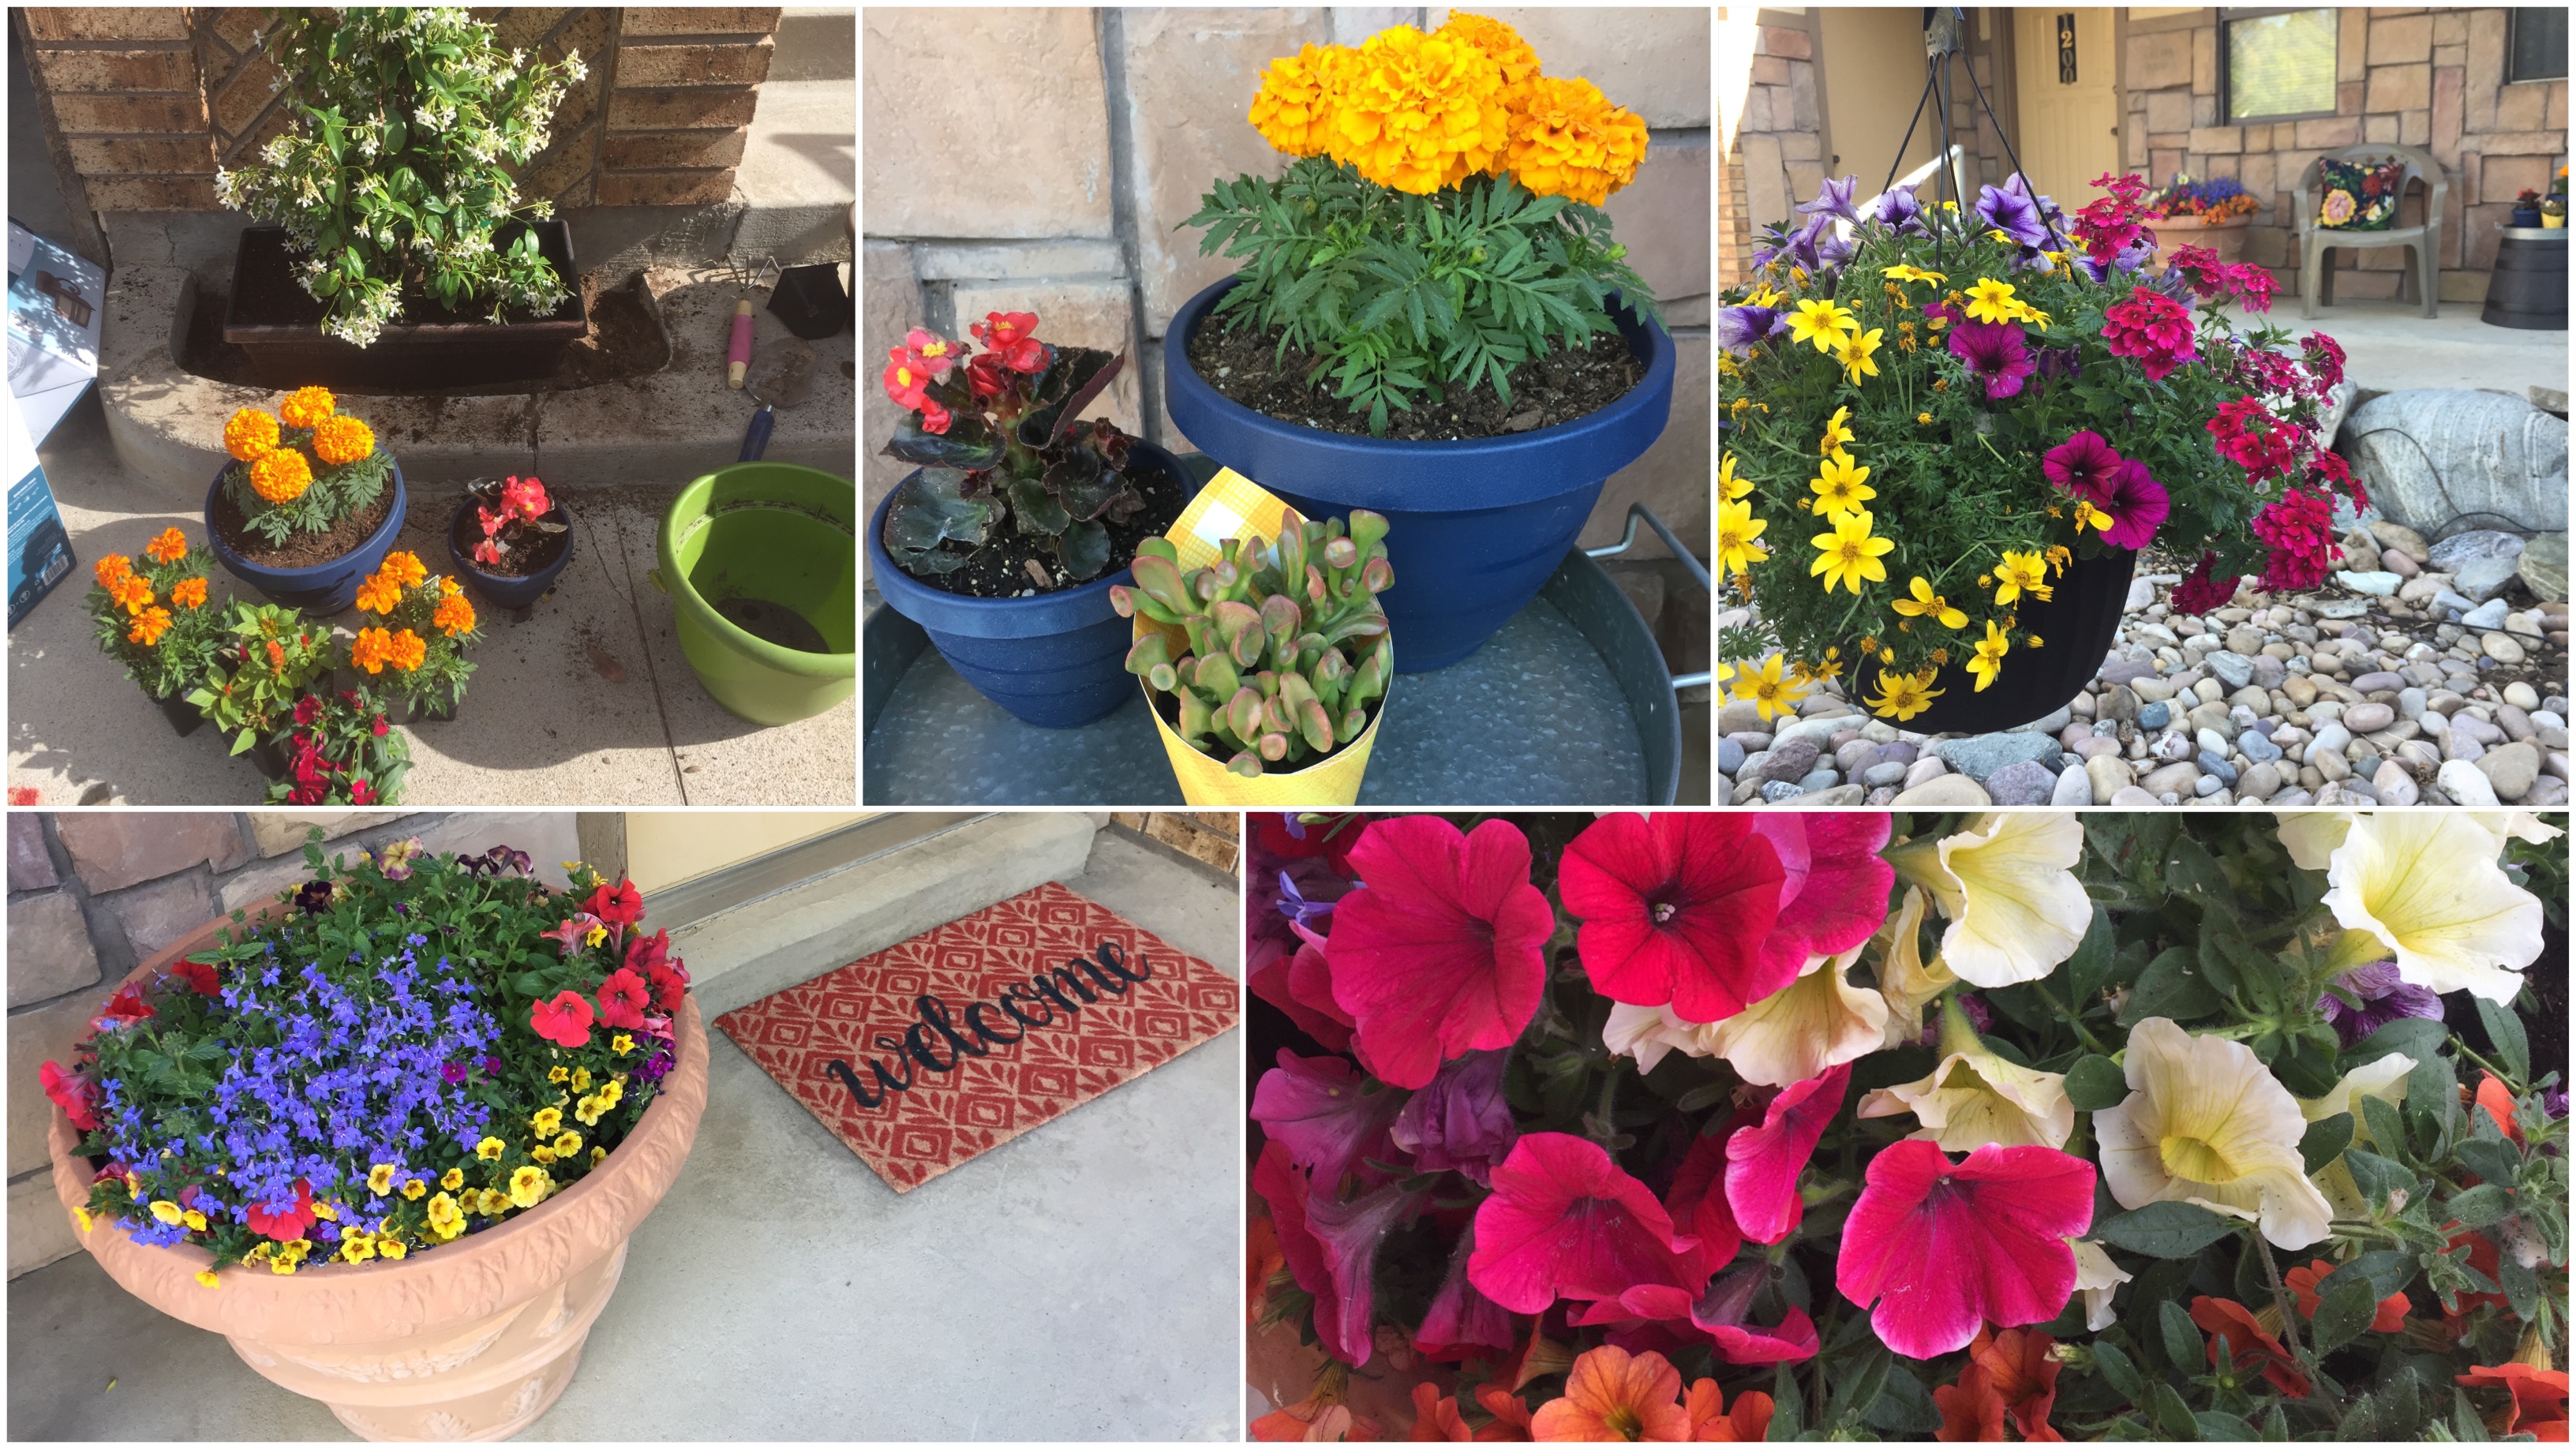
Flowers. And lots of them. I tend to have a black thumb when it comes to plants, but flowers add so much life I knew we had to include them in the porch makeover. My sister taught me a great trick though–that is to buy those large blooming hanging baskets and then plant them in a large pot with soil, rather than growing each plant one by one. Usually those baskets have multiple flower types already grown and blooming, then all you have to do it get them in the soil and water them. It made the pots look like they had been growing all summer long!
Hopefully you’ve been inspired by our simple porch reno and ideas for your own porch have started popping into your head. Here are the links to all of our porch renovation items. Take a look and happy porch planning!
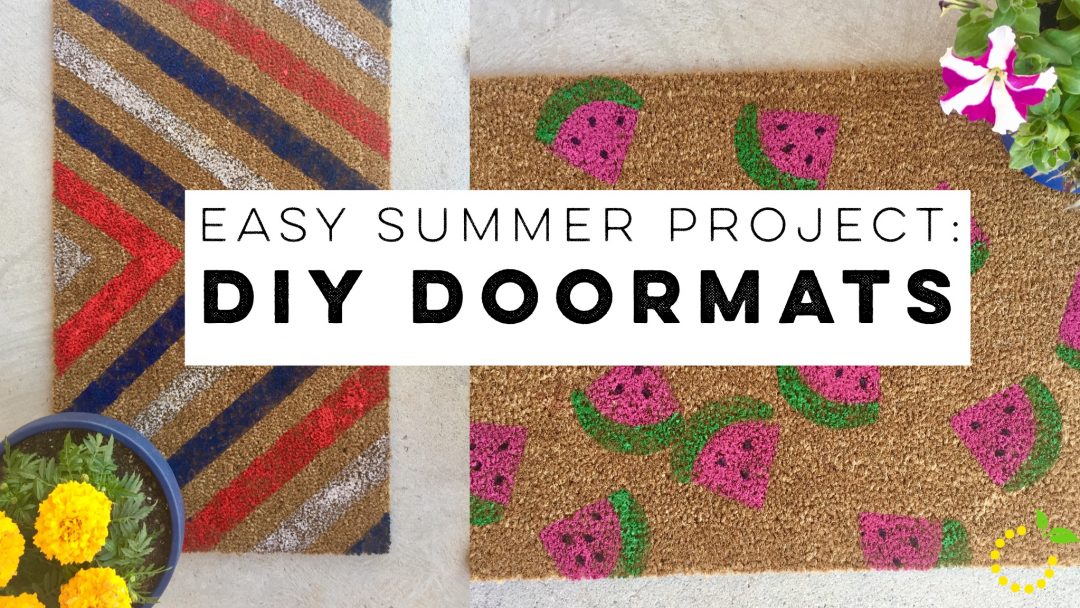
I’m the kind of person that thinks in seasons. On Pinterest I literally have my food boards split into seasons (summer food, fall food, etc). Eating a watermelon basil salad in November just feels wrong, almost as weird as eating cozy chicken pot pie in May. Am I right?? This seasonal framework carries over into my decor, especially on my porch! You guys know what I mean…you have the winter wreath, the spring wreath, the summer wreath,etc. Now I’m kind of obsessed with having seasonal doormats as well. I’m in the process of helping my mom do a “porch makeover” (stay tuned for the big reveal next week) and we needed some fun, summery doormats! My fellow blogger and Target partner-in-crime, Ashley, found some good options, but my parent’s house is tricky and it has three front doors (yeah, three?!?) and we couldn’t find three of the same mat! But sitting next to the picked-over piles of cute mats, was a pile of plain, natural doormats and that’s when the idea struck! Let’s just paint our own! So we did some googling and figured out what we needed, thought about some designs, and went at it. We decided to do a fun watermelon theme on one set and a patriotic theme on the other set (perfect for the upcoming 4th of July holiday).
Some projects we get ourselves into seem super easy, but end up being more complicated and time consuming than we ever thought possible. This project was the opposite! It was super simple and worked out just as easy as had hoped it would. It would even be a fun project to do with kids. It also makes a great gift idea for a new home-owner or anyone that appreciates a little pizazz on their porch! Check out all the details below.
Supplies:
Plain, natural doormat (you can buy them for $10 at Target, Home Depot, or Ikea)
Large all purpose sponge (with curved edge)
Painter’s tape (you know, the green or blue stuff)
Outdoor acrylic craft paint (2 oz bottle of each color)
Waterproof clearcoat/sealer (for extra protection)
Large all-purpose scissors (for cutting sponge)
Small sponge paint brush (for touch ups)
Fine bristle paint brush (for accents/details)
Paper plate (for paint)
Sharpie marker (to make sponge stencil)
Tarp or sheet (to protect floor from paint)
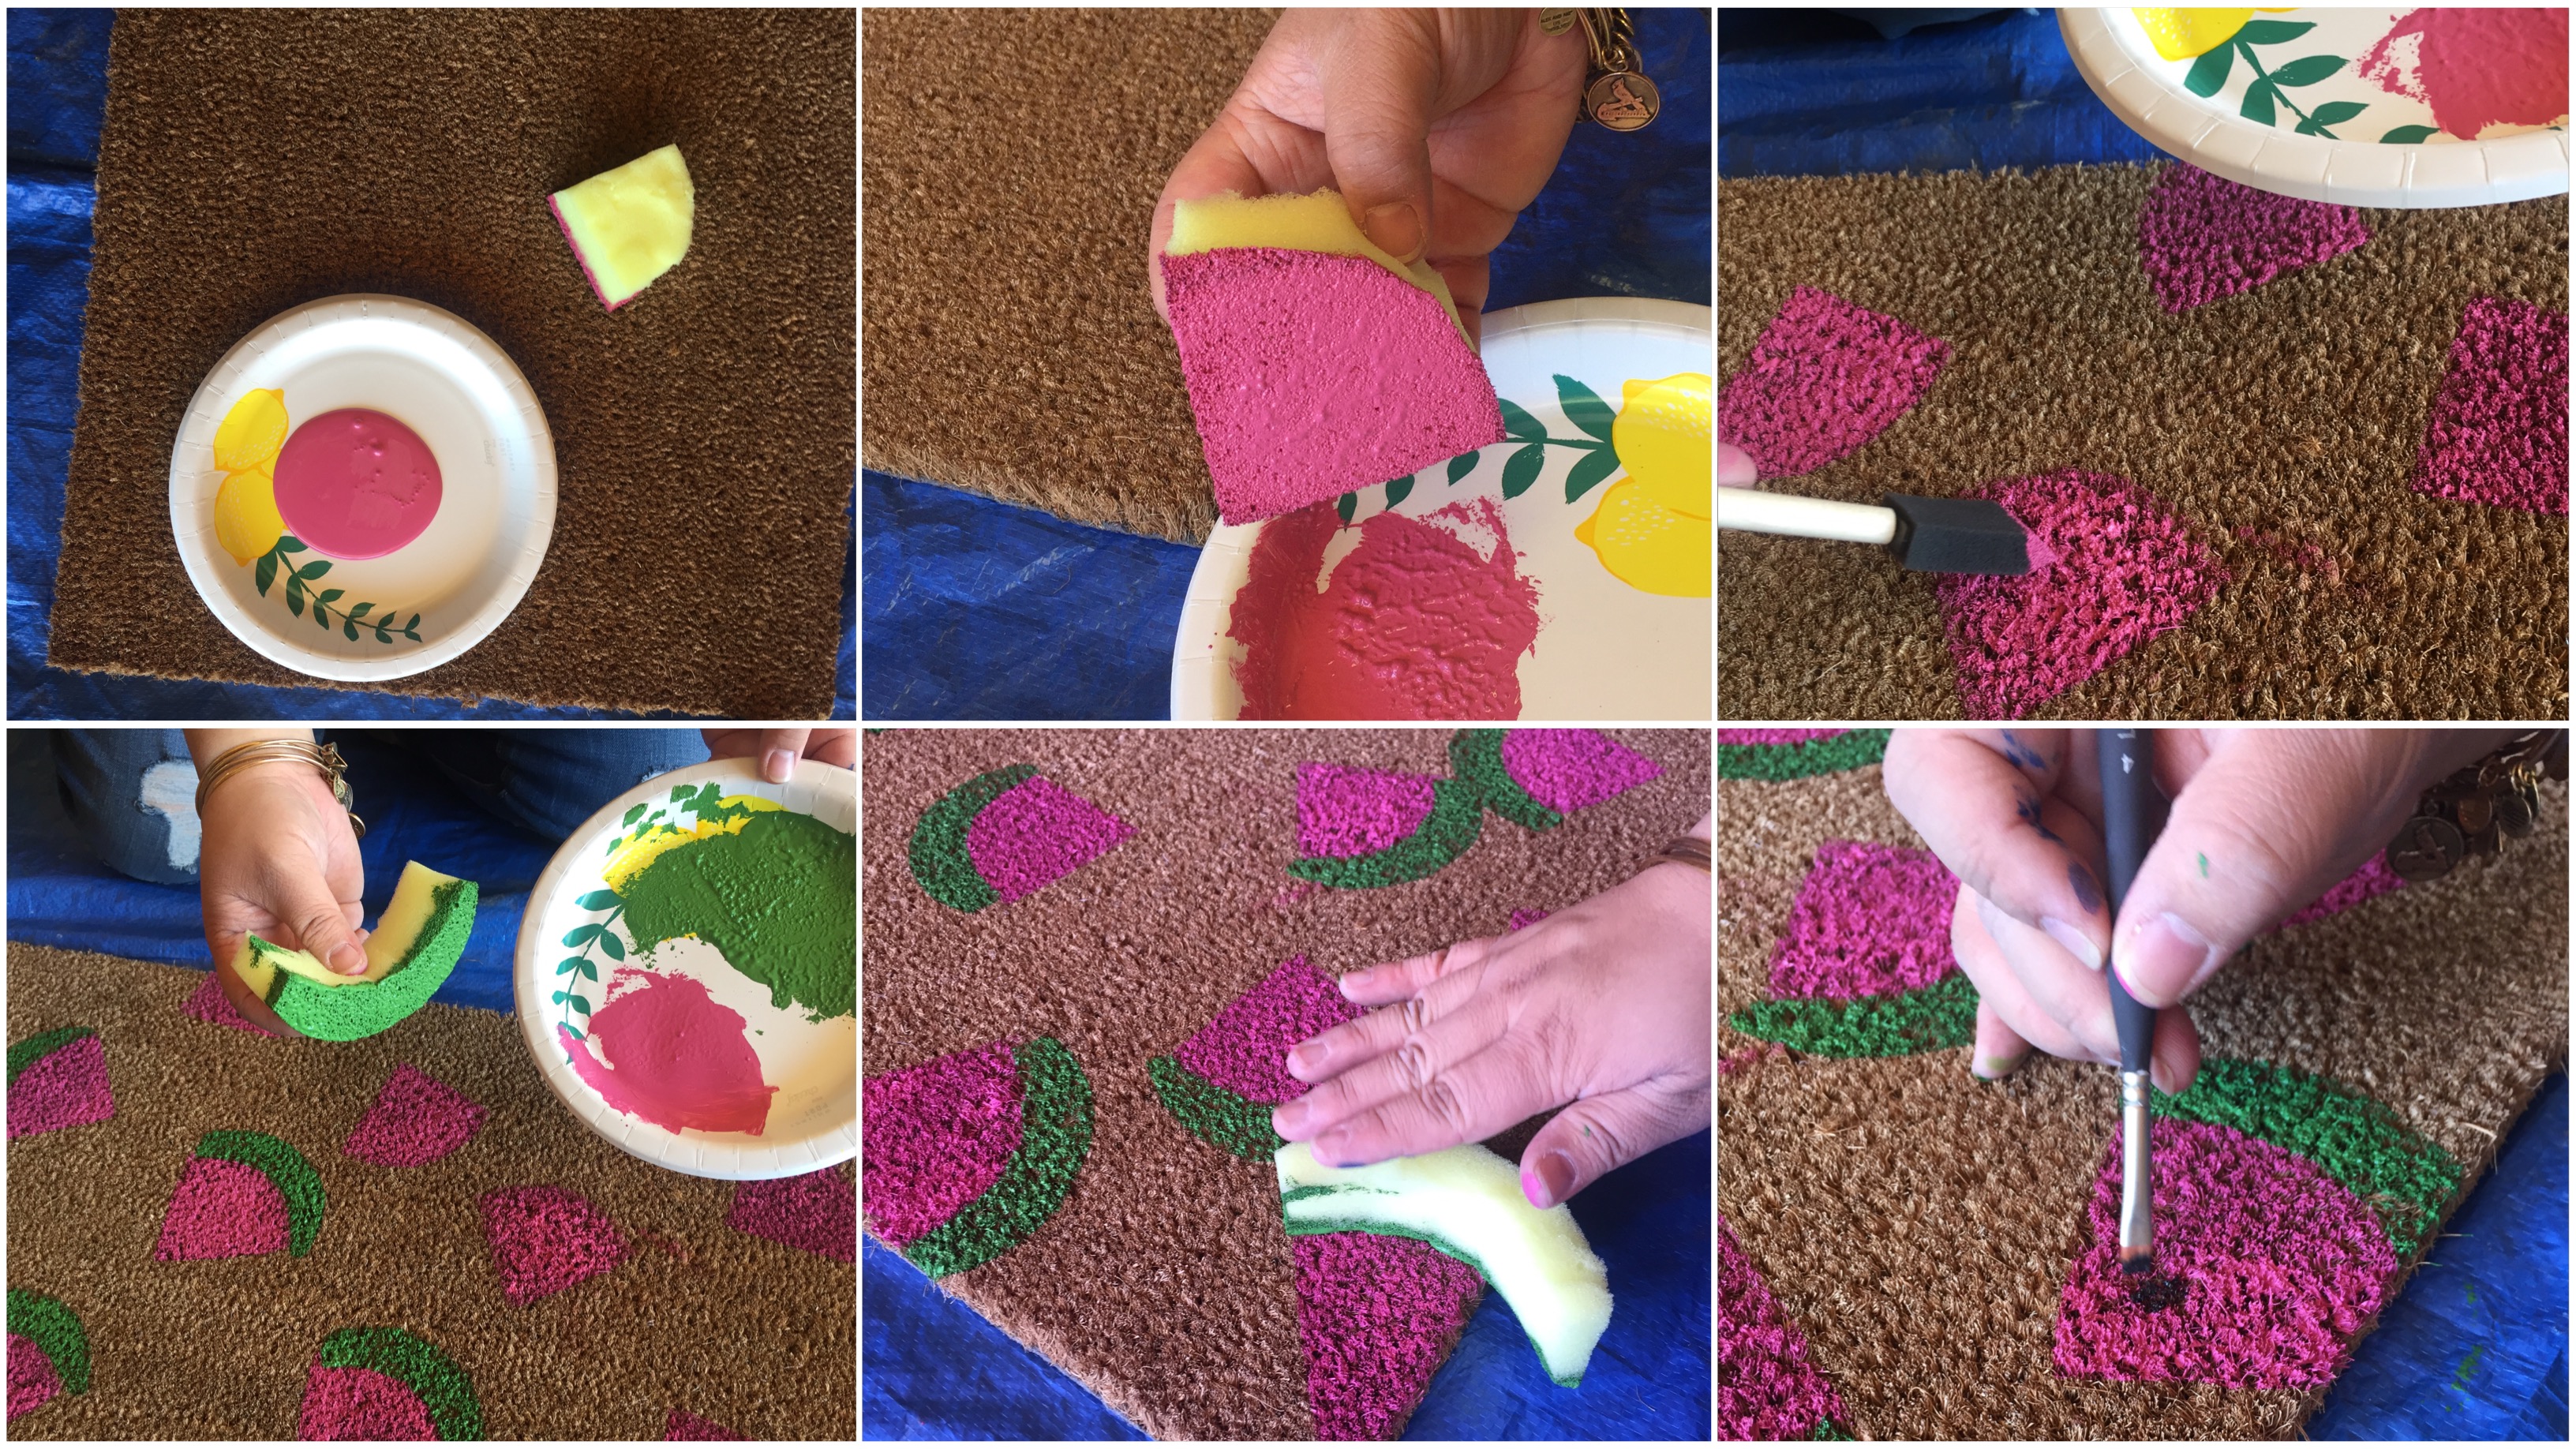
Directions for Watermelon Doormat:
Lay down the tarp to cover your floor.
Shake or wipe off doormat with a towel to get any dirt or dust off.
Using a stencil or freehand, take the curved end of the sponge and draw a triangle coming to a point in the middle of the sponge, making the shape of a watermelon slice. Then draw the curved line about ½ inch to ¾ inch from the curved edge to make the watermelon rind.
Cut out the watermelon shape using scissors. Our sponge was really thick, so we also cut the shape in half so it was easier to work with. You should have one piece cut for the watermelon slice and one piece for the rind.
Pour entire 2 oz bottle of pink paint onto paper plate (don’t pour the green paint yet–it will dry out) and dip watermelon slice into the paint. Make sure there is a thick coating of paint on the sponge.
Stamp the watermelon slice onto the mat and press firmly around the entire shape to ensure the paint transfers from the sponge to the mat. Repeat this process until the mat is covered with a random pattern of watermelon slices.
Allow pink slices to dry about 15 to 20 minutes before stamping the green rind.
Once the slices are dry, pour green paint onto a new paper plate and begin stamping the rinds on each watermelon slice. Allow to dry.
Next, taking the fine bristle paintbrush and black paint, begin painting small oval-shaped seeds on each slice of watermelon. Allow to dry.
Finally, spray the mat with two coats of craft clear coat/sealer (waiting 15 minutes between coats). If you use outdoor paint this isn’t necessary, but will help protect the mat even more.
Directions for Patriotic Design:
Shake or wipe off doormat with a towel to get any dirt or dust off.
Find center of the doormat by folding in half and marking subtly with Sharpie.
Starting in the center, take the painter’s tape and make a line from the center of the mat to the bottom left-hand corner. Repeat and make a similar line from the center to the right-hand corner.
Press the tape firmly into the mat (I rubbed the closed paint bottle over and over the tape until it was fully adhered). This is key to ensure that you have crisp lines and your paint won’t bleed through!
Continue applying the tape in the same fashion to complete the pattern shown.
Gather the paint, you will need a full 2 ounce bottle for each of the three colors, red, blue, silver.
Determine which sections will be which color, I did an alternating pattern of red, blue, silver, blue, red, silver.
Starting with the red, pour paint onto paper plate and paint ALL the red sections. Next, pour the blue paint onto a new paper plate and paint ALL the blue sections. Lastly, pour the silver paint onto a new paper plate and paint ALL the silver sections.
Allow the paint to dry for 15 to 20 min (faster if you put it in the sun) before removing the tape! It’s worth the wait…you’ll mess up your crisp lines if you don’t wait.
Finally, spray the mat with two coats of craft clear coat/sealer (waiting 15 minutes between coats). If you use outdoor paint this isn’t necessary, but will help protect the mat even more.
Tip: we tried it using both the sponge paint brush and a cut square of the large sponge used for the watermelon and FYI the piece of the big sponge worked way better and had better pain coverage than the sponge paintbrush.
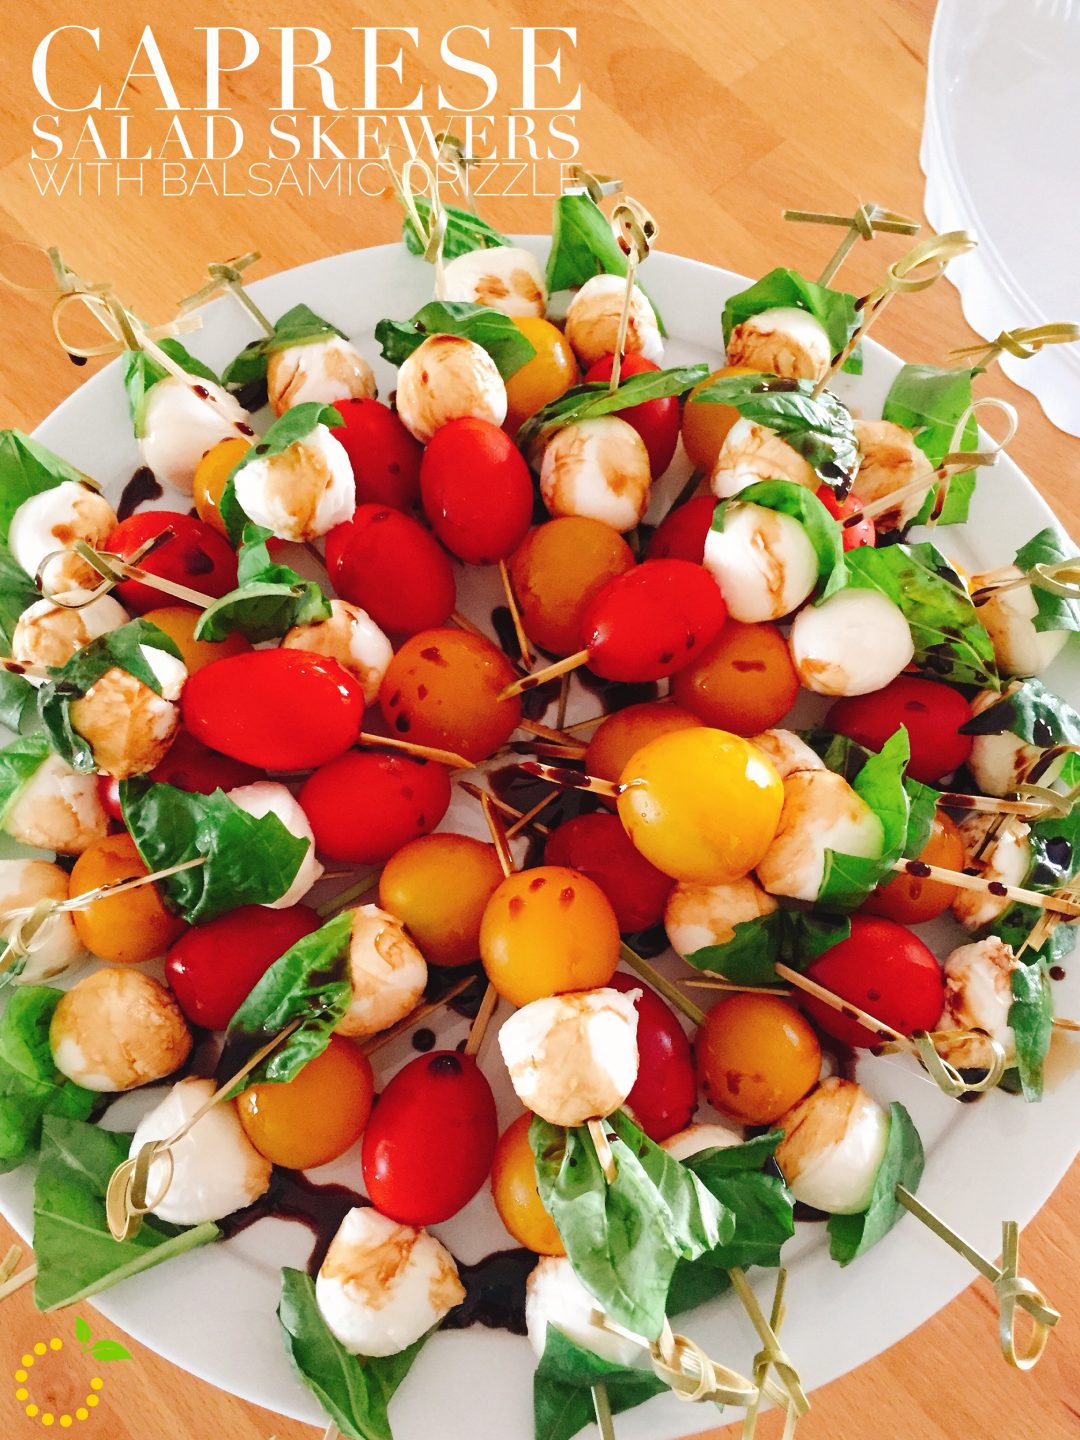
Even though we had a winter day in May here in Utah, it’s starting to feel like summer. And that means BBQ grillin’ time and summer foods! These Caprese salad skewers are perfect bites of freshness and assembly is as easy as 1…2…3!
Basil
Mozzarella ball
Tomato
Made with fresh mini mozzarella balls, skewered with tender basil leaves and juicy tomatoes and drizzled with balsamic vinegar. Tip: You can use a plain balsamic vinegar or try our secret ingredient–pomegranate balsamic vinegar from a local Ogden restaurant called Hearth on 25th! You can also find it online here.
This stuff is delicious! This simple appetizer will have people coming back for more and I know they won’t be able to eat just one!
Balsamic vinegar or our favorite pomegranate balsamic vinegar
Toothpicks or bamboo skewers
Instructions
Drain mozzarella balls.
Wash and dry tomatoes and basil leaves.
Cut basil leaves if too large.
Assemble skewers--basil, mozzarella ball, and then tomato.
Plate and drizzle with balsamic vinegar.
Serve and enjoy!
Notes
Tip: If you would like to make the balsamic into a glaze here are the instructions.
1.Over high heat, bring balsamic vinegar to a boil in a saucepan. Lower heat to medium and simmer for about ten minutes, or until it has slightly thickened.