Browsing Category

Create

Create

DIY Fall Mason Jars

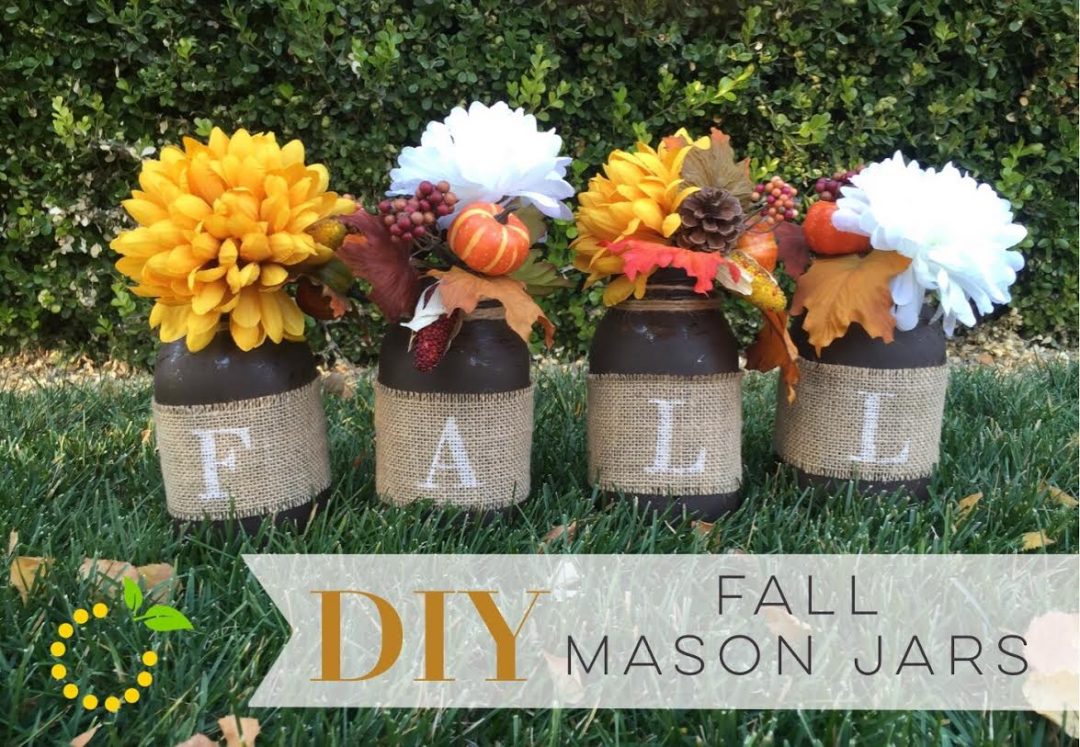
All I have to say is—I LOVE MASON JARS!! Who else loves them too? I practically use them for everything! I use them for drinks, storage, serving dishes, canning, and of course decor! These DIY fall mason jars make a great statement decor piece. The great thing about these jars is you can spell out any fall word you would like to incorporate into your decor. The possibilities are endless! So gather up your supplies and get crafting. This DIY project is easy and can be done before your guests show up for Thanksgiving festivities!

Supplies

  • Mason jars-wide mouth quart 
  • Paint–for both the jars and the letters
  • Sponge brush
  • Burlap
  • Scissors
  • Letter stencils–I made my own with my Silhouette or you can free hand paint your letters
  • Glue gun
  • Coarse sandpaper
  • Letter stencils or a Silhouette cutting machine and vinyl

Directions

  1. Wipe down all mason jars to remove any dirt or oil.
  2. Paint mason jars. Tip: for a distressed look, paint thin coats of paint. Too thick of coats will take longer to dry and harder to sand.
  3. Let paint dry for a couple of hours or until paint is not tacky to the touch. Tip: if you start to paint your second coat too soon, the paint will start to peel and ball up. If you can, letting it dry overnight is best.
  4. Repeat another thin layer of paint and let dry. I chose to just paint 2 layers since I planned to distress and sand them. Don’t worry if some of the glass is peeking through your paint—it just makes the sanding process faster.
  5. Repeat steps 3 & 4 if a more solid look is desired.
  6. While you wait for your paint to dry, cut your stencils if you are making your own.
  7. Cut your burlap down to size.
  8. Wrap burlap around your jars and hot glue ends to secure.
  9. Place stencil onto the burlap and apply paint, repeat, and let dry.
  10. And embellish!

Create

Favorite Apps that spark Kids’ Imaginations

I’m a bad mom. That’s right, I said it. I let my three-year-old daughter watch videos and play games on the iPad. Before my daughter turned one, I was super admit that I would really limit her screen time and only use the iPad or phones every once in a blue moon. Then Olivia turned two and things got real! If you’ve ever had a two-year-old or have even been around one for a short period of time, you know what I’m talking about. I’ve lost track of the number of times those devices have prevented meltdowns, allowed me to eat dinner, have a conversation or even use the restroom in peace.

ipad apps for kids sweetlemonmade.com


Ok, I don’t really think I’m a bad mom. Olivia has actually learned a lot using the iPad by playing different educational apps. There are quite a few she loves to play, but my favorites are from Toca Boca. These games are so much fun, I even take a turn.

Toca Boca is an award-winning play studio that makes digital apps for kids. According to the company’s website, “We make digital toys and games that help stimulate the imagination.” 

My friend Stacy showed me the Toca Boca apps and I couldn’t believe how fun they were. They really do allow you to tap into your imagination. So far, we’ve downloaded around five of the 36 apps they have available. The ones we currently have on our iPad are:

Toca Kitchen: The app allows you to choose and prepare food for hungry characters. You can slice carrots, fry fish or puree broccoli. You can cook and combine any of the food items available. 

Toca Hair Salon: You can run your own Hair Salon using this app by cutting, coloring, combing and blow-drying hair on six different characters. You can create any hair style you want.  

Toca Pet Doctor: This one is my favorite! In this app, you get to take care of 15 animals who need your loving care. Through innovative play you can help a dove, clean up a puppy, fix a bird’s wing or untwist a worm.

Toca House: You can help five friends to fun chores around the house by doing dishes, ironing, sweeping or planting flowers in the garden. 

Toca Store: This app is so much fun. You can go to the store, pick out your groceries and pay using coins in the cash register. 

I can’t say it enough. These apps are so much fun, you’ll be stealing them away from your kids so you can take a turn. Download them now and let us know which ones are your favorites!

Create

Pumpkin Carving Made Easy!

Raise your hand if you love Halloween and all it’s pumpkin-y fanfare…. Yes, me too. I love decorating and carving pumpkins, but pumpkin guts make me want to barf. Seriously, even the thought of scooping that stringy stuff makes me queasy. I don’t know why, but I hate it. So when my friend showed me this magic tool that cleans out those slimy pumpkin innards in a matter of seconds, I was amazed. Even if you don’t have a hard-core aversion to inner pumpkin mush, you’ll still love this. This little tool attaches to any drill (yeah, like the one your husband has in the garage) and guts the entire pumpkin in a matter of seconds. Score!! Watch the YouTube video below to see this baby in action and click here to buy this little piece of genius right now on Amazon.

image-1-2

Create

Simple DIY Halloween Box

If your short on time or just want something simple to make, this project is for you! And the best part is that the box can be used in so many different ways. It’s the perfect statement piece for my coffee table. I love that I can use the box over and over! It’s nice because each holiday or season I can easily change out the decor to match. For this Halloween box, I found a couple pre-made, store bought pieces at Target in the infamous Dollar Spot section (that spot gets me in trouble every time 🙂 Who else can resist that section?) to make decorating a little bit easier when you have limited time to craft. The mummy is also super easy to make too!


Wood Box Supplies:

  • 3 – 1 x 6 Pieces of reclaimed wood or store bought wood boards cut down to 17″
  • 2 – 1 x 6 pieces of reclaimed wood or store bought wood boards cut down to 7″
  • Nail gun
  • Wood stain/paint (optional if using store bought boards)

Directions:

  1. First cut all of your 1 x 6 boards down to size.
  2. Using your nail gun nail each of the long pieces to the bottom piece and then nail small end pieces to the outside of the bottom and long side pieces.


Wood Mummy Supplies:

  • 2×4 piece of wood cut down to 9″ tall
  • Cream/off white spray paint
  • Cheese cloth
  • Wood circles 
  • White and black paint
  • Paint brush
  • New No. 2 pencil with eraser
  • Wood glue
  • Wood stain
  • Latex gloves
  • Hand staple gun 

Directions:

  1. Cut 2×4 down to 9″ tall.
  2. Spray paint and let dry.
  3. Paint wood circles with white paint and using the eraser, dip it into some black paint and dot your eyes. Set aside to dry.
  4. Cut cheese cloth into strips of varying widths.
  5. Put on your latex gloves and dip a couple of fingertips into your wood stain and brush it onto your cheese cloth to give it a spooky look.
  6. Glue eyes on with wood glue.
  7. Wrap strips around your wood piece alternating angles and directions to give it a more mummified look stapling the end pieces to the back of the mummy with a hand staple gun.

Other supplies:

  • Trick or treat sign–found in the Dollar Spot section at Target (last seasons Halloween decor)
  • Apothecary bottle–found in the Dollar Spot section at Target (current find)
  • White and black Pom Pom garlands–found in the Dollar Spot section at Target (current find)
  • Burlap

Assembly:

  1. I stuffed the bottom of my box with a couple packing bubbles and tissue paper and covered it with some burlap to hide it to prop up the mummy, sign, and bottle.
  2. Place your items into the box and then string the garlands around.

Celebrate Create

DIY: Birthday Banners and Decorations

Over here at Sweet LemonMADE this week has been full of celebrating—both Emily and Megan had birthdays this week! I love celebrating birthdays! Growing up my mom always made birthdays a big deal. On the morning of your birthday as you entered the kitchen/family room the kitchen table was always covered with birthday paraphernalia—birthday tablecloth, birthday cake, birthday presents, and sometimes even blown up pictures of you for an added celebratory touch.  My mom would stay up until the wee hours of the morning to ensure this spread was perfectly placed and the cake was perfectly frosted. And although this fantastic tradition was known to us all, my mom would wait until we went to bed before she started creating birthday magic. I’m kind a glad she did. I loved walking out into a celebratory explosion, each year with a slightly different cake and dĂ©cor.

img_0250


Naturally, I have become very fond of celebrating birthdays and as the years go on, I love putting on a celebration for those I love even more.  As a result I have a clear Rubbermaid packed to the brim with birthday supplies. I call it my birthday box. In here I keep on hand at all times, decorations, candles, crepe paper, banners, birthday plates, etc. Everything you need to pull together an impromptu b-day celebration at the drop of a hat. What? What? Party people in the house!

img_0251

This birthday box and my weird obsession for buying fabric (even though I only barely know how to sew and only sew maybe one project a year) came in handy as my friend, Shelley, and I decorated for Emily’s birthday in the wee hours of the morning before Em got up for work. Em is a classy gal that loves diet Coke and all things gold, so it was easy to know what to surprise her with. And you know what I found out? Shelley has a birthday box too. No wonder we are friends.

img_0252

As you can tell, we pulled some super simple elements together to make a fun, snazzy birthday background. Here’s some info on all the things:

  • Gold curtain
  • Reusable birthday banner
  • Fabric—intended for some other project, unhemmed, but fit most of the table 🙂
  • Balloons—no helium here so we just blew them up and tossed them around like confetti
  • Pitcher of flowers—Target for the pitcher and grocery store flowers (since they are the only flower shop open at 6am)
  • Donut cake—Dunford chocolate chocolate donuts stacked into a pyramid (easiest and tastiest birthday cake ever! Those donuts are AMAZING)

img_0253

Seeing how we were working from TWO birthday boxes we had multiple banners, so we hung this little guy in the living room! This homemade cardboard banner is simple, but one of my favorite b-day decorations. All you need is a cardboard box, some twine, and paint and you can create your very own birthday banner.

img_0254

Snazzy Cardboard Birthday Banner:

Supplies:

  • Cardboard box (may need a couple depending on size)
  • Pencil or marker
  • Box cutter (razor cutter)
  • Paint (spray paint or ceramic paint)
  • Twine (long enough to string all your letters on)

Directions:

  1. Find a piece(s) of cardboard to fit the size of letters you want to make and wipe with a dry towel to remove any particles or dust.
  2. Using a pen or pencil draw block letters (or use stencil, or trace letters printed from your computer if your junior high block letter skills have faded) on the cardboard. Make sure to leave about an inch between letters so you can cut them out easily without injuring a close by letter.
  3. Once letters are cut, determine how you want letters to hang on twine and poke two holes near the top of the letter for the twine to thread through. I used a combination of a box cutter and a ball point pen to stab my holes.
  4. Next, paint each of the letters and allow to dry completely. Use two coats of paint to ensure full coverage and vibrant color.
  5. Finally, to complete the banner take the full-length piece of twine and thread each letter through the string. At the beginning and ending of each word tie a not in the twine so the letters don’t’ slide and the words stay distinct. Once all the letters are threaded on the twine, loop the ends (so it can be hung on push pin or nail) and leave at least 6-12 inches of twine on the ends (helpful if you need to tie the banner sometimes rather than hook it on push pins).
  6. Ta Dah! HBD to all your people!

img_0255