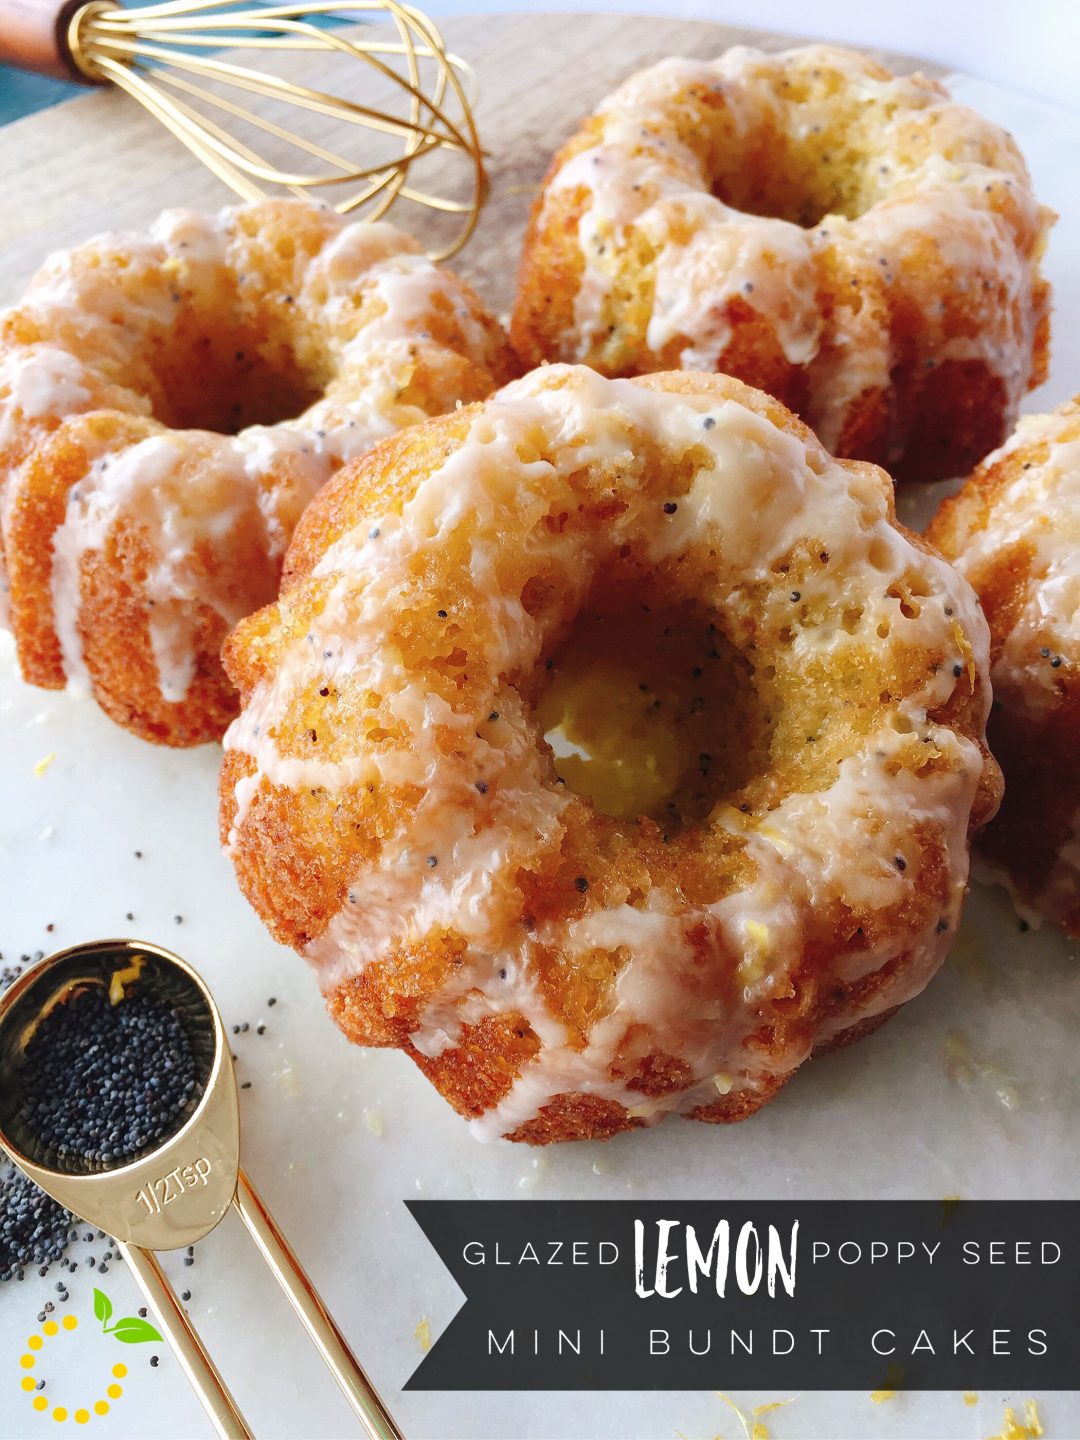
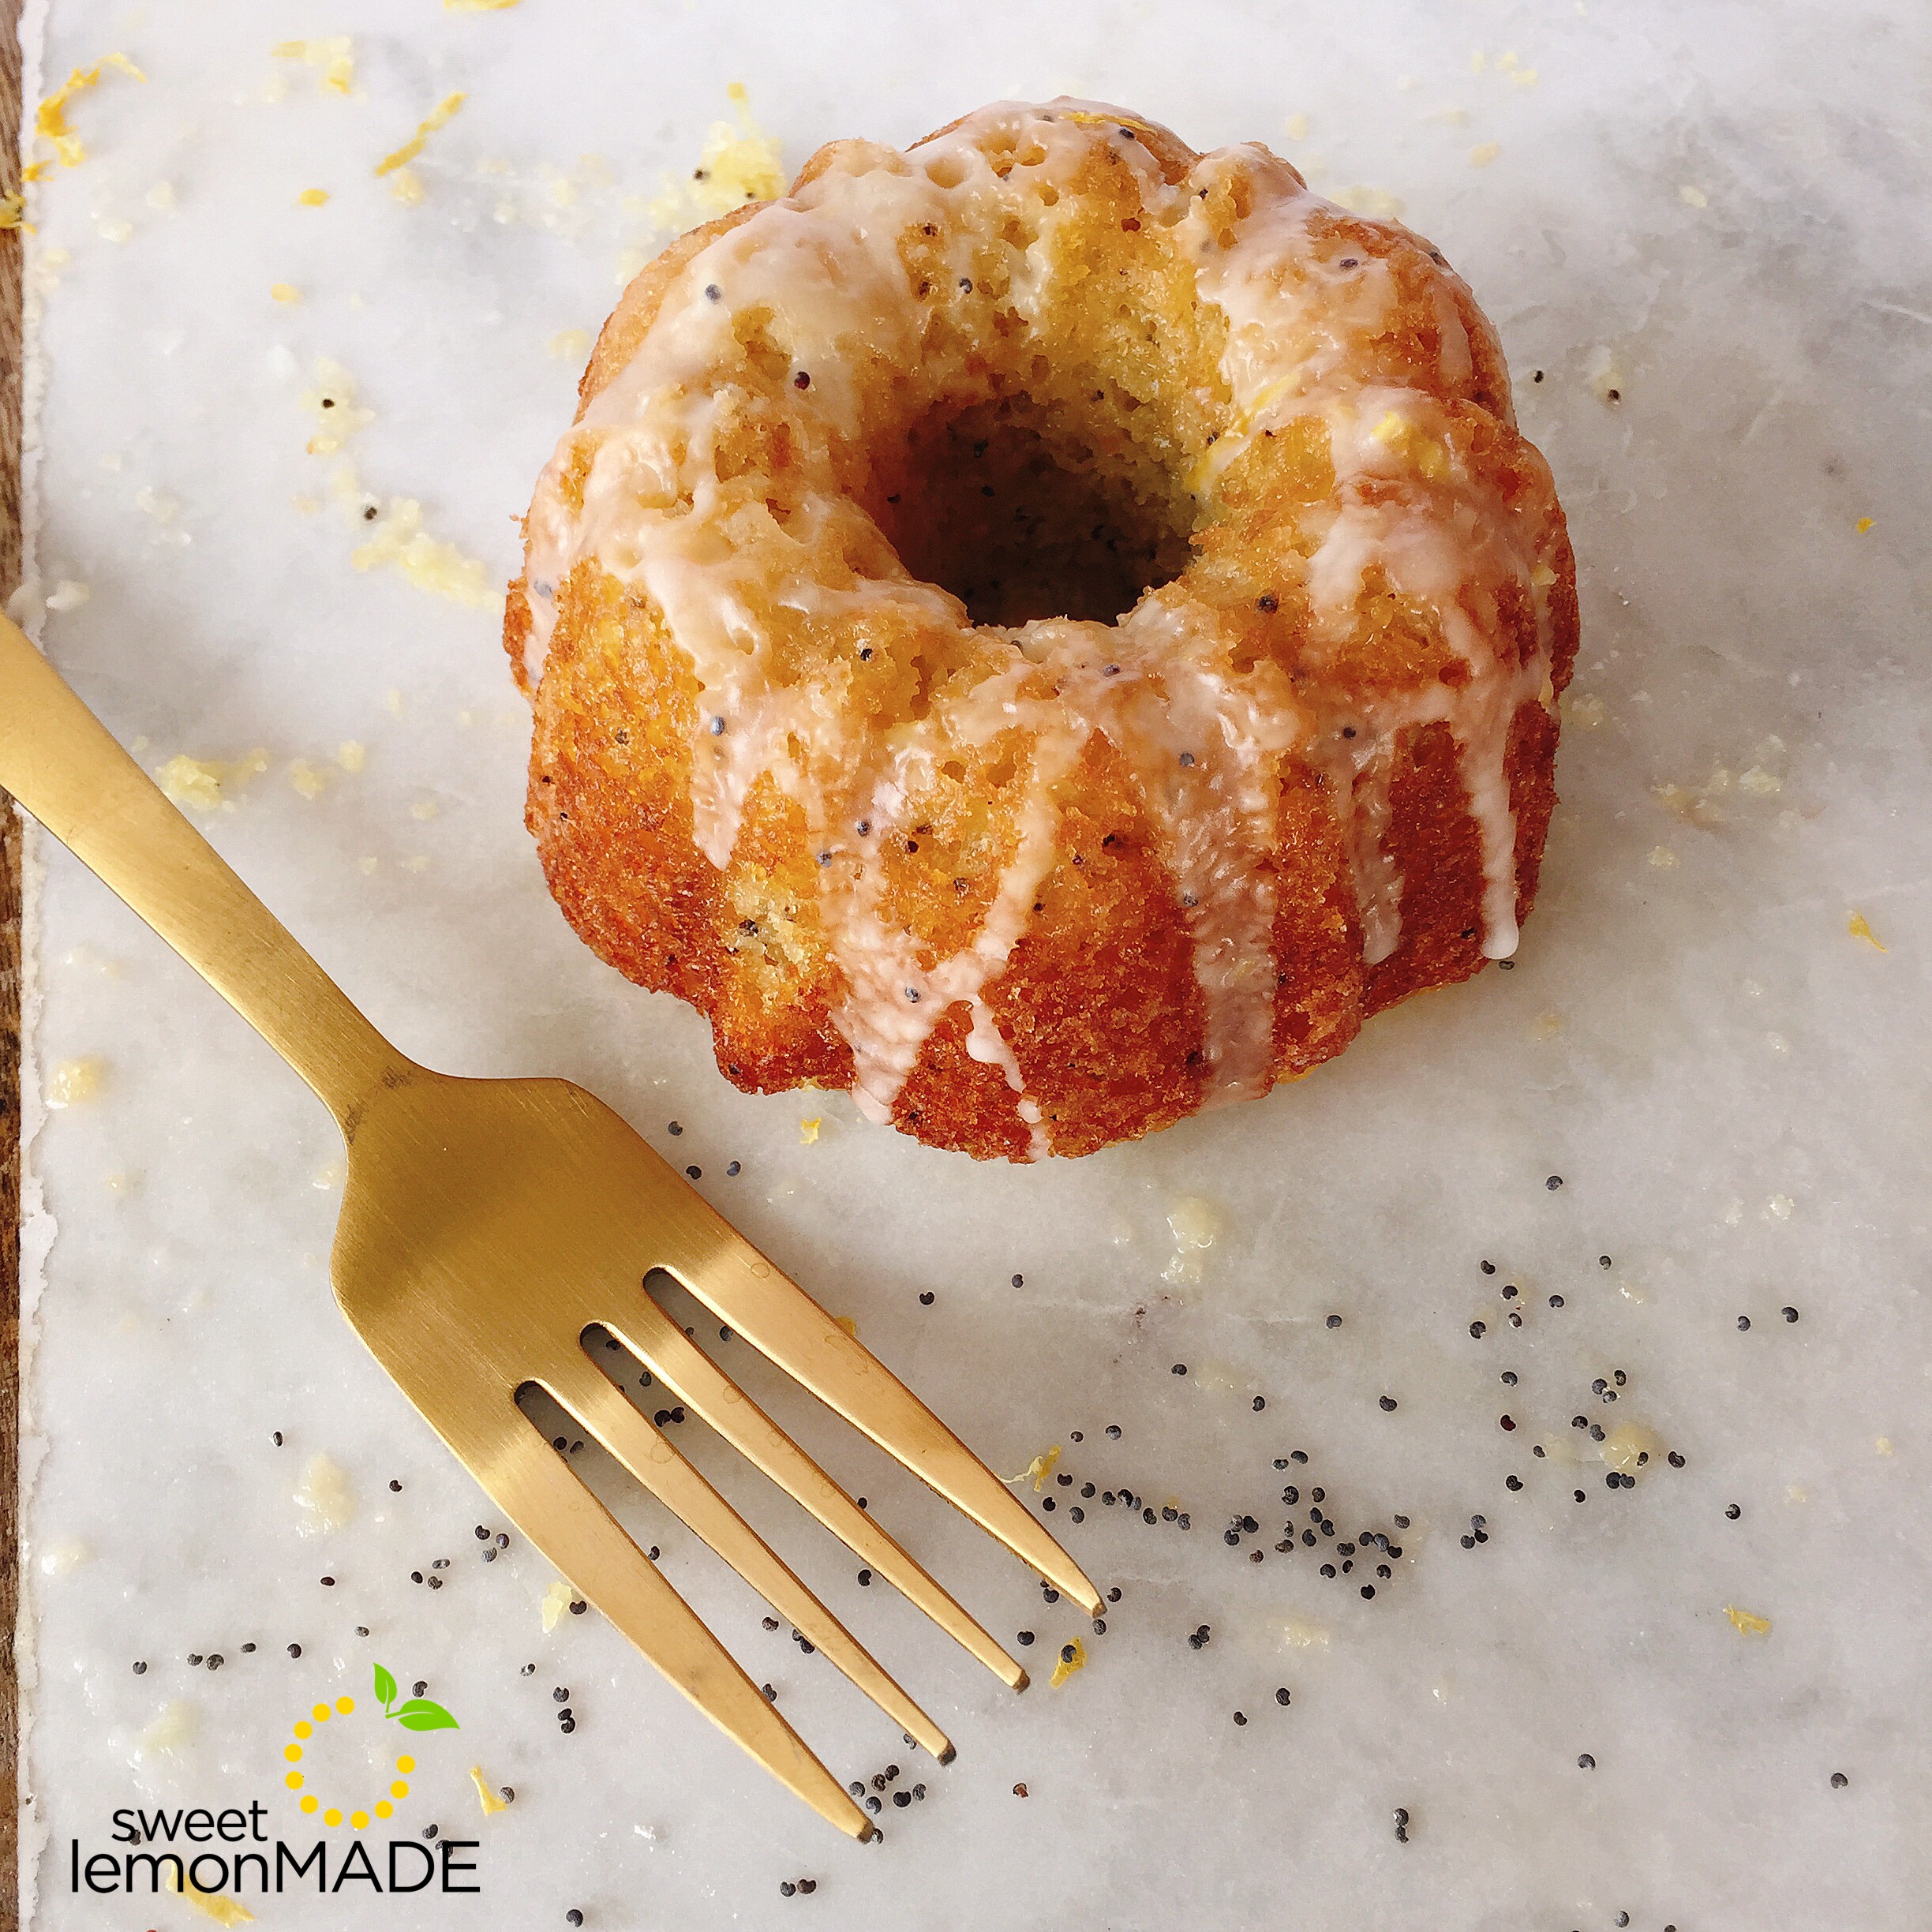
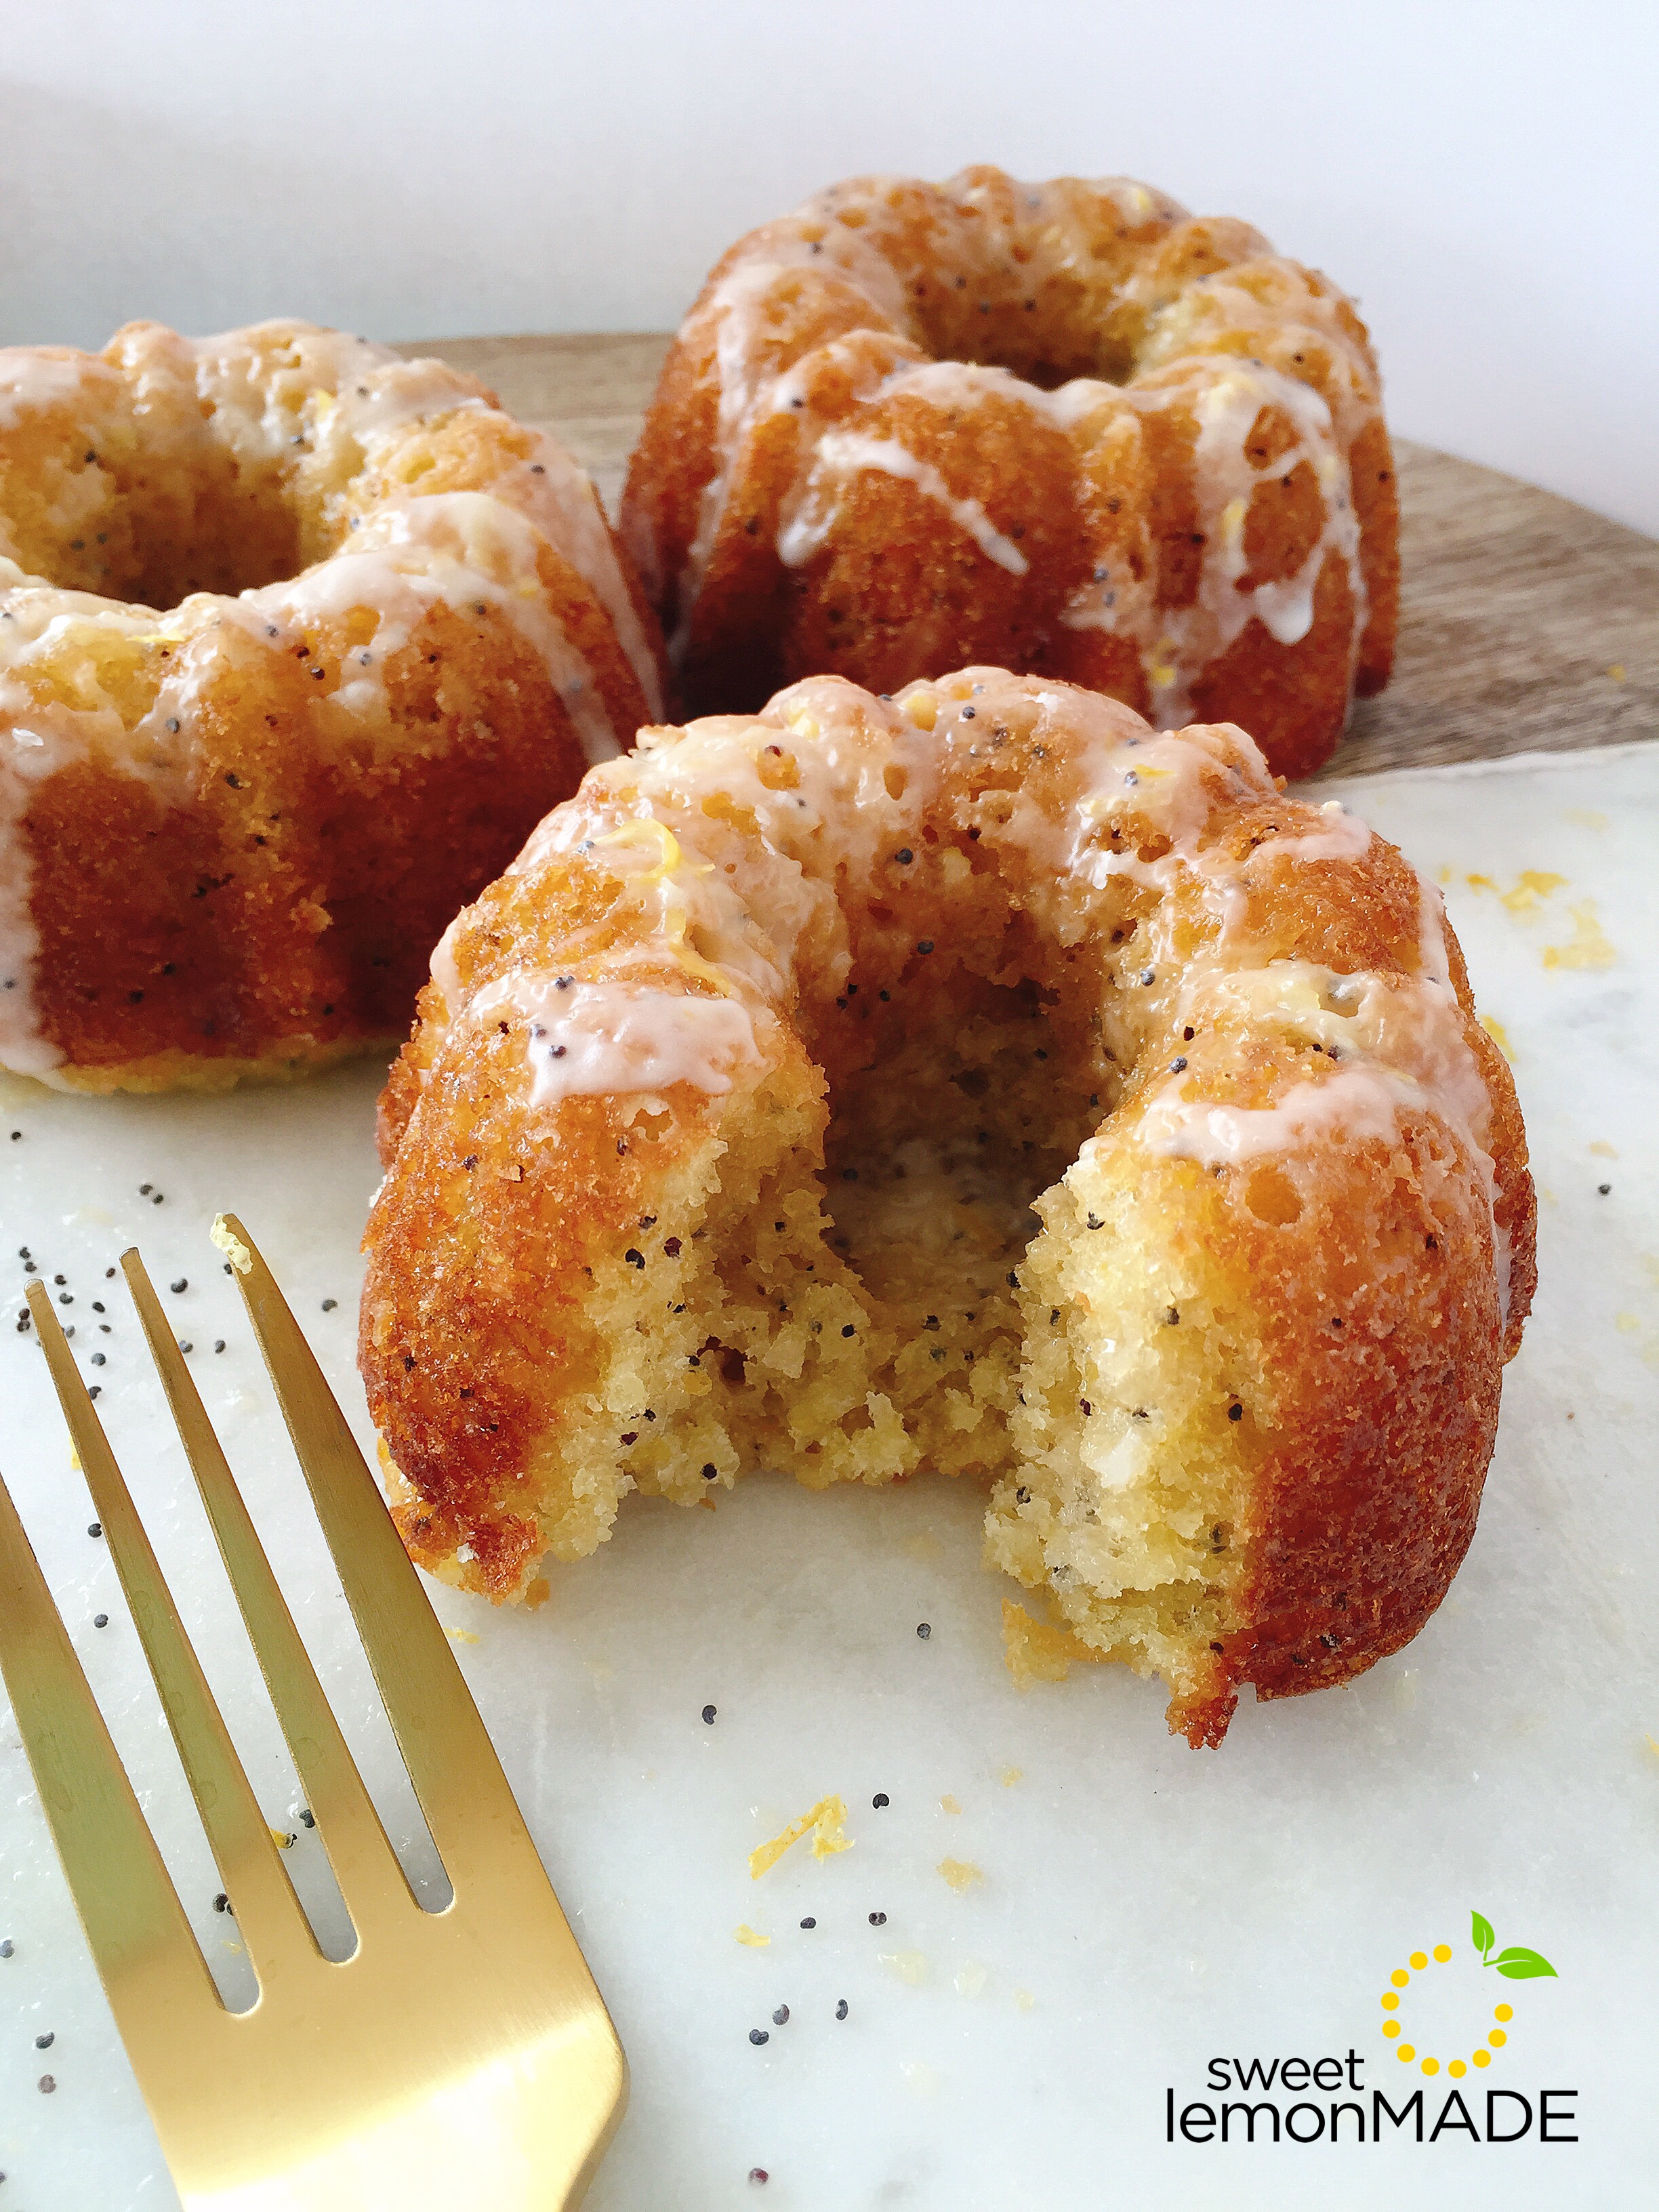
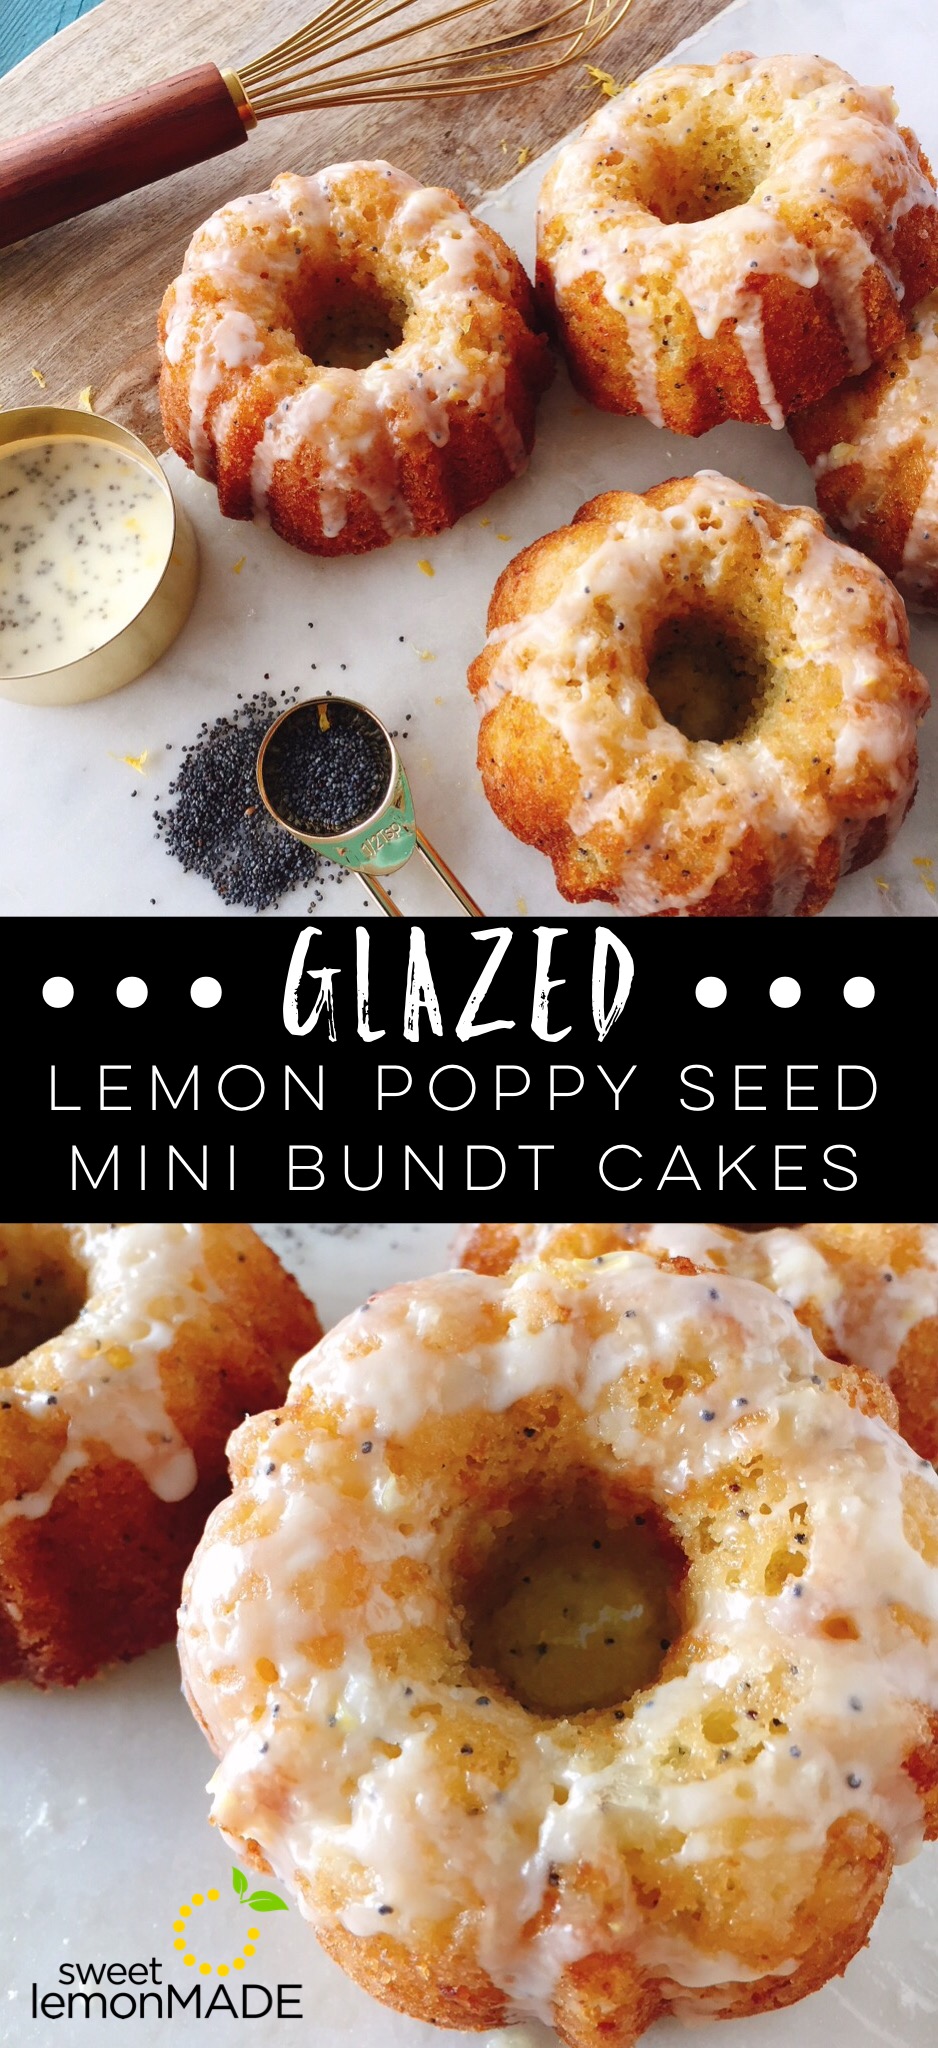
These glazed lemon poppy seed mini bundt cakes are not only cute, they are moist and packed full of tangy lemon flavor. The cakes are topped with a generous drizzle of lemon syrup and lemon glaze, adding more moisture and lemon flavor.
I was inspired to make these mini lemon poppy seed bundt cakes to celebrate our one-year blogiversary! And by the way, where has the time gone?!? I can’t believe we’ve been doing this for a whole year! It’s been an adventure! To celebrate this momentous milestone, I knew I wanted to make something lemon-y to celebrate with all of my supportive friends, family and coworkers! Lemon was only fitting to go with our blog name and the fact that I’m itching for warmer weather.
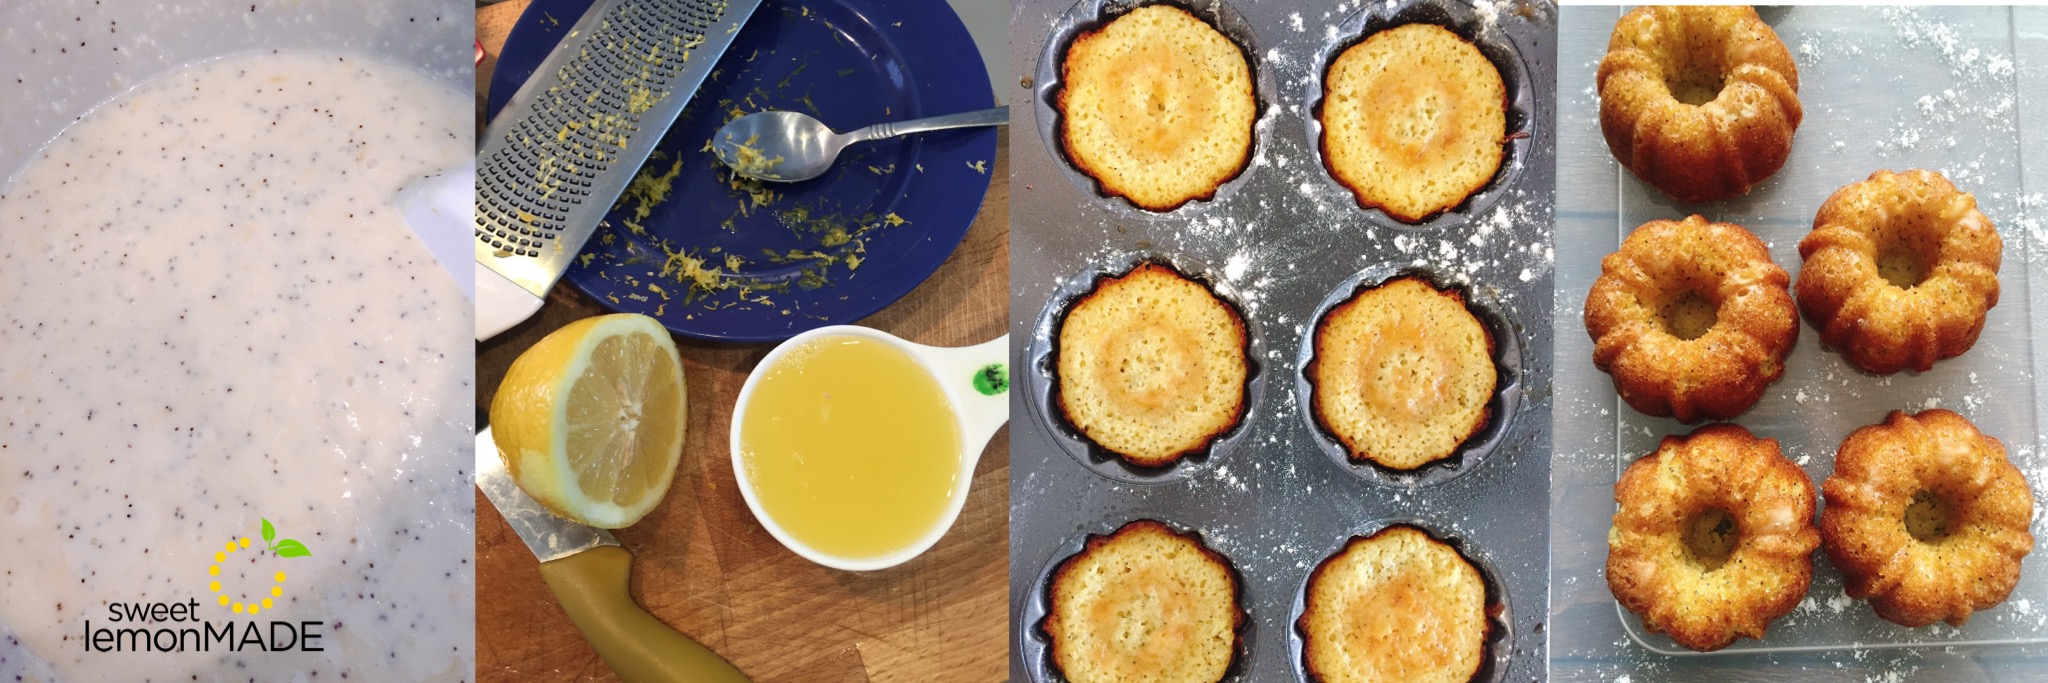
You may find it weird to add yogurt into the recipe but, it adds a little more tang to the flavor of the cake and it also replaces the oil you would normally use in a cake recipe. Tip: I used Tillamook vanilla yogurt but, if you normally eat plain yogurt and have that on hand you can use that in substitution.
After playing around with differ amounts of lemon flavor, the amount in this recipe seems to be the perfect amount according to my helpful and trusty taste testers (aka my friends and family). I personally really love lemon-y lemon poppy seed cake too. And I knew these were a hit when a few of my friends ended up eating all of the cakes they were suppose to share with their family or on the other hand when a few of my other friends wanted to share these delicious cakes with their own friends! These cakes taste even better once they’ve had time to sit and the lemon syrup and lemon glaze have had a chance to soak into the cake.
Your friends and family will love you if you make these delicious cakes for them!
Preheat oven to 350 degrees F. Prepare mini bundt cake pan with nonstick spray and flour.
Using an electric mixer, cream together butter and sugar on medium speed for 2 minutes or until smooth and fully incorporated.
Add in vanilla, eggs, lemon juice, and lemon zest until incorporated.
Add in flour, baking soda, salt, yogurt, buttermilk, and poppy seeds. Mix on low for 1 minute and then on medium for 2 minutes or until well blended.
Fill each cavity 2/3 full and bake 15-20 minutes or until a toothpick inserted into cake comes out clean.
Let cakes cool in pan for 10 minutes.
Invert pan onto cooling rack and let cool for 15 minutes.
While cakes are cooling, prepare lemon syrup by combining sugar and lemon juice in a small saucepan over medium heat until sugar dissolves. Once dissolved, remove from heat and let cool.
While waiting for lemon syrup to cool, prepare glaze by combining sifted powdered sugar, lemon juice, poppy seeds, and lemon zest in a medium sized bowl.
Once cakes and lemon syrup have cooled, place cakes on a baking sheet and drizzle each cake with lemon syrup and then a generous drizzle of glaze over the top.
I know cake pops are so-4-years-ago, but they are tastier than you remember, less complicated than you think and a fun way to celebrate your favorite person or holiday. So read on and give them a try!
Like most ideas I have, this idea for a Spring-y treat came while wandering the aisles of Target. I’m sure you all know the feeling when you walk through those red double-doors and suddenly begin to see unreasonable potential in your creative self and/or your timetable to accomplish such creative endeavors. “Sure, I’ll buy twelve of these gold and mint shelf organizers at the Dollar Spot. This is totally the solution to my cluttered, drab pantry woes.” But then somehow those gold/mint organizers never make it to the pantry and end up cluttering some other closet.
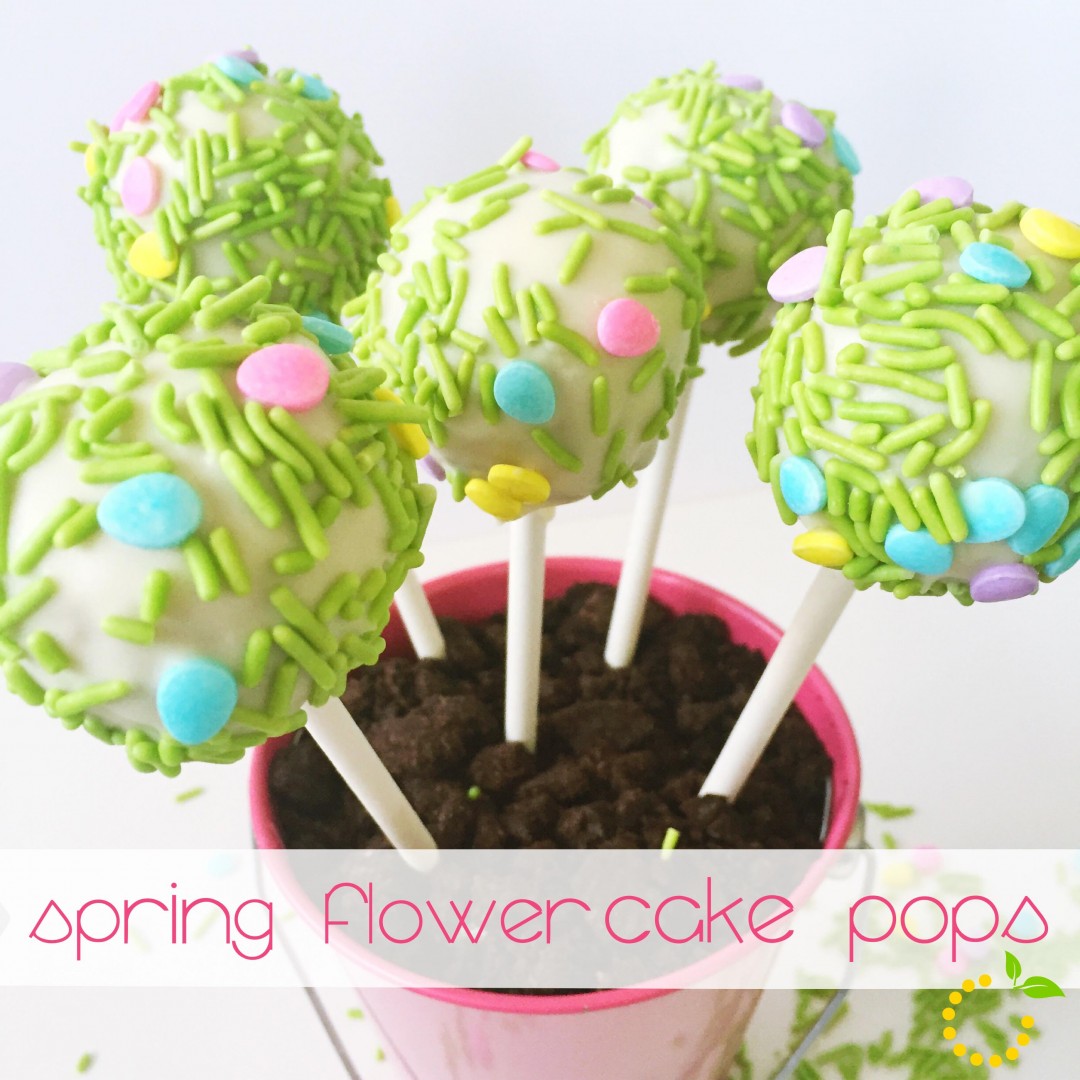
This time the “Dollar Spot” wowed me with some fun, patterned tins (you know the ones, they have them every season just with a different pattern), I saw a few weeks ago. I had visions for some sort of Easter treat basket for my nieces. However, much like those gold and mint shelf organizers, I failed to transform these tins in a timely fashion (why was Easter so early this year???). I should know by now never to pick a time-sensitive creative project, it never works for me (as evidenced by the foam sticker hearts and yet-to-be-painted wood shamrocks in my closet). With Easter long gone and my strong resolve not to put these in the closet for next year (clearly, I already have two projects waiting in the wings already), I thought it would be fun to turn these into a springtime treat…Easter/Spring, same thing, right? As I stared at these pastel tins, it popped into my head to make cake pop “flowers” and to fill the tins with Oreo “dirt” for a fun, blooming treat for my nieces (a peace offering, really, since I failed them on the Easter baskets).
Now I don’t know if you’ve been following the blog long enough to realize that I am not the baker of this sweet lemon group—that’s Ashley—and I have only attempted cake pops one other time in my entire life, and, I’ll be honest, that endeavor belongs on one of those “Pinterest FAIL” blogs because it was seriously the worst. The middle of the cake pops were too gooey due to an inappropriate frosting-to-cake ratio and the supposed thin, chocolate outer-coating was more like a lumpy, rock-hard slab of confection, all on a stick. I took them to my coworkers and they about lost a tooth just attempting to take a bite.
Naturally I was a little nervous to try again, especially knowing that I was going to be putting it out there for all the blogging world to see (I know, it’s only 12 of you, but still), but I was determined to get these tins outta my closet! So I called up Ash and bamboozled her into helping me with this spring cake pop project (note: one of my favorite parts about Ashley is that she is easily bamboozled by my crazy ideas—bless her).
So we gathered our supplies and went to town…
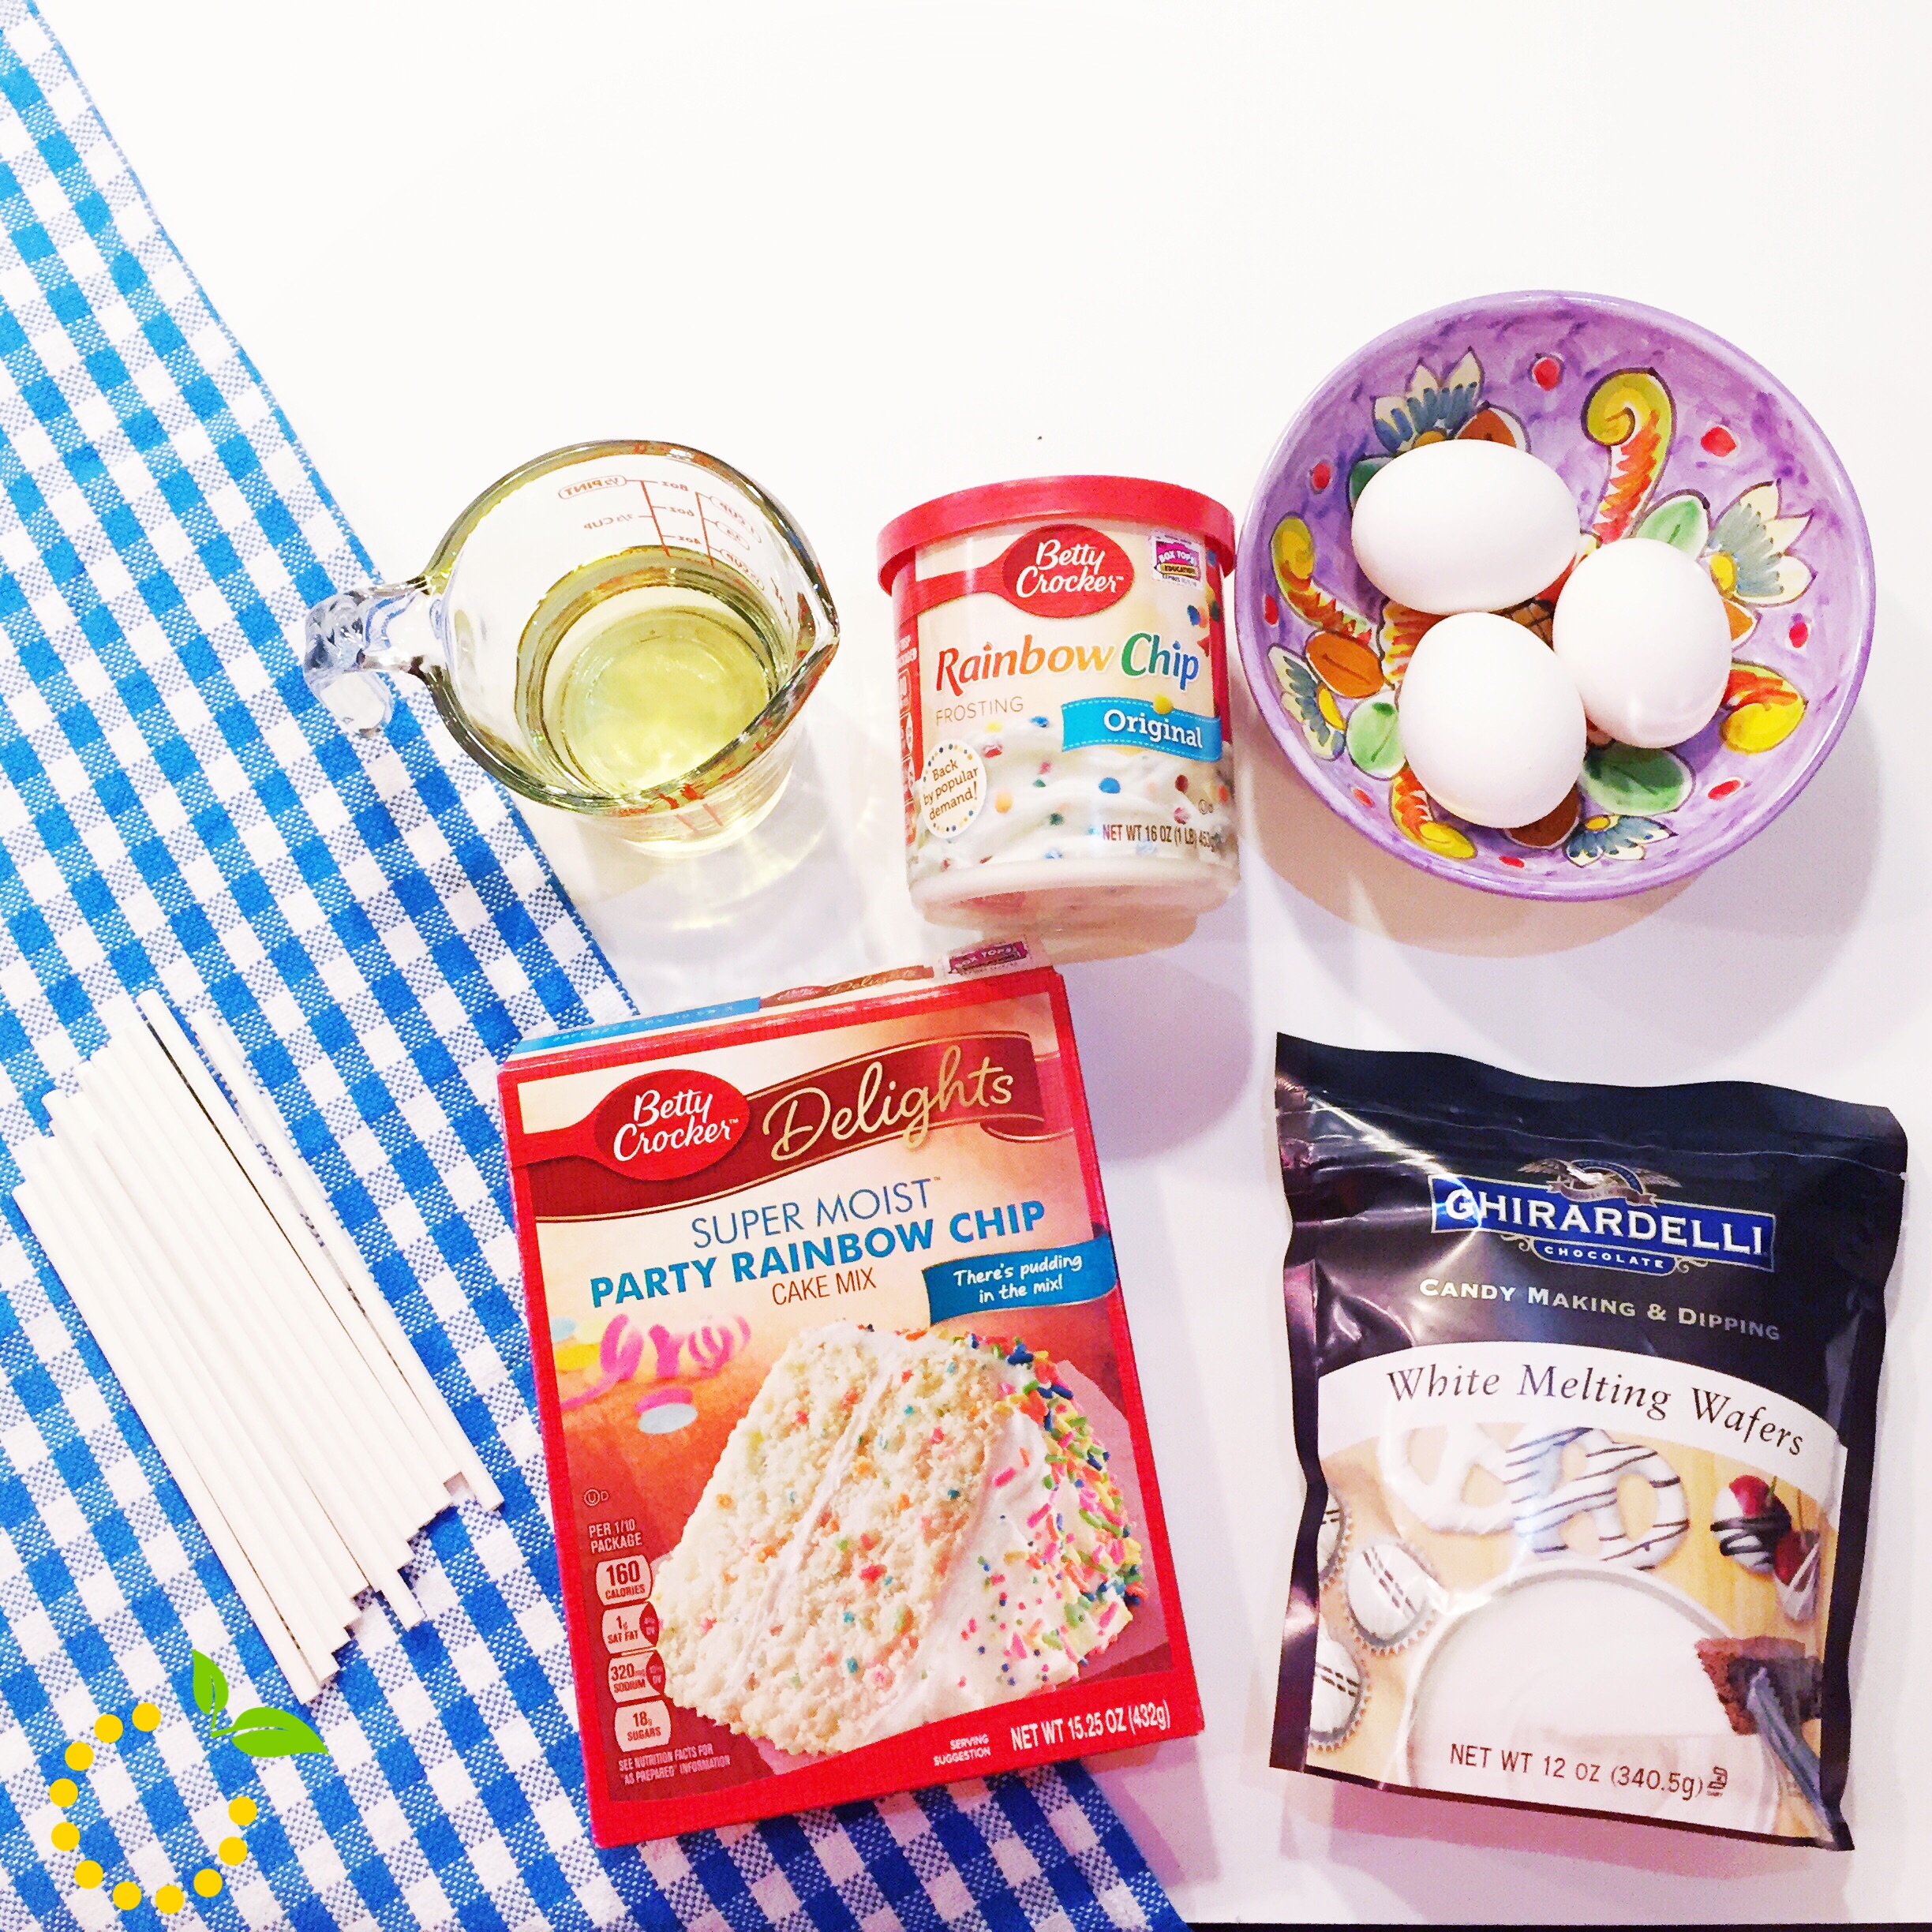
For the cake pops we used Bakerella’s basic cake pop recipe, but snazzed it up a little by using Rainbow Chip cake mix and frosting (don’t be confused, rainbow chip is NOT the same as Funfetti. Rainbow chips are bigger, softer, and tastier. They are the unicorn of the Betty Crocker lineup. Try it, you’ll see).
Tip: While waiting for cake to cool cut it into slices so the heat escapes faster.
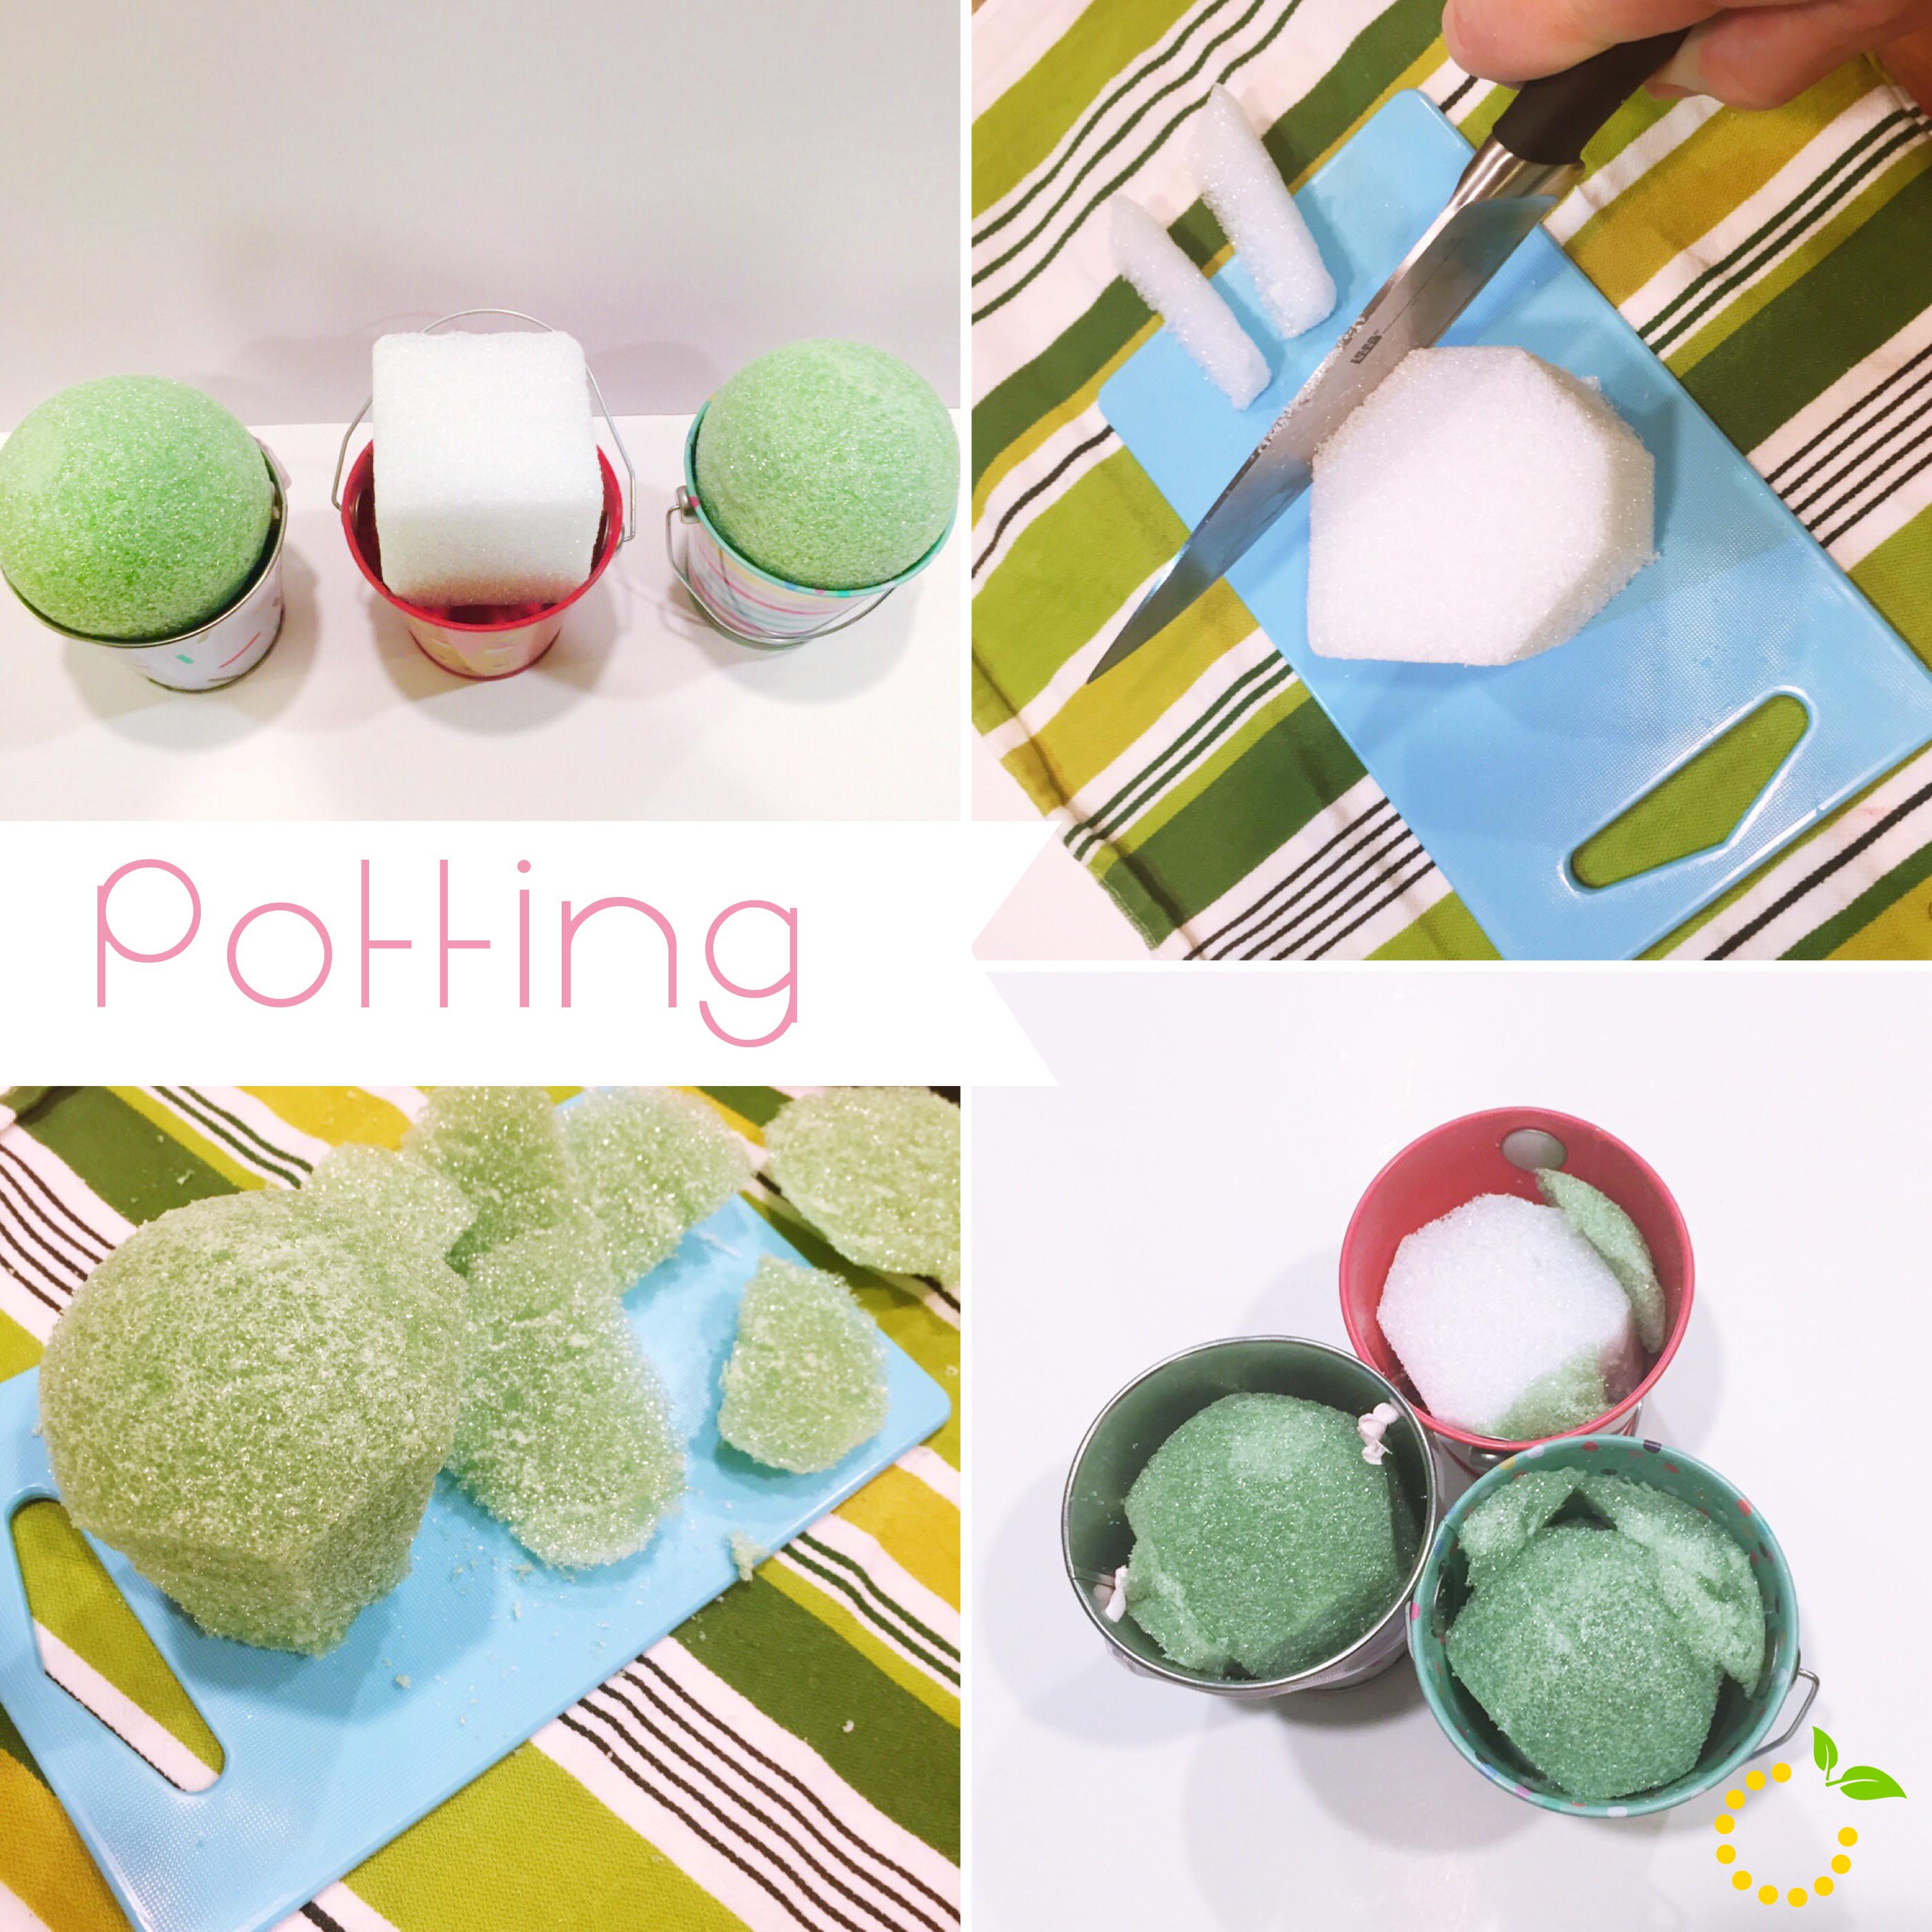
While the cake balls were chilling we prepped our pots with styrofoam (those pops have to have something to hold them up). We found that the small styrofoam balls worked better than a square, but honestly, you can use whatever you have lying around. We just chopped off some sides until it nestled in nicely. You want it to be snug so the foam and the pops don’t slide around. You also want to make sure that your foam is below the rim of the pot about an inch to allow space for your Oreo “dirt.” Once you shaped and chopped to size add the crushed Oreos to the top of the foam.
Tip: Pre-punch your holes where you will be putting your sticks into the styrofoam. Trust me, you will not want to forget this step! It is much harder to do when your cake pop is on the stick (you might end up losing a few cake pops).
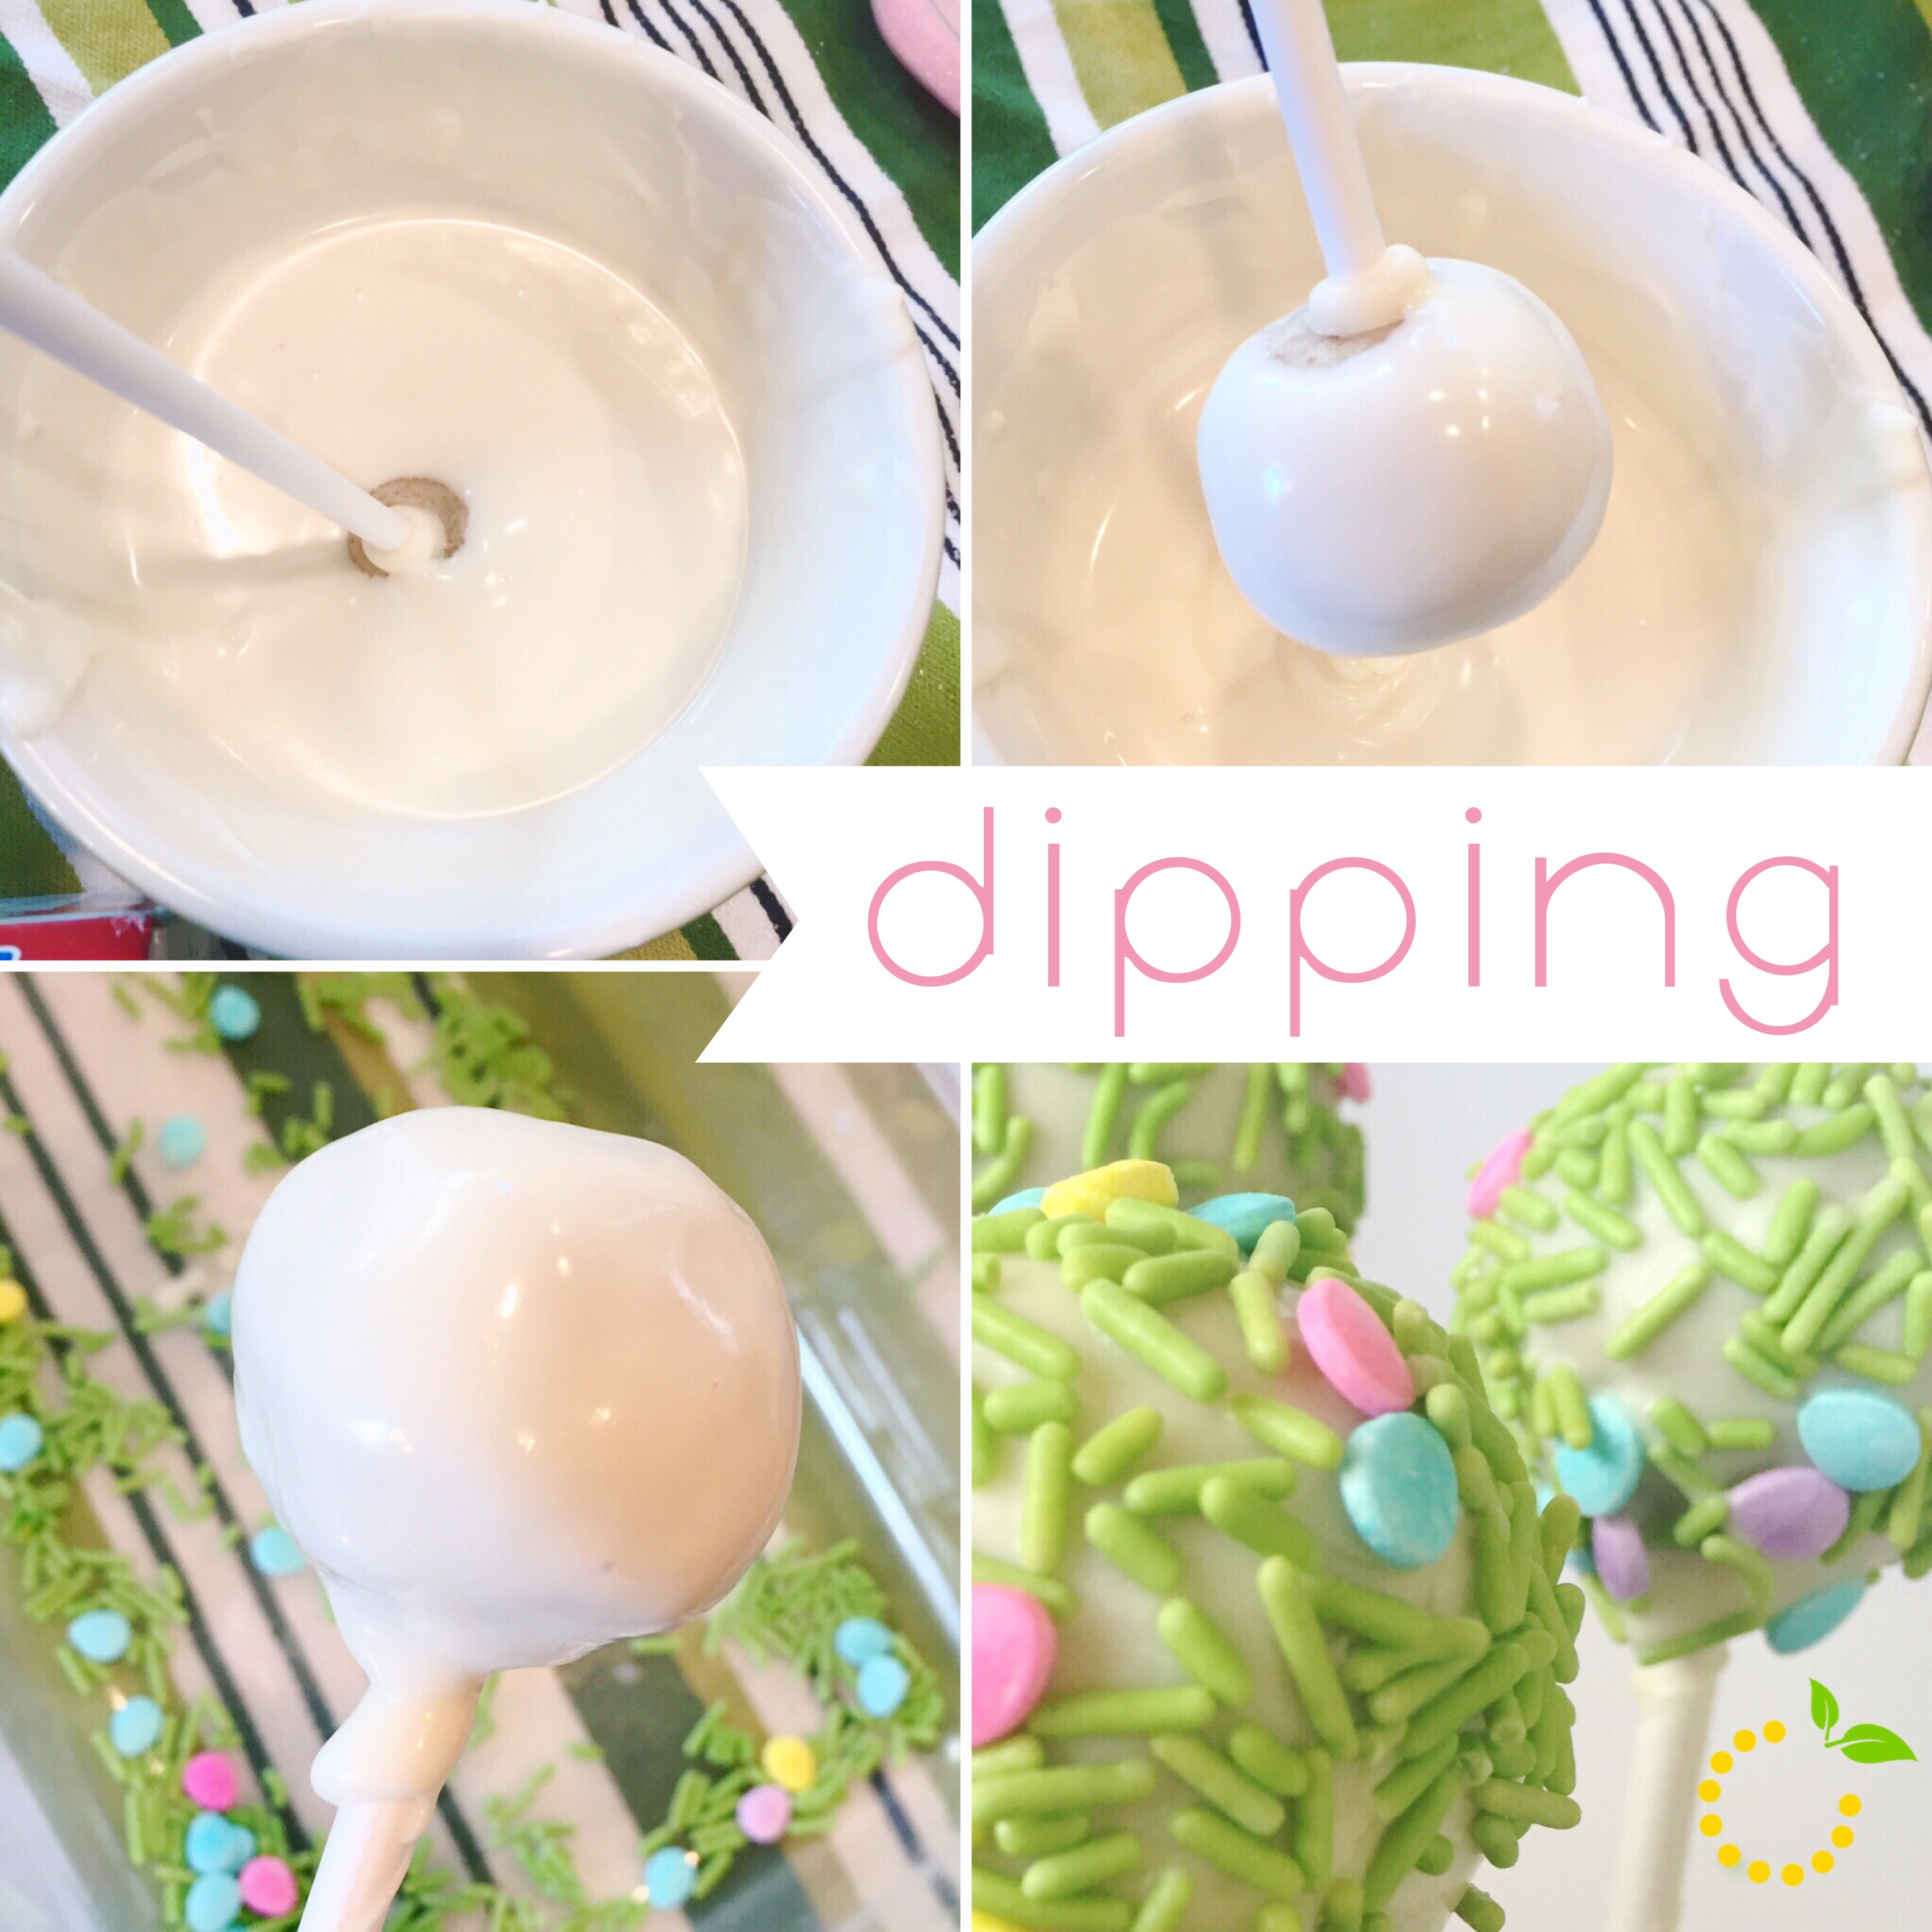
This is where you gently tap and rotate the cake ball so that the candy coating lays (somewhat) flat and smooth on the cake ball. If your candy coating starts to cool down, it gets thicker and heavier, making it harder to coat the cake ball. Also, if your cake balls are no longer cold and become room temperature they are more prone to crack like this when dipping. Tip: The consistency of the candy coating should be thin enough to coat the cake pop but, not too thin that the cake pop shows through the candy coating. Use an extra cake pop to test out the consistency of the candy coating and if it needs to be thinned out add a tiny amount (1/8 of a teaspoon at a time) of vegetable oil until you reach a good consistency. Also, make sure to get your sprinkles on before the candy coating hardens.
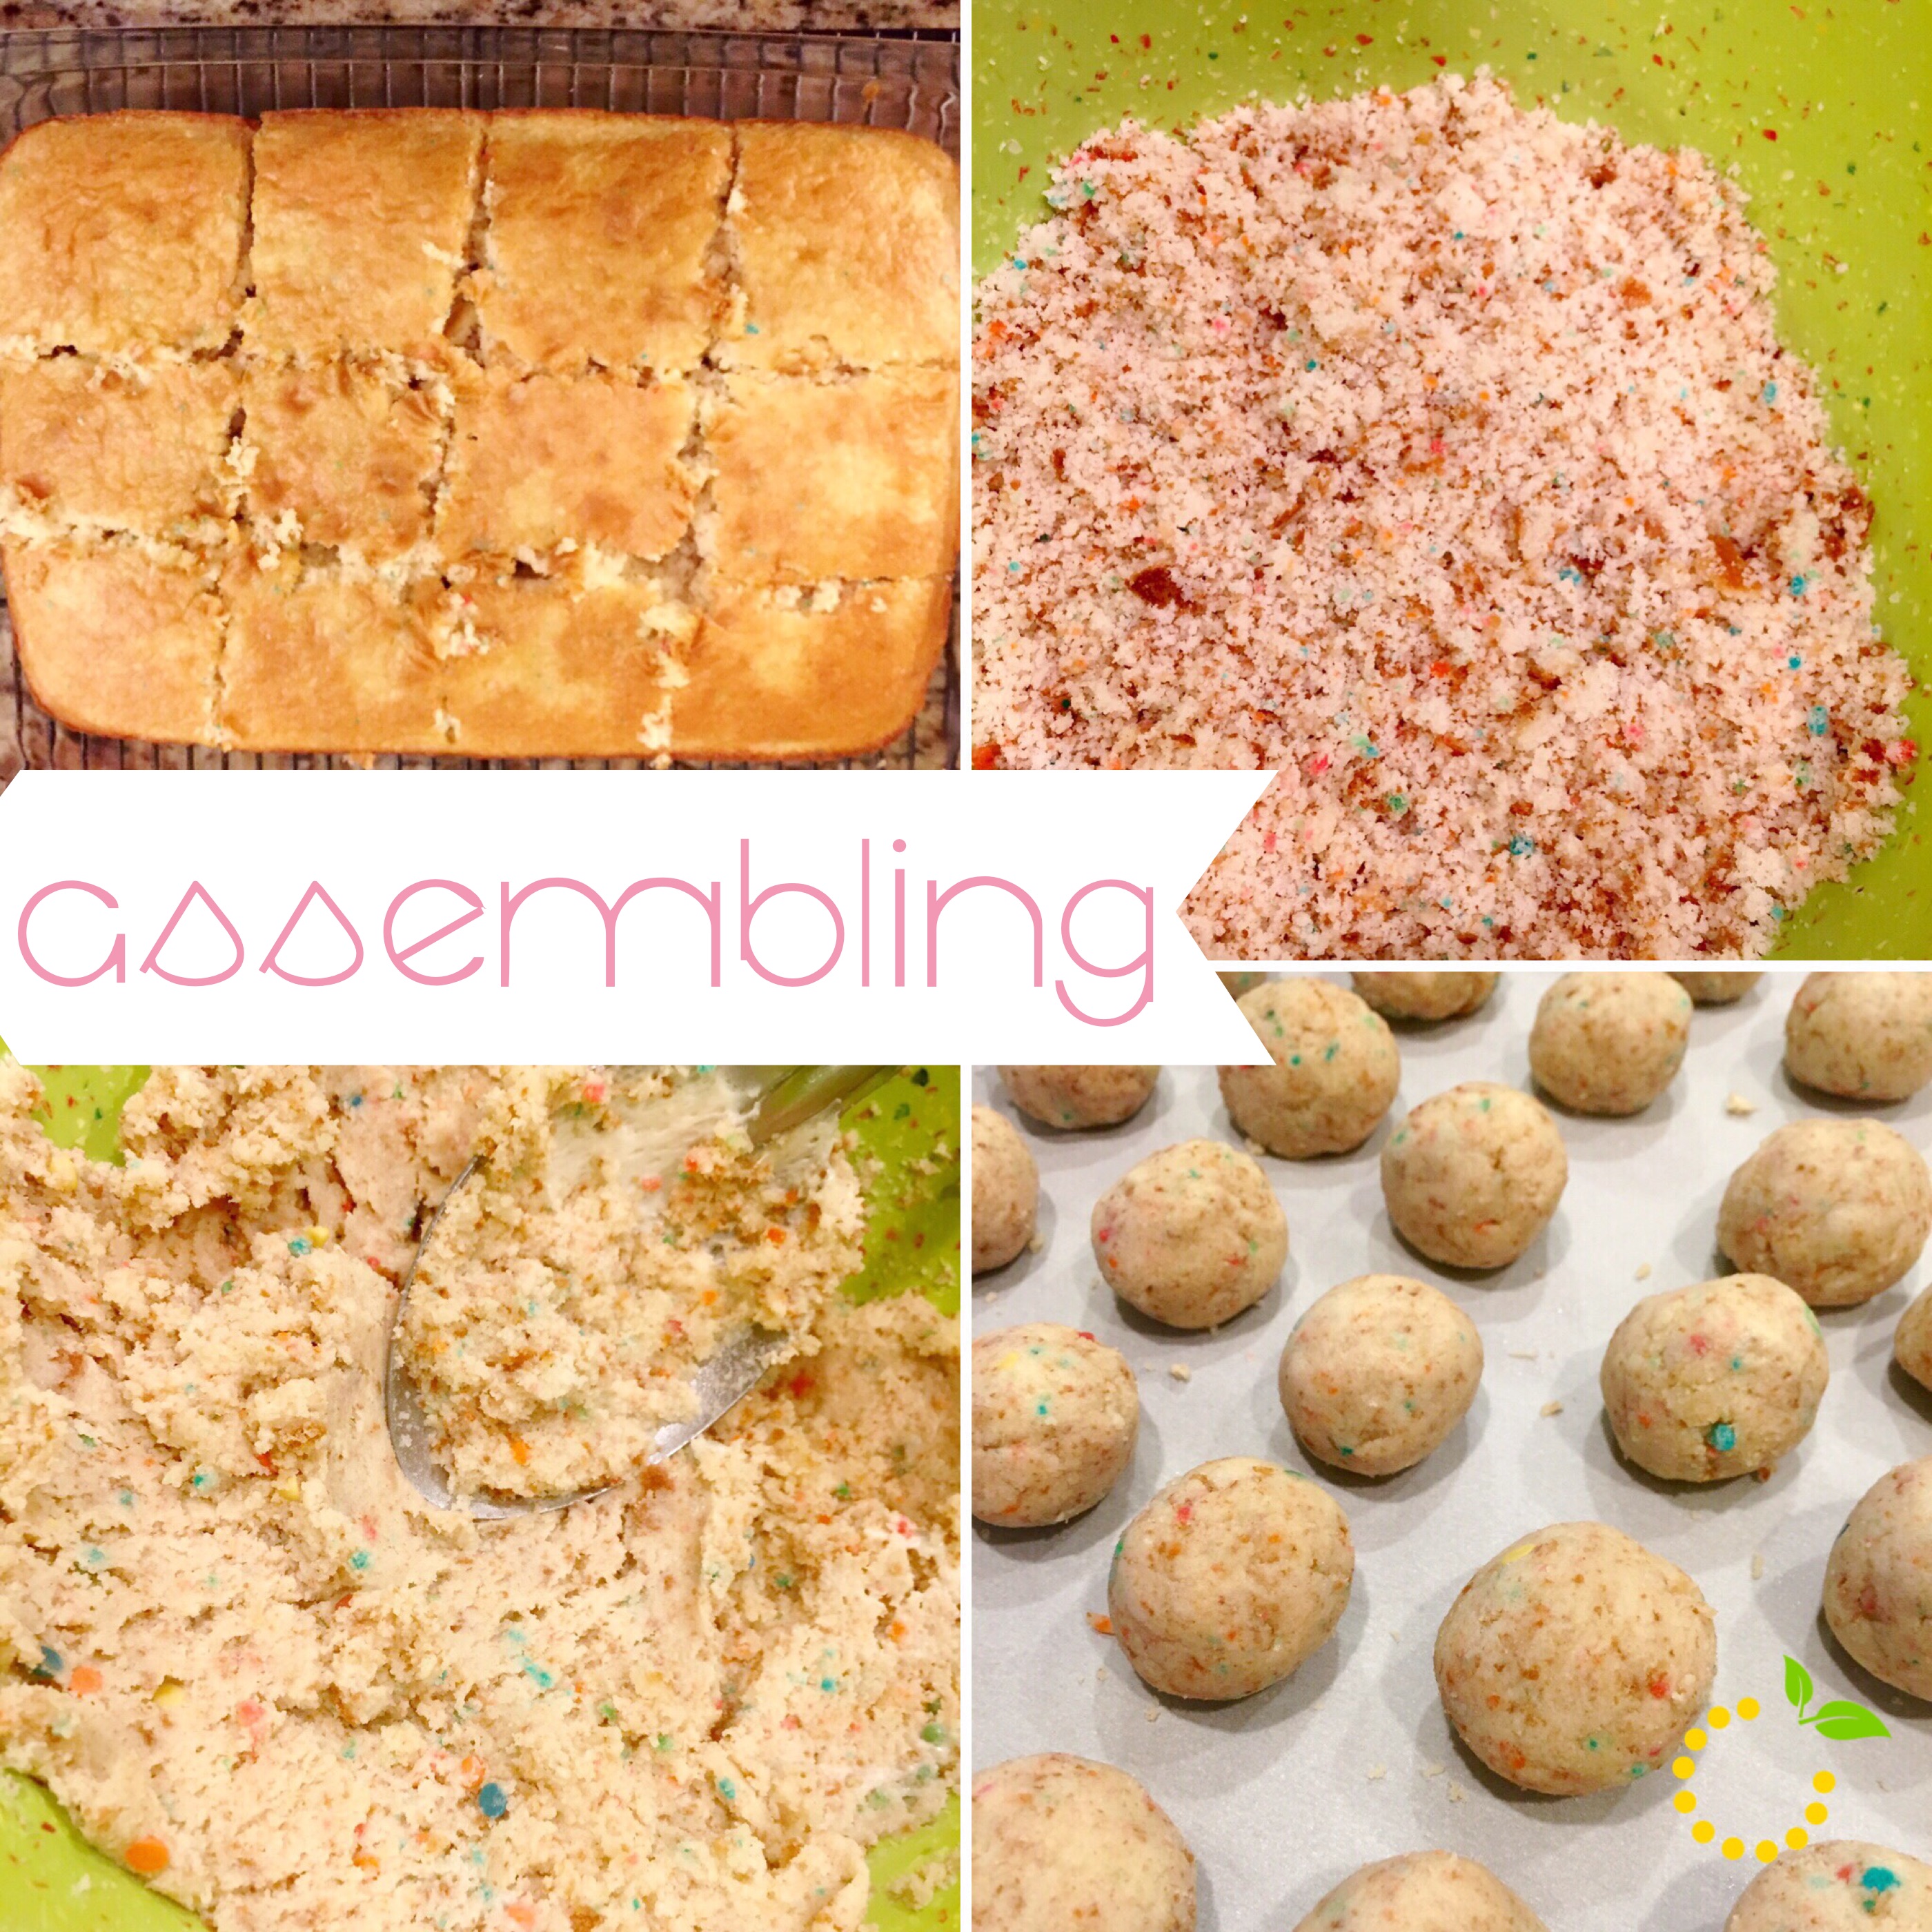
Bake the cake as directed on the box, using the 9-by-13-in cake pan. Let cool completely.
Once the cake has cooled, line baking sheets with wax paper.
Crumble the cooled cake into the large bowl. You should not see any big pieces of cake.
Add up to three-quarters of the container of frosting to the bowl. (You will not need the remaining frosting. Save it in the refrigerator for a later use.) Mix it into the crumbled cake, using the back of the large metal spoon, until thoroughly combined. If you use the entire container, the cake balls will be too moist. The mixture should be moist enough to roll into 1 1/2-in balls and still hold a round shape. After rolling the cake balls by hand, place them on the prepared baking sheets and let them rest for about 20 minutes before chilling.
Cover the baking sheets with plastic wrap and chill for several hours in the refrigerator, or place them in the freezer for about 15 minutes. You want the balls to be firm but not frozen.
Place the candy coating in the deep microwave-safe bowl. These bowls make it easier to cover the cake balls completely with candy coating while holding the bowl and without burning your fingers. The coating should be about 3 inches deep for easier dipping. Work with about 16 oz of coating at a time.
Melt the candy coating. Microwave for 30 seconds at a time, stirring between each interval. (You can also use a double boiler.) Make sure you do not overheat the coating.
Now you’re ready to dip. Take a few cake balls out of the refrigerator or freezer to work with, keeping the rest chilled. If they’re in the freezer, transfer the rest of the balls to the refrigerator at this point so they stay firm but do not freeze.
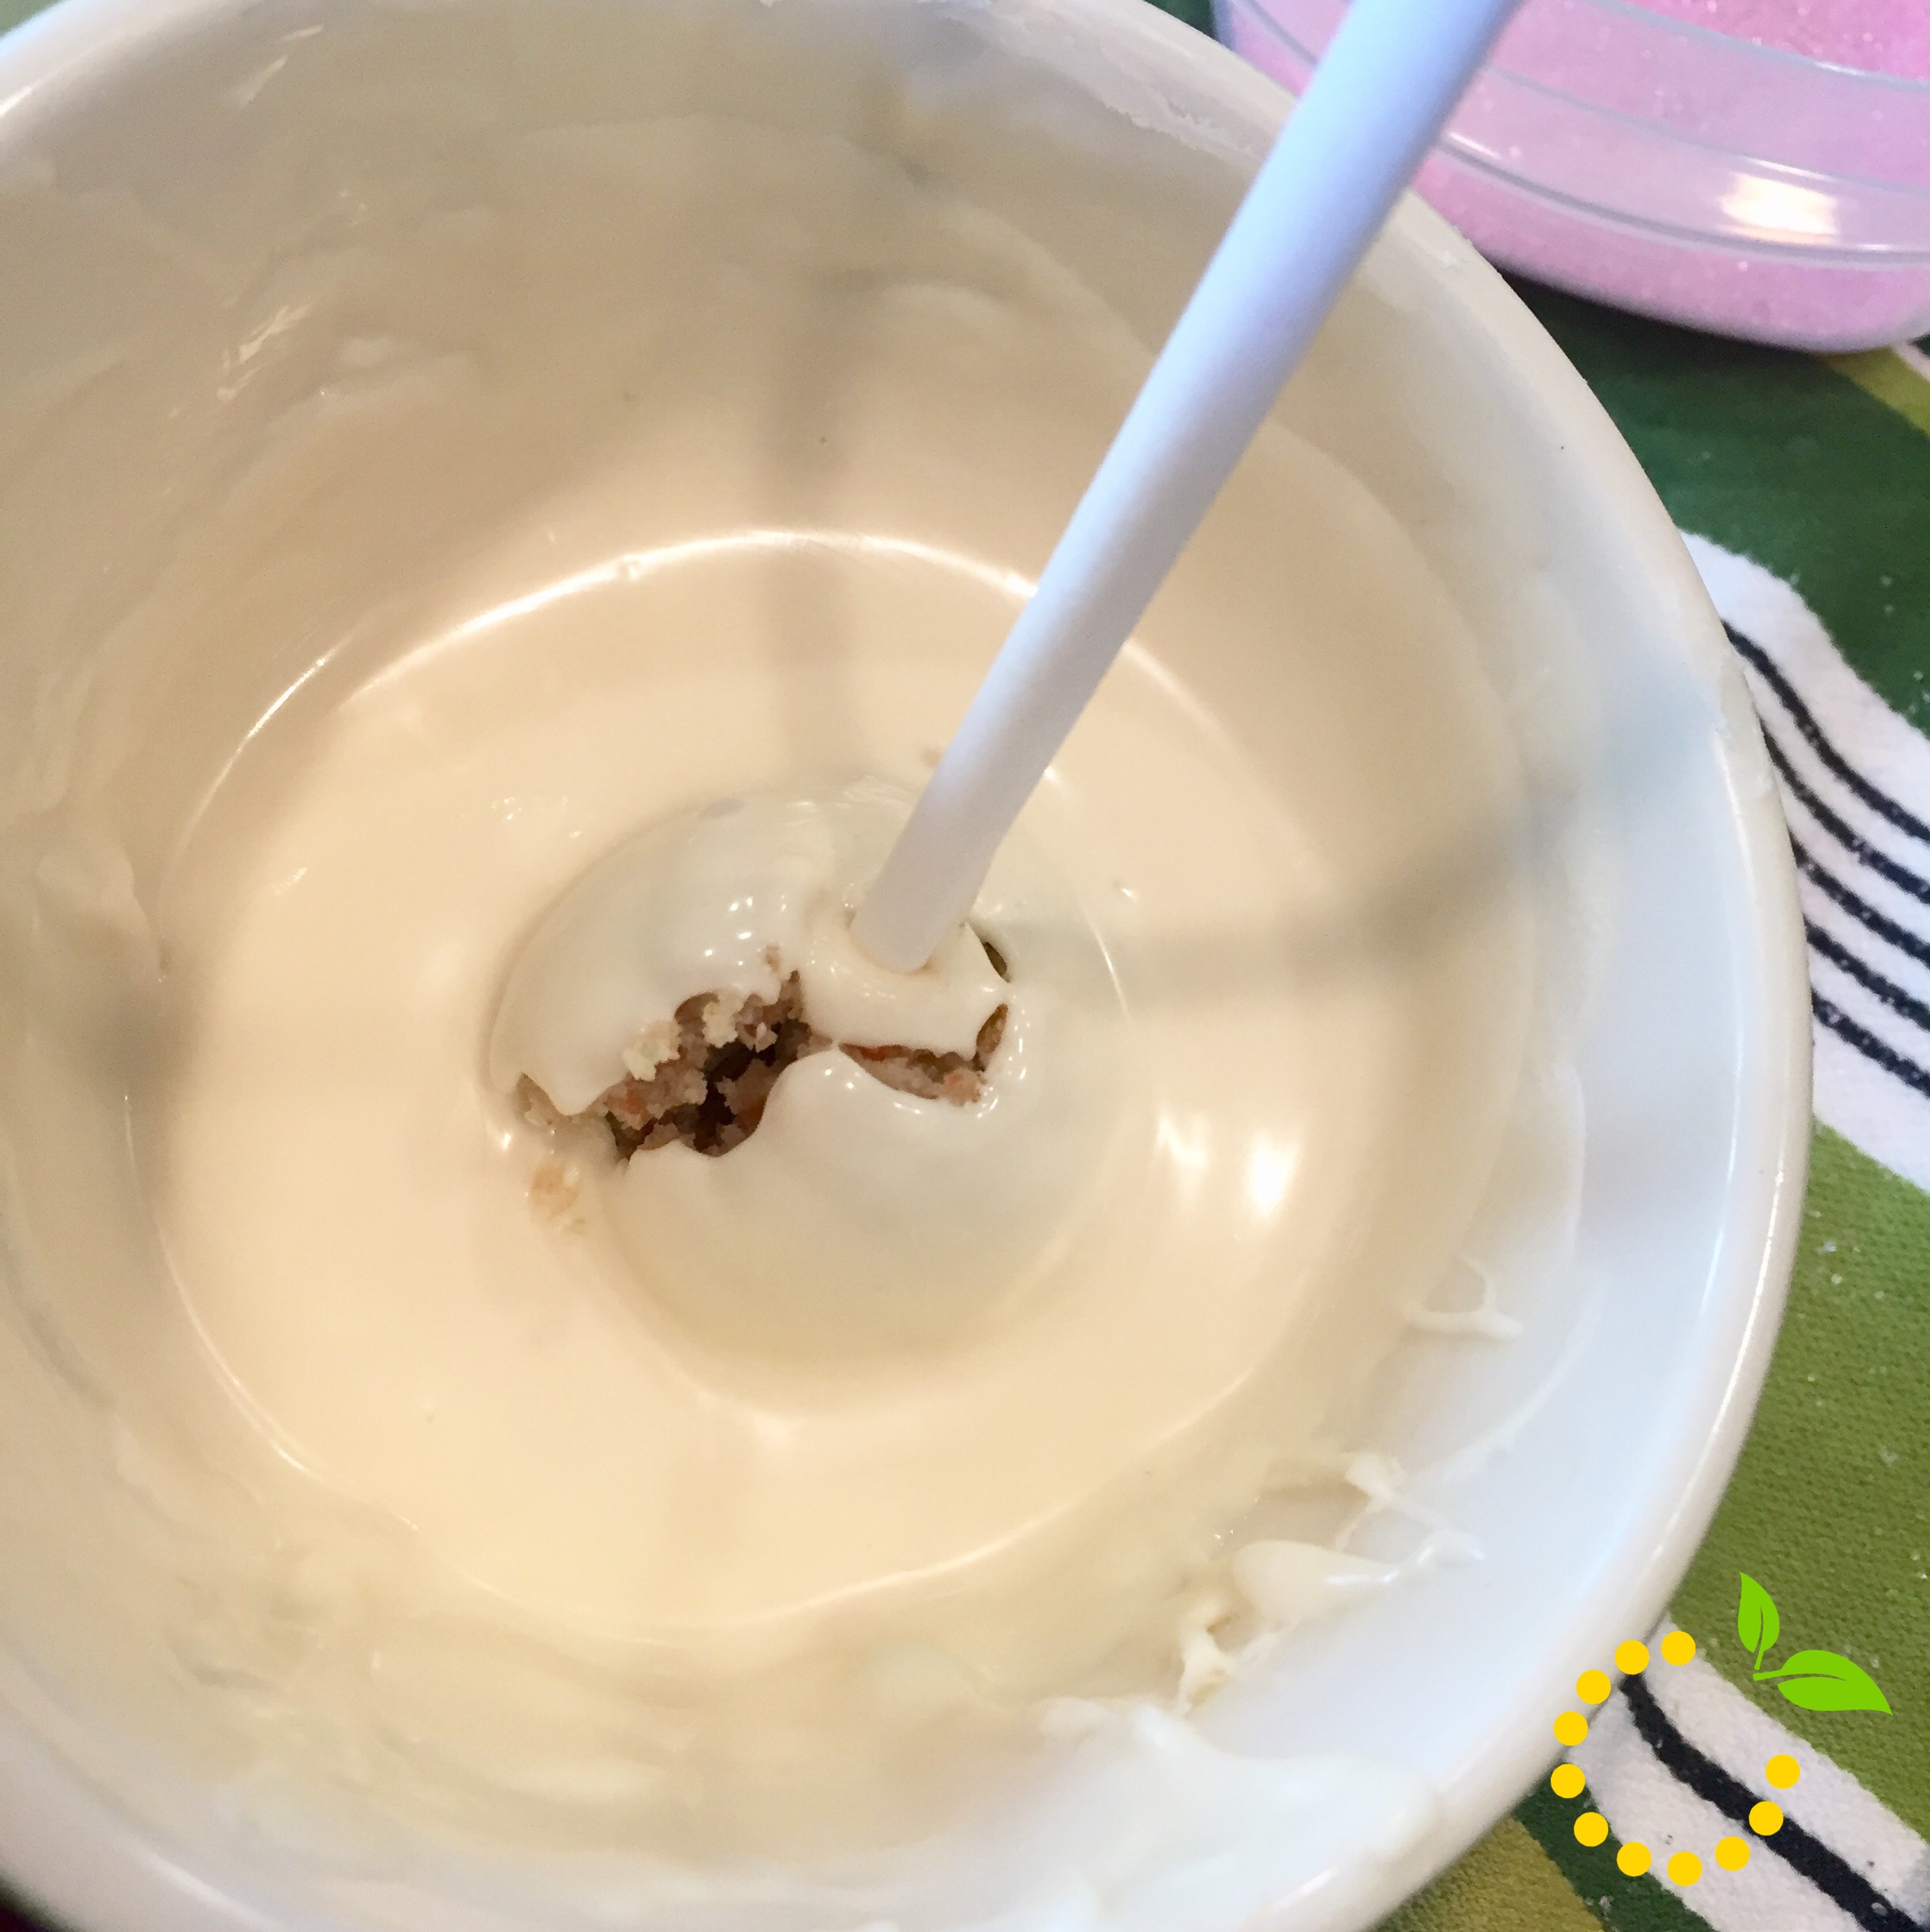
One at a time, dip about 1/2 inch of the tip of a lollipop stick into the melted candy coating, and then insert the lollipop stick straight into a cake ball, pushing it no more than halfway through.
Holding the lollipop stick with cake ball attached, dip the entire cake ball into the melted candy coating until it is completely covered, and remove it in one motion. Make sure the coating meets at the base of the lollipop stick. This helps secure the cake ball to the stick when the coating sets. The object is to completely cover the cake ball and remove it without submerging it in the coating more than once. If you do resubmerge the cake pop, the weight of the candy coating can pull on the cake ball and cause it to get stuck in the coating. The thinner the consistency of your coating, the easier it will be to coat the cake pops. (If you find that your coating is too thick, add some vegetable oil to help thin it and make the coating more fluid.)
Remove the cake pop from the candy coating, some excess coating may start to drip. Hold the cake pop in one hand and use the other to gently tap the first wrist. Rotate the lollipop stick if necessary to allow the excess coating to fall off evenly, so one side doesn’t get heavier than the other. If you didn’t completely dunk the cake pop, this method of tapping and rotating generally takes care of that. The coating will slowly slide down the surface of the cake ball until it reaches the lollipop stick. If too much coating surrounds the base of the lollipop stick, you can wipe the excess off with your finger. Simply place your finger on the stick right under the cake ball and rotate the pop, allowing any excess coating to fall off and back into the bowl. When most of the excess coating has fallen off and it is no longer dripping, stick the cake pop into the Styrofoam block.
Repeat with the remaining cake balls and let the pops dry completely in the Styrofoam block.