Browsing Tag

cookies

Eats

Chocolate Peanut Butter Bars

Chocolate Peanut Butter Bars sweetlemonmade.com

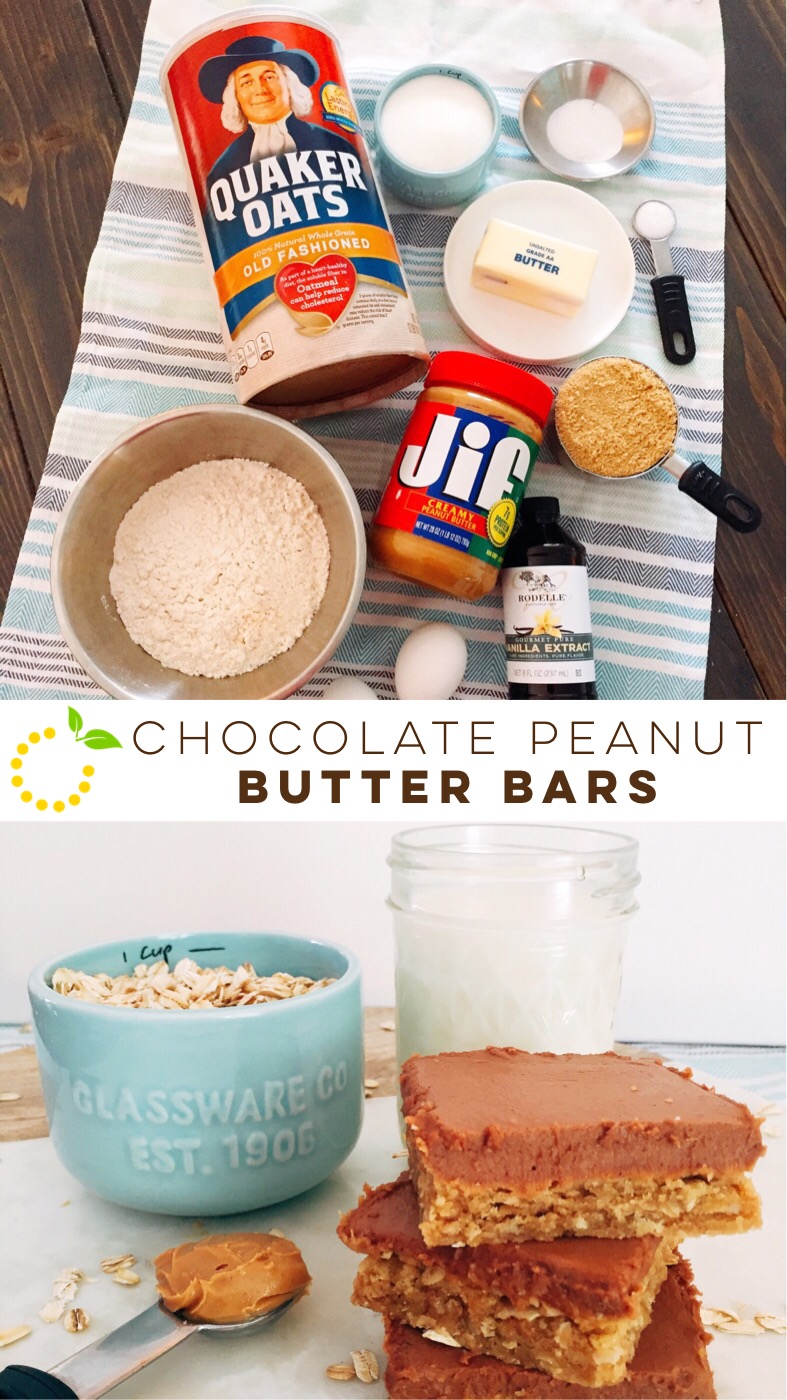
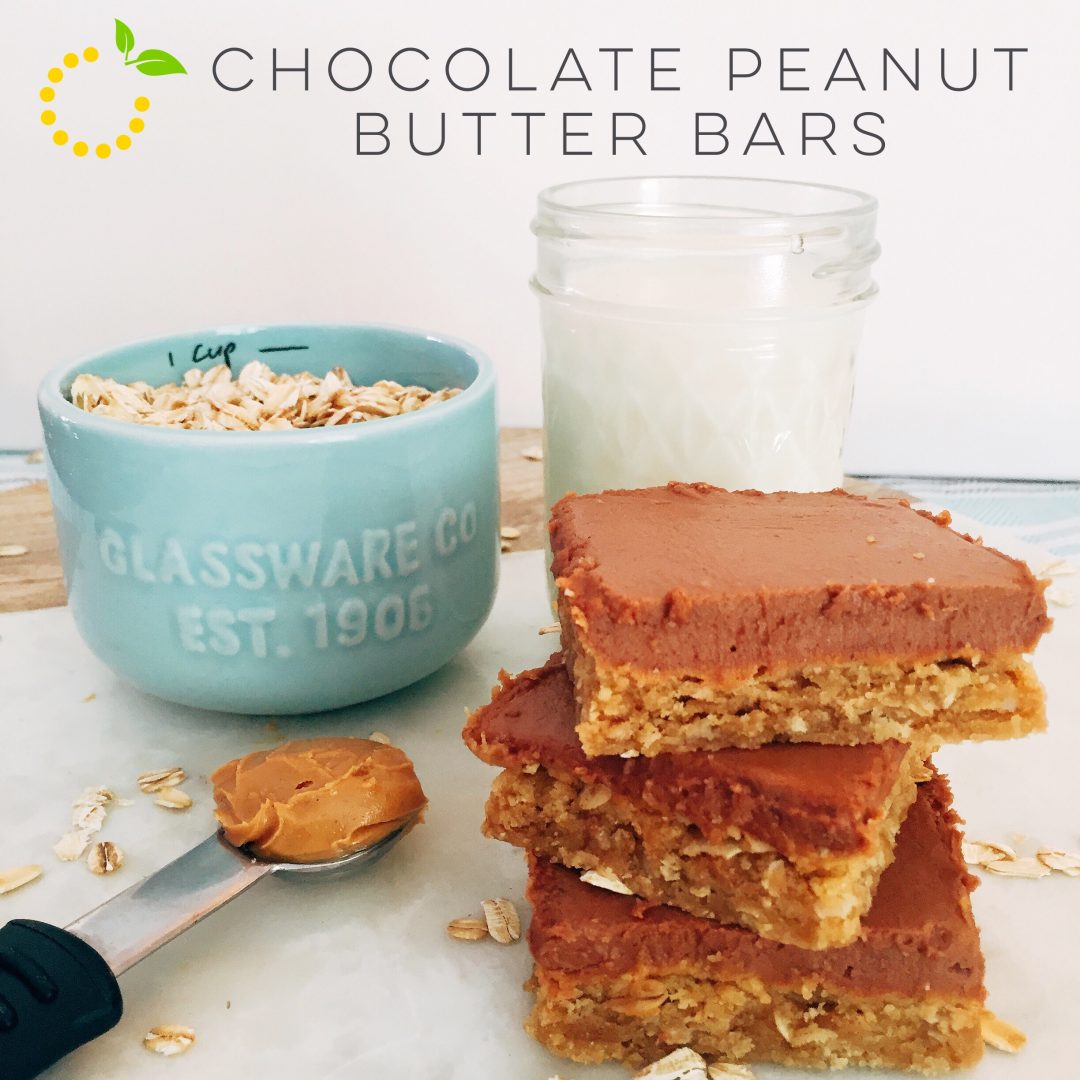
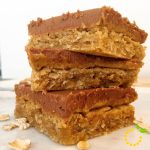
These chocolate peanut butter bars are chewy, peanut buttery and chocolatey. I don’t know about you but, every time I eat one of these chocolate peanut butter bars it takes me back to elementary school when we would get them as a dessert with our school lunch…it was then that I fell in love with these chocolate peanut butter bars! I wonder, do they even serve these anymore? If not, kids these days don’t know what they are missing out on (poor kids).

These oh so delicious peanut butter bars are one of those treats that people just can’t get enough of–I think most people would agree with me when I say that you just can’t eat one. 🙂 Here’s some proof of that. I recently gave some to a friend and when I told him that I forgot to tell him to put any leftovers in the fridge, his response was “…I didn’t have any leftover, they were so good–I ate all 6 of them!”, my other friend’s husband and daughter told her she wasn’t allowed near the box of them because they wanted the rest to themselves (haha!), and the comment that made me laugh was from another friend and he said “…these are good and you know you can trust my statement coming from a guy that looks like he likes to eat (haha!)” When your friends are saying comments like these, you know they love them!

This recipe is spot on and taste as good as “the lunch ladies” peanut butter bars. This recipe is so easy to make and the best part is, it makes an entire cookie sheet! It’s a good thing because you may just want to share some and devour the rest!

Peanut Butter Bar Crust sweetlemonmade.com
Peanut Butter Bar Frosting sweetlemonmade.com
Peanut Butter Bar Assembly sweetlemonmade.com
Peanut Butter Bars Presentation sweetlemonmade.com

Chocolate Peanut Butter Bars
Write a review
Print
For the crust
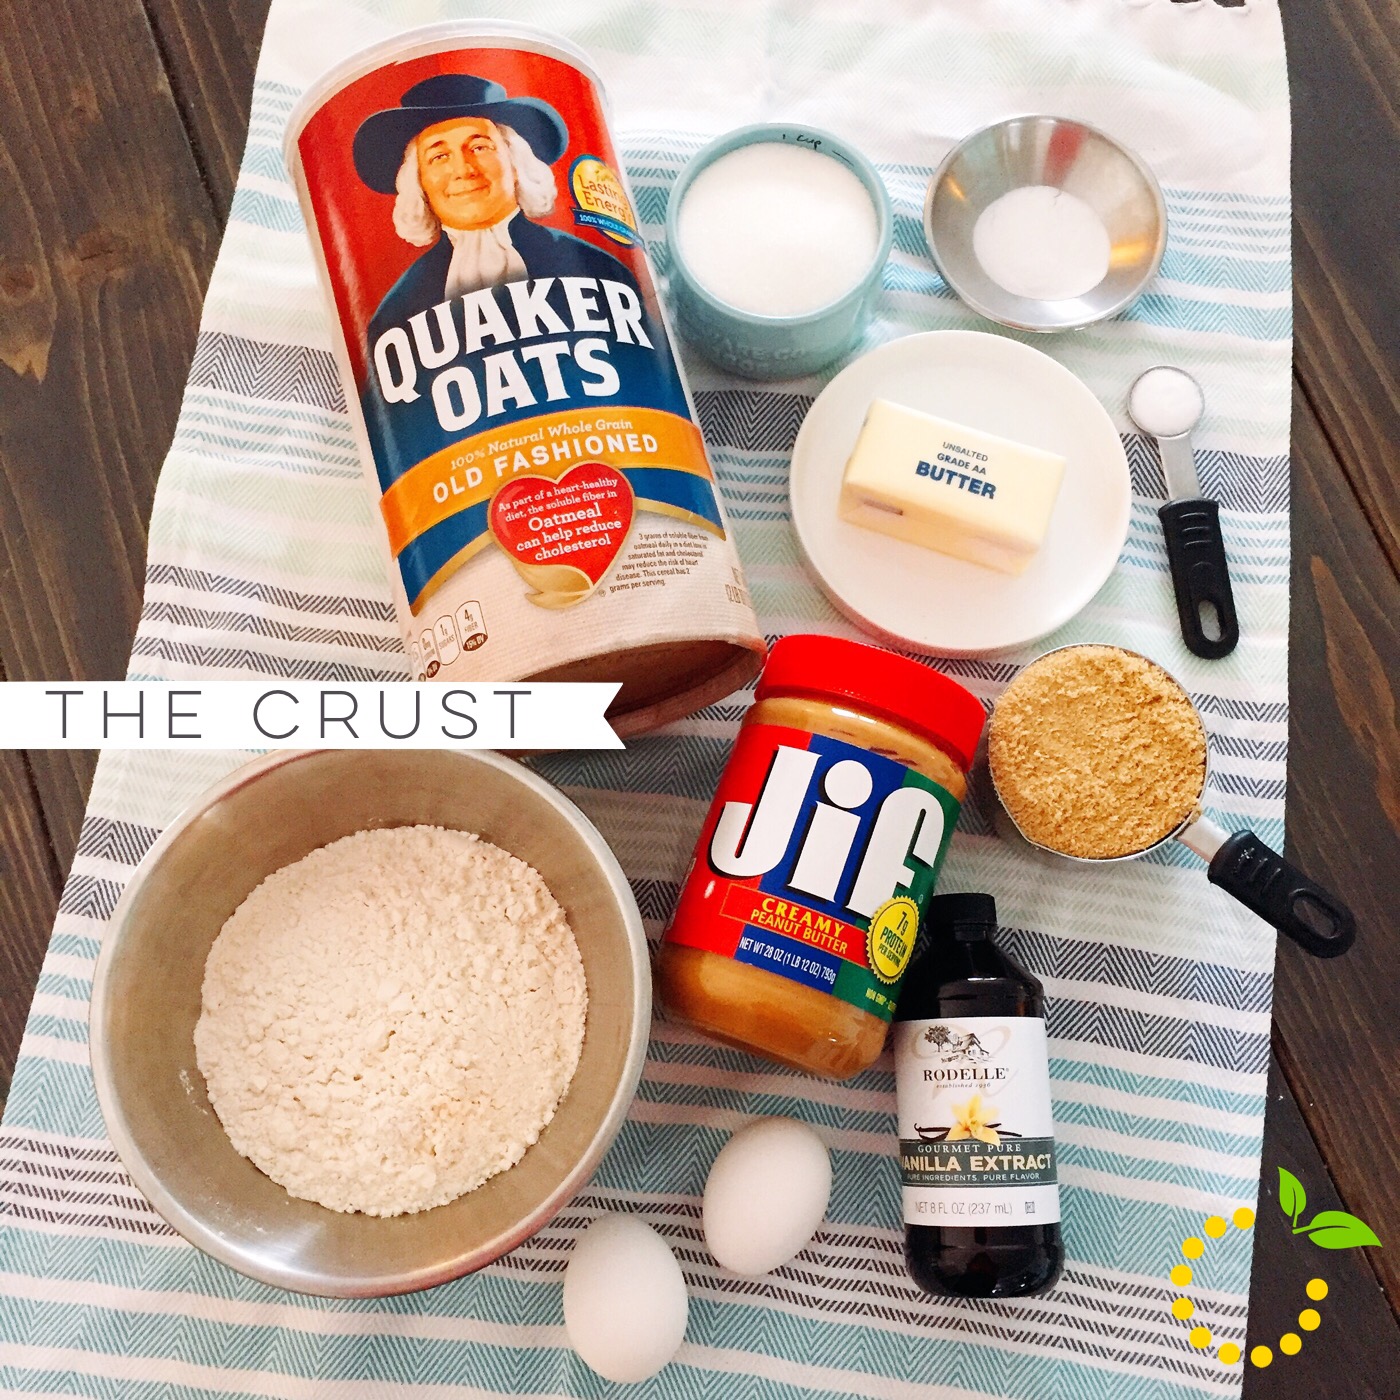
  1. 1 cup unsalted butter, room temp
  2. 1 cup granulated sugar
  3. 1 cup brown sugar, firmly packed
  4. 1 teaspoon vanilla extract
  5. 2 large eggs
  6. 1 cup peanut butter + about 1 and 1/2 cups to spread on top of crust
  7. 2 cups rolled oats
  8. 2 cups all-purpose flour
  9. 1 teaspoon baking soda
  10. 1 teaspoon salt
For the frosting
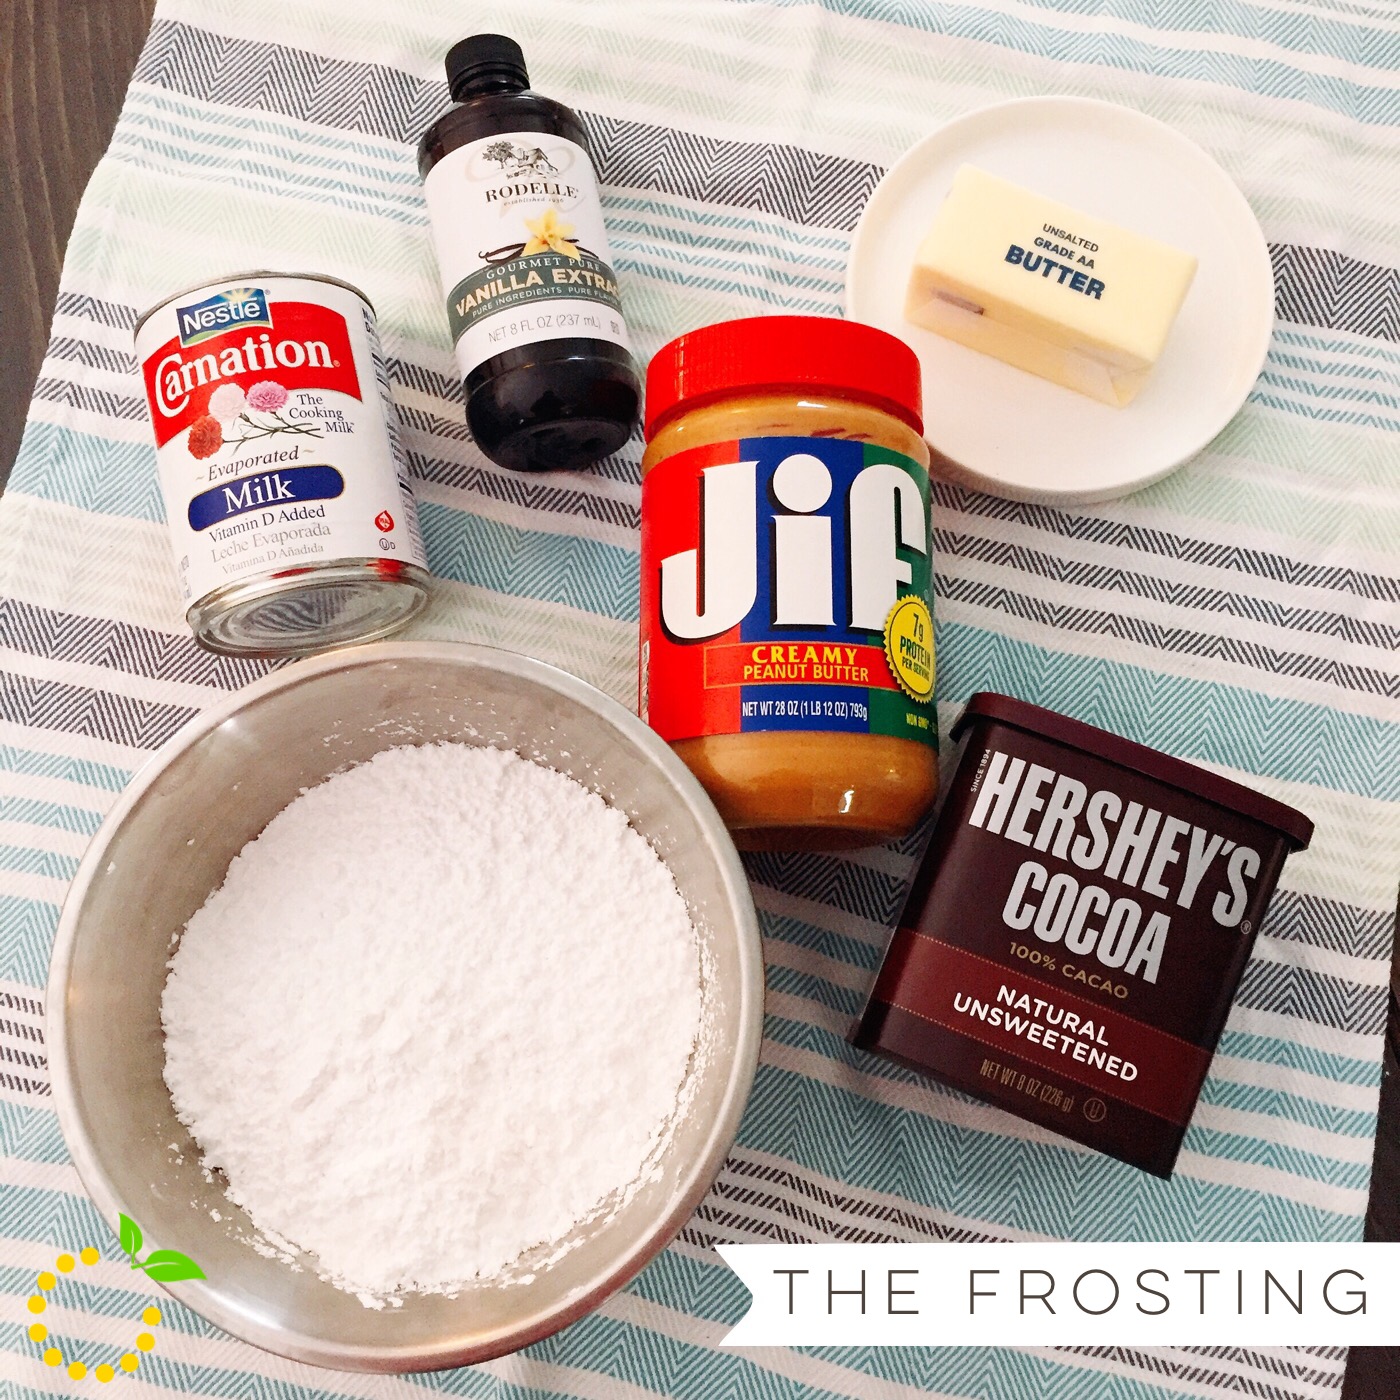
  1. 1 lb. powdered sugar
  2. 3/4 cup butter, room temp
  3. 1 and 1/2 teaspoons vanilla extract
  4. 5 oz. evaporated milk
  5. 4 tablespoons cocoa powder
For the crust
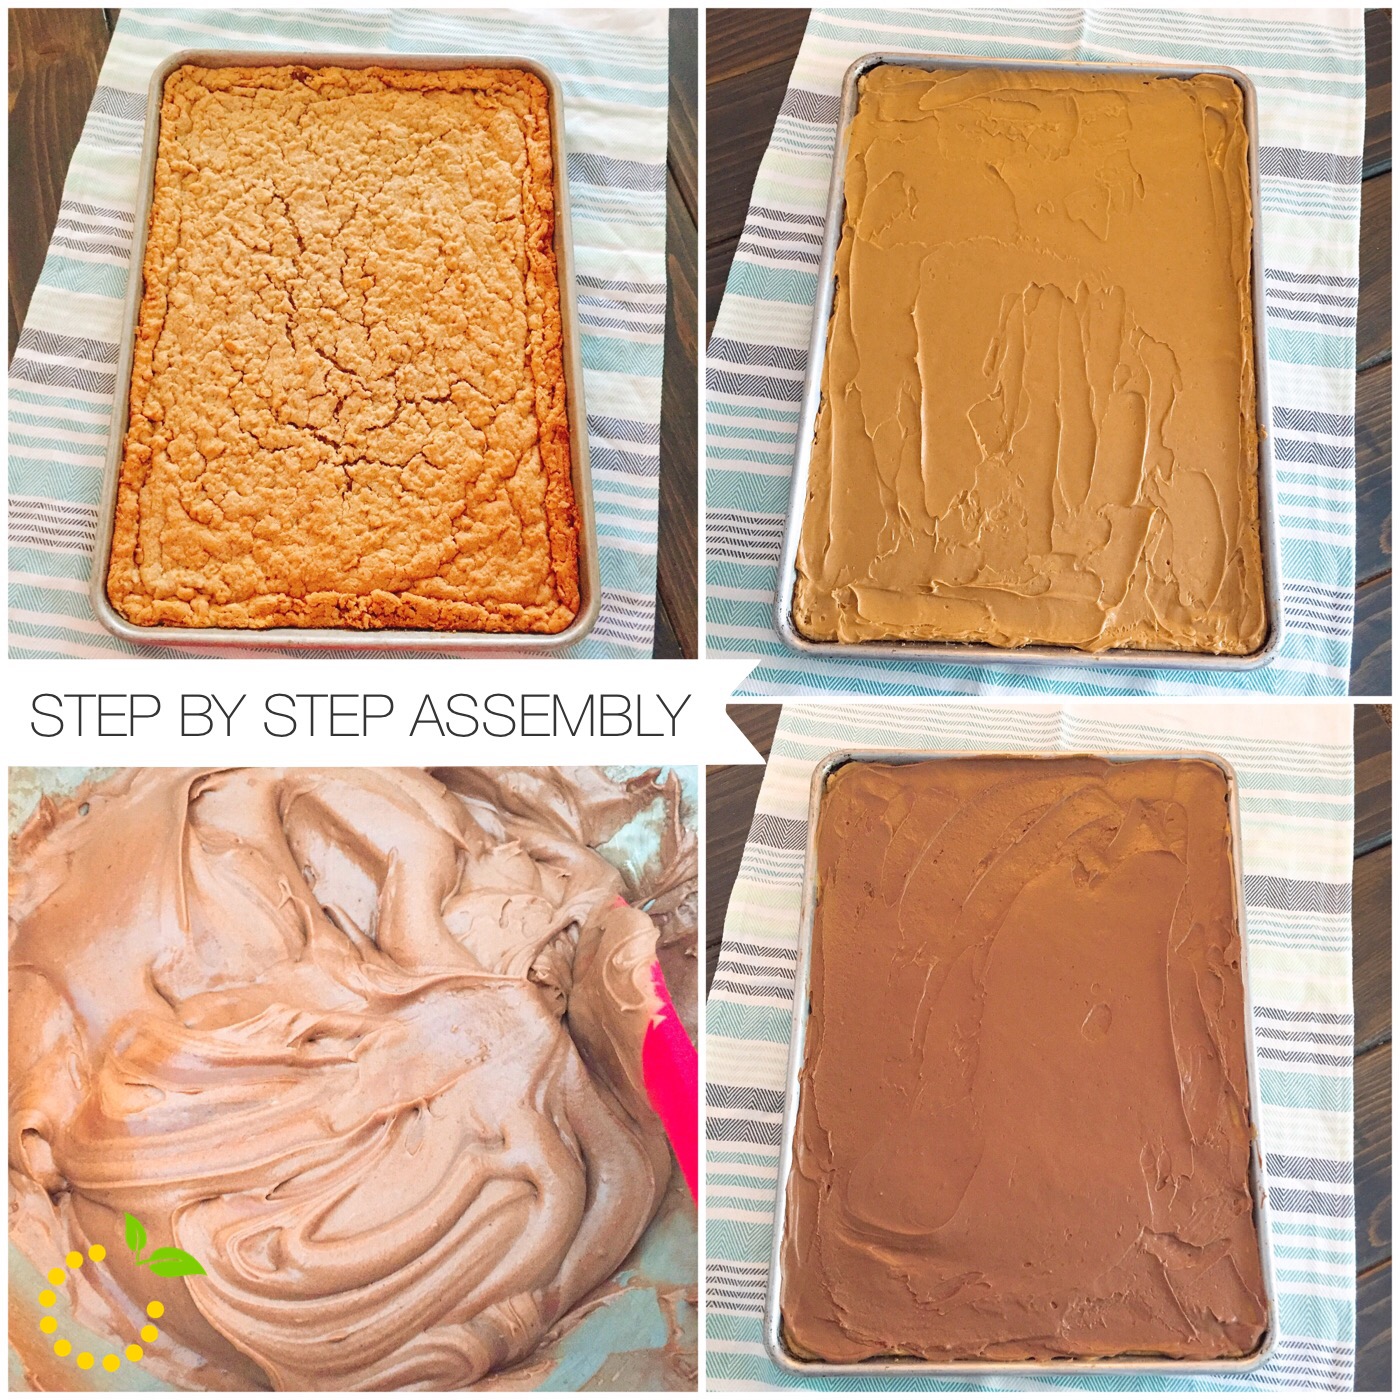
  1. Prepare and grease a standard size cookie sheet with sides and set aside. Tip: use the wrappers from the butter to grease the pan.
  2. Cream together the butter and the sugars for 3-5 minutes until light and fluffy.
  3. Add vanilla, eggs, and peanut butter. Mix until combined.
  4. Add rolled oats, flour, baking soda, and salt. Mix until well combined.
  5. Spread mixture onto the cookie sheet evenly and bake at 350 degrees F for 15 minutes. The crust may come out really puffed up and soft but, it will continue to bake and it will fall as it cools. Be careful to not over bake.
  6. Once the crust is completely cooled, spread about 1 and 1/2 cups or as much as you need to cover the whole top of the crust. Pop it into the fridge while you make the frosting.
For the frosting
  1. Combine all ingredients into a bowl and mix until well incorporated and fluffy.
  2. Take the crust out of the fridge and spread the chocolate frosting all over.
  3. Place back into the fridge and let it set for 15- 20 minutes or overnight and then cut and enjoy!
Sweet Lemon Made http://sweetlemonmade.com/

Peanut Butter Bars Recipe sweetlemonmade.com

Eats

Red Velvet Sandwich Cookies

Yummy Red Velvet Cookies sweetlemonmade.com

If you love red velvet and cream cheese, you will fall in love with these delicious Red Velvet Sandwich Cookies! Can I just tell you how soft these cake cookies are? SUPER SOFT!! Cake cookies have become my new favorite type of cookie. My family, friends and coworkers who I’ve shared them with would all agree. I normally make red velvet treats in February for Valentine’s Day but, when you get a craving for red velvet there is no right or wrong time to have a red velvet treat! Am I right?! I know all you fellow red velvet lovers would agree with me!  Because what’s better than cream cheese frosting smooshed between two soft and chewy red velvet cake cookies! So, if you’ve never had a cake cookie, you’re missing out and should probably make these pronto! They are like pillows of heaven! And another plus, they are super easy to make!

Red Velvet Cookies sweetlemonmade.com

Red Velvet Sandwich Cookies with Cream Cheese Filling
Yields 10
Write a review
Print
Ingredients
  1. COOKIES
  2. 1 package Duncan Hines Red Velvet Cake Mix
  3. 2 large eggs
  4. 1/3 cup vegetable oil
  5. CREAM CHEESE FILLING
  6. 8 ounces cream cheese, room temp
  7. 5 tbsp. unsalted butter
  8. 2 - 2 1/2 cups powdered sugar
  9. 2 tsp. vanilla
For the cookies
  1. Preheat oven to 375° F. Line baking sheet with parchment paper.
  2. Combine cake mix, eggs and oil in a large bowl.
  3. Using a mini ice cream scooper, scoop out dough and roll into balls. Place on baking sheet about 2 inches apart. Tip: **It's best to bake one sheet at a time.**
  4. Bake 8-9 minutes or until edges are set. FYI--The cookies will look under baked when you pull them out. That is alright because once they cool they will be soft and chewy. **Don't over bake them. Let cookies cool for 2-3 minutes on baking sheet. Transfer to cooling rack and let them cool completely.
Cream Cheese Filling
  1. In a bowl of a stand mixer fitted with the paddle attachment beat the cream cheese and butter on medium speed until well combined and smooth, about 2-3 minutes.
  2. Mix in the vanilla extract.
  3. Gradually add in the powdered sugar until desired consistency is reached and smooth--should be thick but, not too thick.
  4. Transfer the cream cheese filing to a pastry bag fitted with a plain, round tip.
Assembling the sandwich cookies
  1. 1. Pair the cookies up by size and shape as best as possible.
  2. 2. Flip one cookie of each pair over so that the flat side is facing up.
  3. 3. Pipe frosting onto the flat sided cookie of each pair, keeping the edges clear.
  4. 4. Sandwich the cookies together so the flat sides are facing each other and press gently and evenly to help the filing reach the edges but, not spilling out.
  5. 5. To store, refrigerate in an airtight container.
Sweet Lemon Made http://sweetlemonmade.com/

Eats

Strawberry LemonMADE Cheesecake Cookies

Strawberry Lemon Cheesecake Cookies sweetlemonmade.com

These soft, cheesecake flavored cookies with fresh strawberries and lemon zest are perfect for a spring dessert or to take along on your next picnic! I was at the grocery store the other day, roaming through the produce section and caught the sweet smell of strawberries. I immediately made a beeline to them! The super red, plump and sweet smelling strawberries had me craving these cookies and with the nice spring weather, it was the perfect time to make some!

With berries being in season now, it’s a great time to pick up some fresh berries at your local grocery store or farmers market and give these delicious cookies a try!

Strawberry Lemon Cheesecake Cookies sweetlemonmade.com

Strawberry Lemonade Cheesecake Cookies
Write a review
Print
Ingredients
  1. 3/4 cup granulated sugar
  2. 1/4 cup unsalted butter, room temp
  3. 4 ounces cream cheese, room temp
  4. 1 large egg, room temp
  5. 1 teaspoon vanilla extract
  6. 1 and 1/4 cup + 1 teaspoon all-purpose flour
  7. 1/2 teaspoon baking powder
  8. 1/4 teaspoon salt
  9. 1/2 teaspoon cornstarch
  10. 2 tablespoons cheesecake flavored pudding mix, dry
  11. 1/2 cup strawberries, stems removed and chopped
  12. 2 teaspoons lemon juice
  13. 1 teaspoon lemon zest
  14. Optional: extra lemon zest for sprinkling on top
Instructions
  1. Preheat oven to 350 degrees F and line cookie sheet with parchment paper or a silicone baking mat.
  2. In the bowl of a stand mixer, cream together the sugar and butter until light and fluffy.
  3. Add in the cream cheese and continue to beat until the batter is completely smooth.
  4. Beat in the egg and vanilla.
  5. In a separate bowl, combine the flour, baking powder, salt, cornstarch, and pudding mix. Stir together and then slowly add to the wet ingredients.
  6. In the same bowl you used for the dry ingredients, combine the strawberries, lemon juice, lemon zest, and 1 teaspoon flour.
  7. Gently fold the strawberries into the batter being careful not to over mix (tip: over mixing or mixing too hard will dye your batter red from the strawberries).
  8. Using a small cookie scoop, scoop batter and place on cookie sheet.
  9. Optional: garnish cookies with lemon zest.
  10. Bake for 10-13 minutes or until the bottoms are slightly brown.
Sweet Lemon Made http://sweetlemonmade.com/
Recipe adapted from Chelsea’s Messy Apron


Eats

Loaded Chocolate Peanut Butter Cookies

Loaded Chocolate Peanut Butter Cookies sweetlemonmade.com

Hey all you peanut butter lovers out there–today is your day! March 1st is National Peanut Butter Lover’s Day and we’re celebrating with these Loaded Chocolate Peanut Butter Cookies! During one of my pinning sessions a while back, I came across these delicious looking cookies on Pinterest and I knew I had to make some right away. I made them for a friend who loves peanut butter and he loved them! With 3 types of peanut butter–creamy PB in the cookie, PB chips, and Reese’s Pieces there’s definitely no shortage of peanut butter! Your PB loving friends will LOVE YOU if you make these for them! And any excuse to make treats especially for a food holiday is fine in my book!

Peanut Butter Chocolate Cookies sweetlemonmade.com 

Loaded Chocolate Peanut Butter Cookies
Write a review
Print
Ingredients
  1. 3 cups flour
  2. 1 1/2 teaspoons baking soda
  3. 3/4 teaspoons salt
  4. 1/2 cup unsalted butter, room temperature
  5. 1/2 cup creamy peanut butter
  6. 1 cup packed brown sugar
  7. 3/4 cup sugar
  8. 2 large eggs
  9. 1 tablespoon milk
  10. 1 tablespoon vanilla extract
  11. 1 cup semisweet chocolate chips or chocolate chunks
  12. 1 cup peanut butter chips
  13. 1 cup Reese's Pieces
  14. turbinado sugar (optional)
Instructions
  1. Preheat oven to 350 degrees. Line baking sheet with parchment paper or silicone baking mats.
  2. In a medium bowl combine flour, baking soda and salt.
  3. In the bowl of an electric mixer, beat the butter, brown sugar and sugar on medium-high speed until well combined, about 2 minutes.
  4. Add the eggs, milk, and vanilla and beat until combined. On low speed gradually add the flour mixture and beat just until combined.
  5. Add the chocolate chunks, peanut butter chips and Reese's Pieces and beat until combined or hand mix with spatula.
  6. Using a mini ice cream scooper, scoop dough balls and roll. Place on baking sheet and using a flat bottom cup, flatten the cookies to be 1/2 inch thick. Press a few extra chips on top and sprinkle with a little turbinado sugar (optional).
  7. Bake for 12-15 minutes or until cookies are light golden brown around the edges. Be careful to not overbake. Let cool on baking sheet for 2 minutes and then transfer to cooling rack to completely cool. Store in airtight container at room temperature.
Sweet Lemon Made http://sweetlemonmade.com/
Recipe adapted from Our Best Bites

Eats

Cookie Butter Chocolate Hearts

If you know what cookie butter is, you will love these! And for those of you saying cookie butter?!? What is cookie butter?!? Let me just tell you, it is one of the most delicious spreads ever! It’s so good that I have eaten it by the spoonful (shh…don’t tell anyone)! Anyone else done that? The last time I went to Trader Joe’s, I bought a few extra jars just in case I wasn’t able to go back down before I ran out. They sell out of this stuff often so I usually stock up.

I wanted to make something a little bit different for my Valentine’s Day treats this year so I thought I would try making cookie butter chocolate hearts.

Cookie Butter Chocolate Hearts
Write a review
Print
Ingredients
  1. 6 oz of Cookie Butter
  2. 12 oz chocolate chips (you can use white, milk, or dark)
Instructions
  1. Melt your chocolate in the microwave in a microwave safe bowl in 30 second intervals and stirring after each 30 seconds.
  2. In your heart silicone mold, place enough chocolate in the heart to cover the bottom and I like to bring a little bit up the sides as well.
  3. Place in fridge for about 10 minutes or until chocolate has hardened.
  4. Then place 1 - 1 1/2 teaspoons of cookie butter on top of the chocolate. Tip: try to keep the cookie butter in the middle of the heart.
  5. Cover the cookie butter with more melted chocolate until heart is full.
  6. Place them in the fridge or freezer until hardened.
  7. Store in airtight container in fridge until ready to eat.
Sweet Lemon Made http://sweetlemonmade.com/
 Cookie butter – Trader Joe’s or Biscoff spread (Grocery Stores)
Heart silicone mold – JoAnn’s
Printable tag from Eighteen25